Quantcast
Channel: Code Inside Blog
Viewing all 358 articles
Browse latest View live

WPF, Chrome Embedded and WebApi Self-hosted

$
0
0

Building “rich desktop clients” is not a very easy task. WPF can be a good choice for “fat” Windows Apps, but if you have zero knowledge in XAML you might end up in hell, because… XAML, right? If you are more a “web guy” (like myself) or just want to reuse existing code from your Web-App and want to stick to your .NET know-how this blogpost might come handy.

Cross Platfrom?

If you want to go real cross platform and don’t have any issues with Javascript there are other options available: nw.js or for more advanced use cases Electron. Both frameworks seems like a good starting point, but in a “Windows Only”-environment (well… this might be a bet on the future…) or with an existing large .NET code base not the ideal solution.

The idea

So, back to .NET land and the idea is clever and kinda stupid together: We want to build a small app that embeds a browser and a server (this is more or less the same trick from Electron & co.). The host should be a WPF application, because with this we could combine interesting frameworks in one application - e.g. legacy code stuff, WPF controls, web stuff… yeah!

Building blocks: The Browser

If you just want to display “Web-Content” you can just use the built-in WebBrowser-Control. The most common and annoying problem is that the default rendering engine is stuck in the stone age: Internet Explorer 7. Even on Windows 10 the default rendering engine will be set to IE7. To fix this you can use some Registry-Magic, but this is not very elegant.

A better solution would be to take a deeper look at the Chromium Embedded Framework for .NET. It is the rendering engine of Chrome - which gives you a super powerful platform - and is super easy to use. The only downside: You need to compile your app for x86 or x64 - AnyCPU won’t work.

So… let’s take a look how we can achieve our goal.

Building blocks: The Server

A good option is using the HttpListener with the ASP.NET WebApi - of course you could also use NancyFx or any other OWIN/”self-host” web framework. The hosting application will use the HttpListener from your System and will listen to a specific port. As long as you use a high port number you don’t need admin privileges.

For the demo I embedded the HTML inside the application, but this could be read from a resource file or any other storage in real life.

As far as I know maybe you could also do some other hosting tricks, so that the application doesn’t really needs to listen to a specific port, e.g. hosting the stuff in-memory.

Code: Server Part

The (important) Server Parts:

public partial class App : Application
{
    public App()
    {
        string baseAddress = "http://localhost:9000/";

        webApp = WebApp.Start<Startup>(url: baseAddress);
    }

    public IDisposable webApp { get; set; }

    ~App()
    {
        webApp.Dispose();
    }
}

public class Startup
{
    // This code configures Web API. The Startup class is specified as a type
    // parameter in the WebApp.Start method.
    public void Configuration(IAppBuilder appBuilder)
    {
        // Configure Web API for self-host. 
        HttpConfiguration config = new HttpConfiguration();

        DefaultConnectWebApiConfig.Register(config);

        appBuilder.UseWebApi(config);
    }
}

The controller code: Simple ApiController which reads a embedded HTML file.

public class DemoController : ApiController
{
    private const string ResourcePath = "SelfHostAndCef.HtmlSamples.{0}";
    public static string GetTestFileContent(string folderAndFileInProjectPath)
    {
        var asm = Assembly.GetExecutingAssembly();
        var resource = string.Format(ResourcePath, folderAndFileInProjectPath);

        using (var stream = asm.GetManifestResourceStream(resource))
        {
            if (stream != null)
            {
                var reader = new StreamReader(stream);
                return reader.ReadToEnd();
            }
        }
        return String.Empty;
    }

    public HttpResponseMessage Get()
    {
        var response = new HttpResponseMessage();
        response.Content = new StringContent(GetTestFileContent("demo.html"));
        response.Content.Headers.ContentType = new MediaTypeHeaderValue("text/html");
        return response;
    }

}

Code: The Browser

This is more or less the “minimal cef” sample, but for the sample it is good enough:

<Window x:Class="SelfHostAndCef.DialogWindow"
        xmlns="http://schemas.microsoft.com/winfx/2006/xaml/presentation"
        xmlns:x="http://schemas.microsoft.com/winfx/2006/xaml"
        xmlns:d="http://schemas.microsoft.com/expression/blend/2008"
        xmlns:mc="http://schemas.openxmlformats.org/markup-compatibility/2006"
        xmlns:local="clr-namespace:SelfHostAndCef"
        xmlns:wpf="clr-namespace:CefSharp.Wpf;assembly=CefSharp.Wpf"
        mc:Ignorable="d"
        Title="DialogWindow" Height="300" Width="300"><Grid><Grid.RowDefinitions><RowDefinition /><RowDefinition Height="Auto" /></Grid.RowDefinitions><wpf:ChromiumWebBrowser x:Name="Browser" Grid.Row="0"
                          WebBrowser="{Binding WebBrowser, Mode=OneWayToSource}"
                          Title="{Binding Title, Mode=TwoWay}" /><StatusBar Grid.Row="1"><ProgressBar HorizontalAlignment="Right"
                         IsIndeterminate="{Binding WebBrowser.IsLoading}"
                         Width="100"
                         Height="16"
                         Margin="3" /><Separator /><!-- TODO: Could show hover link URL here --><TextBlock /></StatusBar></Grid></Window>

public partial class DialogWindow : Window
{
    public DialogWindow()
    {
        InitializeComponent();
        this.Browser.Address = "http://localhost:9000/api/v1/Demo";

        var hostElement = new SampleWebViewHost();
        this.Browser.RegisterJsObject("sampleWebViewHost", hostElement);

        hostElement.SampleWebViewHostInvoked += HostElementSampleWebViewHostInvoked;
    }

    private void HostElementSampleWebViewHostInvoked(object sender, SampleWebViewHostEventArgs e)
    {
        Dispatcher.Invoke(() =>
        {
            this.DialogResult = true;
            this.Close();
        });
    }   
}

Code: The HTML

<!DOCTYPE html><htmllang="en"><head><metacharset="UTF-8"><metahttp-equiv="X-UA-Compatible"content="IE=edge"><title>Example Form</title><script type="text/javascript"src="https://code.jquery.com/jquery-2.1.4.min.js"></script></head><body><h1>SampleForm</h1><form><label>HelloWorld:</label><inputname="test"/><buttontype="submit">OK</button></form><script>$(document).ready(function(){$("form").submit(function(){varresult=JSON.stringify($("form").serializeArray());if(sampleWebViewHost!=null){sampleWebViewHost.done(result);}returnfalse;});});</script></body></html>

Building blocks: Browser-to-App communication

There are several ways how to interact between the hosting app and the web-app. One way is via URLs or using standard web methods. If you host the server component, then you can invoke anything inside your app. Another solution would be to register a “scriptable” Javascript object inside the Browser-Control. I already blogged about the “window.external” api (in German). With this “scriptable” object in place you can call .NET functions from Javascript or the other way around.

The full lifecycle

  • Application starts and “self-hosts” the WebApi and listens on Port 9000
  • WPF Window is displayed with a large button
  • The Button will invoke the actual WebBrowser Control and set up a “scriptable” Javascript object
  • User fills in the desired data, press OK inside the WebBrowser and sends the data (in this case) to the WebBrowser-Host via the “scriptable” Javascript object
  • Our technology mix is complete: We can host our own WebApp inside our WinApp

x

TL;DR

Ok… as I told you this blogpost shows you a really stupid or really clever trick (it depends on your habbits… WebGuy vs. WindowsGuy). In this example we used a self-hosting WebApi to display an embedded HTML page via CEF Sharp inside a Windows App.

It’s magic, right?

The full code can be found on GitHub.


Nothing to do next weekend? Come to Leipzig and join the Developer Open Space 2015

$
0
0

x

The Developer Open Space is not a typical developer conference: There are no fixed speakers or topics, just many other tech lovers who wants to learn or sharetheir knowledge.

The Open Space was started in 2009 and was more or less Microsoft-centric, but times are changing and the technology discussions on previous Open Spaces spread to all different kinds of technology - from fancy Web, to DevOps, Functional Programming, IoT etc.

But it is not just technology: If you want to talk about Soft-Skills or want to hear how other developers do their jobs just join the Developer Open Space. Even if you want to talk about how you craft your own beer: I bet you will find your audience ;)

Sounds good, right? Just visit the official website for more information. I will be there from Saturday to Sunday :)

Key Facts

  • No fixed agenda or speakers
  • If you have a topic to talk about: Just do it
  • You are a part of this “conference”
  • Location: Leipzig, Germany
  • Date: 16.10 - 18.10.2015
  • Official Website

XML deserialize to abstract class, interface or base class

$
0
0

Let’s assume we have the following XML structure:

<?xml version="1.0" encoding="utf-8" ?><Root><Node><LabelId="Label1">Betreff</Label><TextBoxId="TextBox1"MultiLines="3"/></Node><Node><LabelId="Label2">Betreff 123132</Label><TextBoxId="TextBox2"/><ButtonId="Button1"Label="Hello World"Action="Foobar"/></Node></Root>

Under we have n--elements and each element has a couple of specialized elements. The elements share a common attribute, in this case "Id", so we could say that we need a "Base"-Element.

Code: Deserialize the elements & co.

The first step: We need to deserialize the and it's children.

public class Root
{
    [XmlElement(ElementName = "Node")]
    public List<Node> Nodes { get; set; }
}

Next - and this is the main part of this blogpost - we need to describe the element and that it contains a list of "baseelements".

public class Node
{
    [XmlElement(typeof(LabelElement), ElementName = "Label")]
    [XmlElement(typeof(TextBoxElement), ElementName = "TextBox")]
    [XmlElement(typeof(ButtonElement), ElementName = "Button")]
    public List<BaseElement> Elements { get; set; }
}

As you can see, we need to “register” each specialized known element. The default XmlSerializer will read all XmlElement Attributes and will do the main work.

The last part: The base class and the specialized classes for each element.

public abstract class BaseElement
{
    [XmlAttribute(AttributeName = "Id")]
    public string Id { get; set; }
}

public class ButtonElement : BaseElement
{
    [XmlAttribute(AttributeName = "Label")]
    public string Label { get; set; }

    [XmlAttribute(AttributeName = "Action")]
    public string Action { get; set; }
}

public class LabelElement : BaseElement
{
    [XmlText]
    public string Content { get; set; }
}

public class TextBoxElement : BaseElement
{
    [XmlAttribute(AttributeName = "MultiLines")]
    public int MultiLines { get; set; }
}

Interfaces, base classes etc.

It doesn’t matter if you choose a interface, base class or a abstract base class. The built-in XmlSerializer is flexible, but as far as I know you will need to “register” the implementation elements on the base element. So there is no “convention” or any magic in place.

Using the code

Using the XmlSerializer is simple:

FileStream readFileStream = new FileStream(@"test.xml", FileMode.Open, FileAccess.Read, FileShare.Read);

XmlSerializer serializer = new XmlSerializer(typeof(Root));
var test = serializer.Deserialize(readFileStream);

x

Serializing

If you want to serialize objects to XML with this code the XmlSerializer should be well prepared and no code changes should be needed. It just works ;)

Hope this helps!

The code is also available on GitHub.

Working with JumpLists in WPF Apps

$
0
0

JumpLists?

JumpLists were introduced with Windows 7 and if it they are implemented right are pretty handy, because it can provide common functionality.

A real world example:

x

JumpLists with .NET

In pre .NET 4.0 times there was a Windows7API Code Pack available to access the JumpLists APIs of Windows and many older blogposts reference it, but since .NET 4.0 is out the JumpList APIs are part of the PresentationFramework.dll. So, you don’t need any other library - at least not for the stuff that I want to show you here.

JumpLists & Windows Vista

A warning for everyone that still have to support Windows Vista: .NET 4.0 is supported on Windows Vista, but the JumpLists were introduced with Windows 7. If you are trying to create a JumpList or touch the JumpList APIs your app will crash with a NotSupportedException.

Creating JumpLists via XAML

Small warning: If you try this on Windows Vista, your app will just crash…

JumpLists are registred per application and the easiest way to create a (static) JumpList is via XAML in the App.xaml:

<Application x:Class="Jumplist_Sample.App"
            xmlns="http://schemas.microsoft.com/winfx/2006/xaml/presentation"
            xmlns:x="http://schemas.microsoft.com/winfx/2006/xaml"
            StartupUri="MainWindow.xaml"><Application.Resources></Application.Resources><JumpList.JumpList><JumpList ShowRecentCategory="True"
                ShowFrequentCategory="True"
                JumpItemsRejected="JumpList_JumpItemsRejected"
                JumpItemsRemovedByUser="JumpList_JumpItemsRemovedByUser"><JumpTask Title="Notepad" 
                    Description="Open Notepad." 
                    ApplicationPath="C:\Windows\notepad.exe"
                    IconResourcePath="C:\Windows\notepad.exe"/><JumpTask Title="Read Me" 
                    Description="Open readme.txt in Notepad." 
                    ApplicationPath="C:\Windows\notepad.exe"
                    IconResourcePath="C:\Windows\System32\imageres.dll"
                    IconResourceIndex="14"
                    WorkingDirectory="C:\Users\Public\Documents"
                    Arguments="readme.txt"/></JumpList></JumpList.JumpList></Application>

Creating JumpLists via Code

The “coding” JumpList API is a bit odd to use, but still easy to understand:

var jt = new JumpTask
{
    ApplicationPath = "C:\\Windows\\notepad.exe",
    Arguments = "readme.txt",
    Title = "Recent Entry for Notepad",
    CustomCategory = "Dummy"
};

JumpList.AddToRecentCategory(jt);


var jt2 = new JumpTask
{
    ApplicationPath = "C:\\Windows\\notepad.exe",
    Arguments = "readme.txt",
    Title = "Code Entry for Notepad",
    CustomCategory = "Dummy"
};

var currentJumplist = JumpList.GetJumpList(App.Current);
currentJumplist.JumpItems.Add(jt2);
currentJumplist.Apply();

The “Apply()” call is needed, otherwise the new JumpItem will not be added. As you can see, you can create new JumpList entries, add (and I think you could also remove items) from the default recent category. Besides JumpTasks there is JumpPath, which just contains a link.

In the XAML Part I also hooked up some events, so your application can get notified when a user pins something or removes something which you might want to handle.

Result

x

Oh… and of course: Windows 10 still supports JumpLists and there are rumors that even UWP apps will somehow support JumpLists.

A good read was this blogpost (and it also contains information about other Windows 7 “Taskbar”-enhancements which are still valid for Windows 10).

Hope this helps!

The code is also available on GitHub.

Serving embedded resources with ASP.NET WebApi

$
0
0

Embedded files? Why?

In a normal Web-Application all files are somehow stored as files in the app directory, but sometimes it could be handy to embed those files.

One scenario could be that you have a “library”, which can be integrated in a larger application. If you don’t want to pull over all files and you just want to expose a single assembly (for example as NuGet package) embedded resources might come handy.

Demo-Application

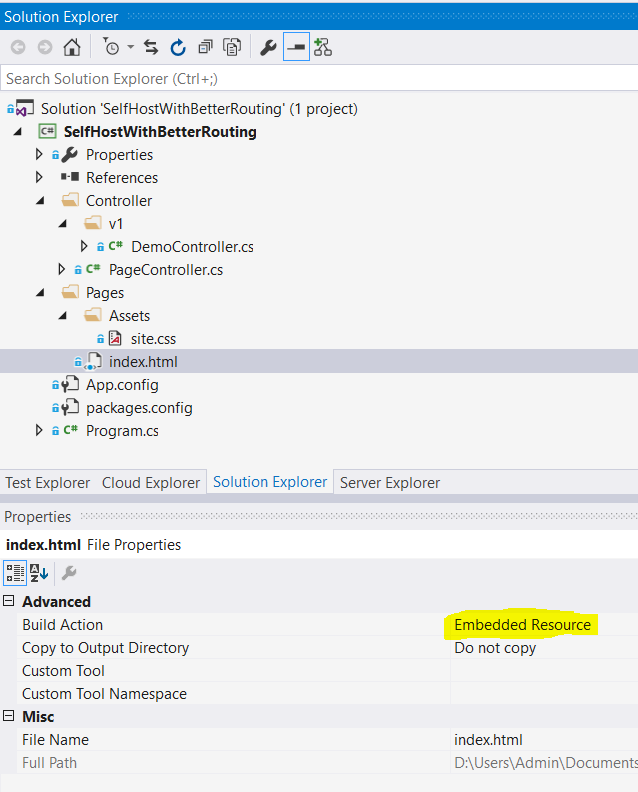
My demo application is a simple ConsoleApp, which a selfhosting WebAPI and two Controllers (Demo and Pages):

x

Important is, that my “target” html and css file are marked as Embedded Resource.

Routing

In my sample I have created on “PageController”, which accepts all requests that seems to target the embedded files.

Registration:

public class Startup
{
    public void Configuration(IAppBuilder appBuilder)
    {
        HttpConfiguration config = new HttpConfiguration();

        config.MapHttpAttributeRoutes();

        config.Routes.MapHttpRoute(
            name: "ApiV1",
            routeTemplate: "api/v1/{controller}/{id}",
            defaults: new { id = RouteParameter.Optional }
            );

        config.Routes.MapHttpRoute(
           name: "PageController",
           routeTemplate: "{*anything}",
           defaults: new { controller = "Page", uri = RouteParameter.Optional });

        appBuilder.UseWebApi(config);
    }

}

The “PageController”

This controller will try to read the HTTP GET PathAndQuery and will look inside the assembly resources for something with the same name.

public class PageController : ApiController
{
    private const string ResourcePath = "SelfHostWithBetterRouting.Pages{0}";

    public static string GetStreamContent(string folderAndFileInProjectPath)
    {
        var asm = Assembly.GetExecutingAssembly();
        var resource = string.Format(ResourcePath, folderAndFileInProjectPath);

        using (var stream = asm.GetManifestResourceStream(resource))
        {
            if (stream != null)
            {
                var reader = new StreamReader(stream);
                return reader.ReadToEnd();
            }
        }
        return String.Empty;
    }


    public HttpResponseMessage Get()
    {
        var virtualPathRoot = this.Request.GetRequestContext().VirtualPathRoot;
        string filename = this.Request.RequestUri.PathAndQuery;

        // remove SERVER/appname from request to get the relative filename
        if (virtualPathRoot != "/")
        {
            filename = filename.ToLowerInvariant().Replace(virtualPathRoot.ToLowerInvariant(), string.Empty);
        }
        
        // input as /page-assets/js/scripts.js
        if (filename == "/" || filename == "")
        {
            filename = ".index.html";
        }

        // folders will be seen as "namespaces" - so replace / with the .
        filename = filename.Replace("/", ".");
        // resources can't be named with -, so it will be replaced with a _
        filename = filename.Replace("-", "_");

        var mimeType = System.Web.MimeMapping.GetMimeMapping(filename);

        var fileStreamContent = GetStreamContent(filename);

        if (string.IsNullOrWhiteSpace(fileStreamContent))
        {
            throw new Exception(string.Format("Can't find embedded file for '{0}'", filename));
        }

        if (virtualPathRoot != "/")
        {
            fileStreamContent = fileStreamContent.Replace("~/", virtualPathRoot + "/");
        }
        else
        {
            fileStreamContent = fileStreamContent.Replace("~/", virtualPathRoot);
        }

        var response = new HttpResponseMessage();
        response.Content = new StringContent(fileStreamContent);
        response.Content.Headers.ContentType = new MediaTypeHeaderValue(mimeType);
        return response;
    }

}	

Mix the “PageController” and normal WebAPI Controllers

In my sample the “PageController” will catch all requests that are not handled by other controllers, so you could even serve a general 404 page.

Hosting in IIS

If you host this inside an IIS it will not work out of the box, because the IIS itself tries to serve static content. One easy option would be to include this inside your web.config:

<!-- prevent IIS from serving embeddded stuff --><location path="pages"><system.webServer><handlers><add name="nostaticfile" path="*" verb="GET" type="System.Web.Handlers.TransferRequestHandler" preCondition="integratedMode,runtimeVersionv4.0" /></handlers></system.webServer></location>

With this web.config setting in place the request should route through your code.

Result

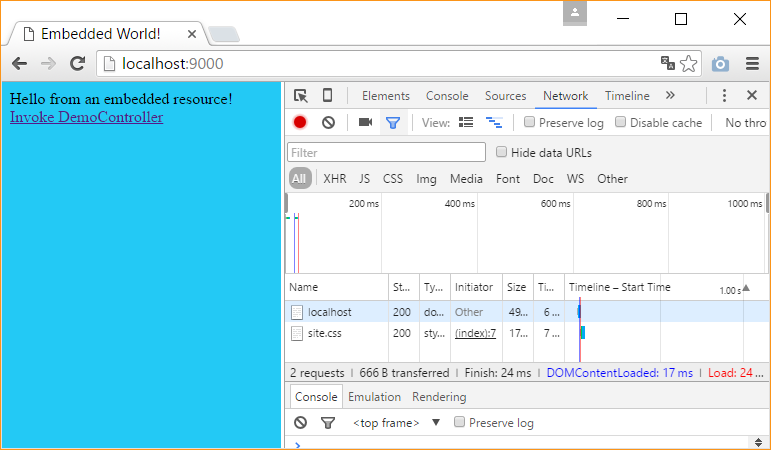
The self hosting WebAPI returns the “index.html” and the linked “site.css” - all embedded inside the assembly:

x

In an older blogpost I used a similar approach, but the routing part is now “better” solved.

Hope this helps!

The code is also available on GitHub.

Working with FontIcons in UWP

$
0
0

FontIcons in UWP

Microsoft ships one builtin UWP (Universal Windows Platform) SymbolIcon class.

The good thing about such FontIcons is, that you can scale and change the appearances very nice and don’t need a bunch of image assets for your icons.

The down side is, that those icons are just a font… so no multicolor option.

The builtin SymbolIcon usage is pretty easy:

<SymbolIcon Symbol="Accept" />

Using FontIcon to serve other font e.g. FontAwesome

Microsoft ships another simple class, the FontIcon class.

Including the font

You will need the actual Font-File, e.g. a .otf file. This file must be included in your project as Content.

After that the usage is pretty simple if you know the correct syntax:

<FontIcon FontFamily="./fontawesome.otf#FontAwesome" Glyph="&#xf0b2;"></FontIcon>

The Glyph-Property is the HexCode for the target char.

Pretty important, but I’m not a Font-Expert, so maybe this is “normal” - The #FontAwesome must be set. - In XAML the Glyph must be in this form

"&#xf0b2;"
  • From Code, the value must be unicode, e.g.

    Test.Glyph = “\uf0b2”;

Instead of the “./…” path syntax you could also use something like this:

<FontIcon FontFamily="ms-appx:///fontawesome.otf#FontAwesome" Glyph="&#xf0b2;"></FontIcon>

Result

The result is hopefully that you see the correct icon… right?

BTW, we try to bring FontAwesome to UWP with a simple NuGet package.

And thanks to Alexander Witkowski for the suggestion of the FontIcon class - I didn’t know that this is part of the SDK.

Demo-Code

I made a pretty small UWP Demo, which can be viewed on our Samples-Repo.

Shipping Visual C++ 2015 redistributable DLLs with your app or how to do an app-local deployment

$
0
0

Small warning: I’m not a C++ dev

We use VC++ just for a very small part of our application, but this part needs the VC++ 2015 runtime “installed” on the client, but we don’t want the UAC install dialog. So - let’s take a look how we can solve this problem.

And if I write something stupid here - please let me know.

Ways to deploy VC++ 2015

There are three ways to deploy the runtime:

  • Install it via the standalone VCRedist installer. This is probably the most known way, but requires elevated permissions because the file will be installed to System32.
  • Install it via a merge module. If you already have an installer, you can include the needed .msm files in your own installer, but this will also require elevated permissions because the files will be also installed to System32.
  • Deploy it with your app as app-local deployment. We will cover this in this blogpost, because we don’t want to touch anything that needs elevated permissions.

If you want to read more about the first two ways, the MSDN might be a good place to start.

App-Local deployment of the VC++ 2015 runtime

All what you need is already (if you are using Windows 10 & Visual Studio 2015) installed on your dev machine. Otherwise you will need to download the Windows 10 SDK and Visual Studio 2015.

Depending on your application, you will need to ship all dlls from the following folders with your application (= the dll/exe/whatever that needs the runtime) :

x86 applications

  • C:\Program Files (x86)\Windows Kits\10\Redist\ucrt\DLLs\x86
  • C:\Program Files (x86)\Microsoft Visual Studio 14.0\VC\redist\x86\Microsoft.VC140.CRT

x64 applications

  • C:\Program Files (x86)\Windows Kits\10\Redist\ucrt\DLLs\x64
  • C:\Program Files (x86)\Microsoft Visual Studio 14.0\VC\redist\x64\Microsoft.VC140.CRT

The “Universal CRT” consists of many dlls and all are required. You have to copy them to your application folder and it should just work.

As far as I know, if a user has installed the runtime via VCRedist or the merge modules the files inside System32 will be picked.

I found this solution here and it seems to work just fine - no UAC prompt. Yay.

Hope this helps.

ExpensiveMeeting - a Universal Windows Platform OSS app using Template10

$
0
0

ExpensiveMeeting

The app - which is just a fun project and shouldn’t be taken too seriously - is like a stopwatch for meetings. But instead of the pure time it shows you also the burned money for your meeting, because time is money, right?

x

Don’t worry: The app is free and no ads are shown.

Windows Store Download

Behind the scenes: Universal Windows Platfrom (UWP)

The app itself is a UWP app, which means it runs on Windows 10, Windows IoT, Windows Mobile 10 (or is it Phone?) and maybe in the future on Xbox One. To see the app running on my phone, without touching the code at all, was pure fun. I really like the UWP approach.

Behind the scenes: Template10

Starting from scratch can be fun, but to shorten the development time I used the nice Template10 template, which gives me the typical hamburger app layout. The project can be found on GitHub and has a very active community.

Behind the scenes: All Code on GitHub

I decided to work in the open on GitHub, so if you are interested on the actual code, just take a look and do whatever you want to do.

If you have ideas or found bugs I would appreciate your help: Just create an issue or send a pull request.


Pretty Print XML in .NET

$
0
0

Pretty Print

The term “pretty print” describes that a document is more or less human readable formatted. So instead of this:

<Foo><Bar><Buzz></Buzz></Bar></Foo>

You might want to get this:

<Foo><Bar><Buzz></Buzz></Bar></Foo>

Many editors support this feature - but we want to do it in code.

Pretty Print XML with .NET

The code is really simple, because XDocument does the heavy lifting for us.

var xDocument = XDocument.Parse(input);
string formattedXml = xDocument.ToString();

// Force XML Declaration if present
if (xDocument.Declaration != null)
{
  formattedXml = xDocument.Declaration + Environment.NewLine + formattedXml;
}
return formattedXml;

This should work in most cases - there might be some issues with comments or maybe special XML chars. If you have a better idea, please let me know.

Hope this helps!

Using Travis CI for GitHub Pages builds

$
0
0

x

Short recap: GitHub Pages & Jekyll

This blog is powered by GitHub Pages, which uses Jekyll in the background. Jekyll is a static website generator, which means that this page is “build” and has no server-side rendering logic when you hit the page - it’s pure static HTML, CSS and JS.

You could run Jekyll on your local box and publish the sites to GitHub Pages - I prefer a pure “GitHub Page”-based model. Actually I don’t even have Jekyll installed on my PC. I wrote a small blogpost about running Jekyll on Windows if you are interested.

Travis CI

As you might imaging - during the build stuff can break. In this case GitHub will send you a very short “error” email via mail. To get a more detailed report, GitHub suggests to use Travis CI, which is the main topic of this blogpost.

Travis CI Setup

The basic setup is pretty simple, but I had some issues - the last step is not very good documented - and that’s why I decided to blog about it.

1. Login to Travis CI and “sync” your account

You will need to login to Travis CI with your GitHub account. This will kick in a “sync”. After a short period you should see all your repositories on your profile page:

x

2. Enable the desired project on Travis CI

Just flip on the switch on your profil page for the desired project and Travis will watch the repository for any changes.

3. Adding a Gemfile and a .travis.yml file to your project

To build GitHub Page stuff via Travis you will need a Gemfile and a .tarvis.yml. My current files are pretty basic and a copy from the GitHub Pages Help site, with one important exception

4. Targeting the correct branch

The last step is to ensure that Travis CI will search for the correct branch. In my case, I only have the “gh-pages” branch, but Travis CI will look for a “master” branch.

To configure Travis CI to use the correct “gh-pages” branch you will need this config section inside the .yml:

branches:
 only:
 - gh-pages  

After this setup you should already see the finished Travis CI build:

x

Important: The output of the build will not be copied over to GitHub - at this stage it is just a “safety net”. If you want to publish from Travis CI, there are many blogposts out there that describe this topic.

Hope this helps!

Using FontAwesome in UWP apps

$
0
0

FontAwesome in WPF and Fonts in UWP

I blogged about how to use FontAwesome in WPF last year and wrote a short blogpost about the nice FontIcon class in UWP. With the help of the FontIcon class I could include the FontAwesome glyphs, but working with the unicodes is not very dev friendly.

Bringing FontAwesome.WPF to the UWP universe - OSS rocks!

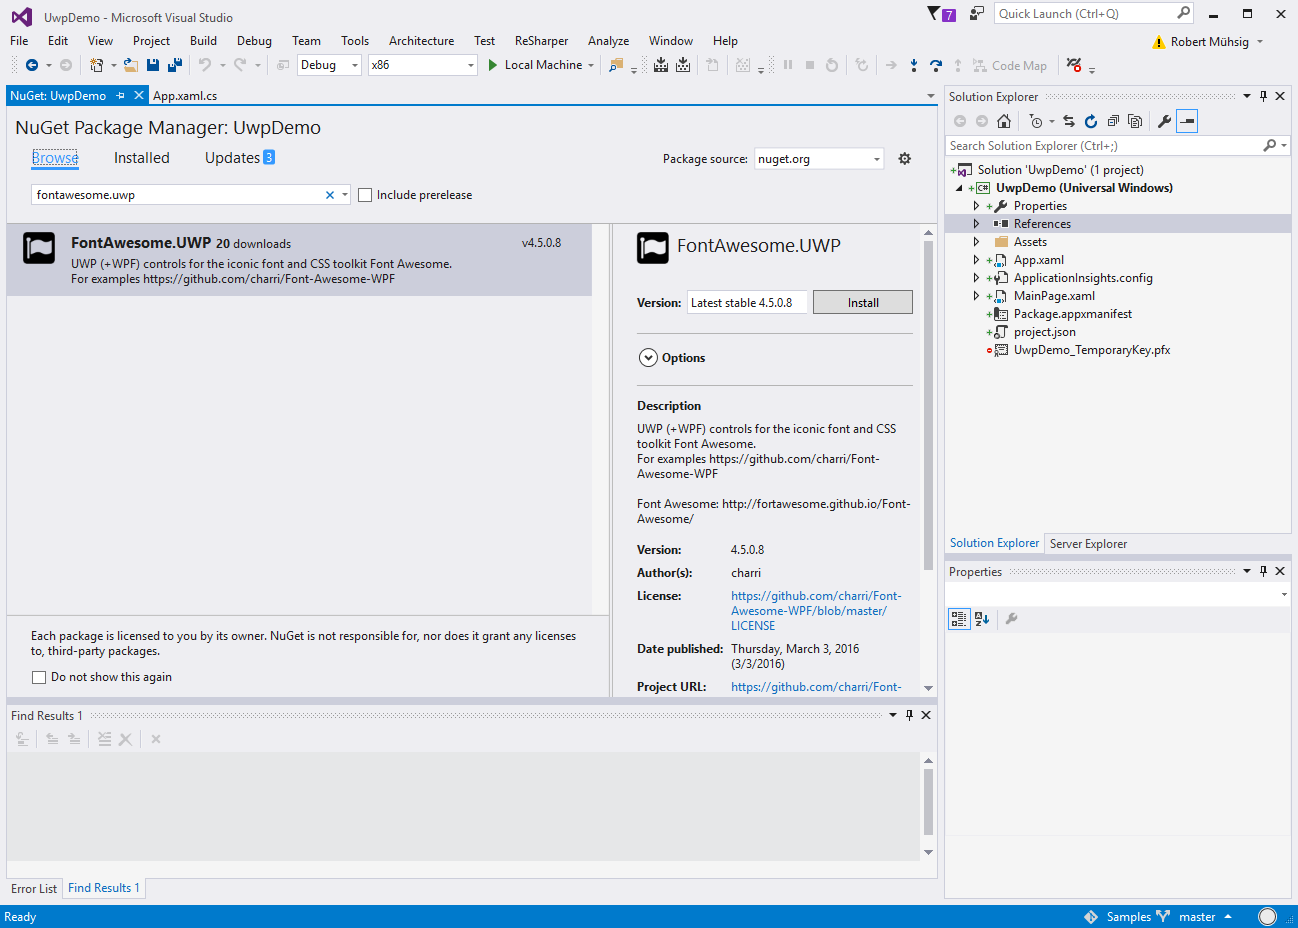
The goal was pretty clear: I would like to have the excellent FontAwesome.WPF NuGet package working on UWP. So I created an issue on the FontAwesome.WPF GitHub repo and some contributions later the FontAwesome.UWP NuGet package was born.

_Thanks to everyone who was involved!__

x

Using FontAwesome in UWP…

As you might imaging - the usage is now pretty easy after including the FontAwesome.UWP NuGet package.

<Page
    x:Class="UwpDemo.MainPage"
    xmlns="http://schemas.microsoft.com/winfx/2006/xaml/presentation"
    xmlns:x="http://schemas.microsoft.com/winfx/2006/xaml"
    xmlns:local="using:UwpDemo"
    xmlns:d="http://schemas.microsoft.com/expression/blend/2008"
    xmlns:mc="http://schemas.openxmlformats.org/markup-compatibility/2006"
    xmlns:fa="using:FontAwesome.UWP"
    mc:Ignorable="d"><Grid Background="{ThemeResource ApplicationPageBackgroundThemeBrush}"><fa:FontAwesome Icon="Flag" FontSize="90" Foreground="Chartreuse" HorizontalAlignment="Center" /></Grid></Page>

Result:

x

Pretty nice and it was a good collaboration - big thanks to Thomas Charriere, who is the maintainer behind the project.

Demo Project on our GitHub Sample repo

Hope this helps!

Parsing XML Schemas in .NET

$
0
0

XML Schemas

XML can be very verbose and seems to be old-fashioned, but the good part around XML is, that there is a hugh pile of standardized mechanics around it. To query XML documents you can use XPath, for transforming XSLT and for validation XML Schemas or in short a “XSD” (XML Schema Definition).

Parsing the XSD Tree

A XSD is just a XML document itself that describes the your valid XML document tree. Because its just a normal XML document (with a fancy XML-namespace), you could parse it via the normal XDocument, but things are way easier for you when you look at the System.Xml.Schema-Namespace.

Code

The basic code was taken from the MSDN and I added the recursive part to get all possible elements.

/// <summary>
/// Code based on https://msdn.microsoft.com/en-us/library/ms255932(v=vs.110).aspx
/// </summary>
class Program
{
    public static void AnalyseSchema(XmlSchemaSet set)
    {
        // Retrieve the compiled XmlSchema object from the XmlSchemaSet
        // by iterating over the Schemas property.
        XmlSchema customerSchema = null;
        foreach (XmlSchema schema in set.Schemas())
        {
            customerSchema = schema;
        }

        // Iterate over each XmlSchemaElement in the Values collection
        // of the Elements property.
        foreach (XmlSchemaElement element in customerSchema.Elements.Values)
        {
            RecursiveElementAnalyser(" ", element);
        }

    }

    public static void RecursiveElementAnalyser(string prefix, XmlSchemaElement element)
    {
        string elementName = prefix + element.Name;

        string dataType = element.ElementSchemaType.TypeCode.ToString();

        Console.WriteLine(elementName + " (" + dataType + ")");

        // Get the complex type of the Customer element.
        XmlSchemaComplexType complexType = element.ElementSchemaType as XmlSchemaComplexType;

        if (complexType != null)
        {
            // If the complex type has any attributes, get an enumerator 
            // and write each attribute name to the console.
            if (complexType.AttributeUses.Count > 0)
            {
                IDictionaryEnumerator enumerator =
                    complexType.AttributeUses.GetEnumerator();

                while (enumerator.MoveNext())
                {
                    XmlSchemaAttribute attribute =
                        (XmlSchemaAttribute)enumerator.Value;

                    string attrDataType = attribute.AttributeSchemaType.TypeCode.ToString();

                    string attrName = string.Format(prefix + "(Attr:: {0}({1}))", attribute.Name, attrDataType);

                    Console.WriteLine(attrName);
                }
            }

            // Get the sequence particle of the complex type.
            XmlSchemaSequence sequence = complexType.ContentTypeParticle as XmlSchemaSequence;

            if (sequence != null)
            {
                // Iterate over each XmlSchemaElement in the Items collection.
                foreach (var childElement in sequence.Items)
                {
                    var xmlSchemaElement = childElement as XmlSchemaElement;
                    if (xmlSchemaElement != null)
                    {
                        RecursiveElementAnalyser(" " + prefix, xmlSchemaElement);
                    }
                    else
                    {
                        // support for XmlSchemaChoise element list
                        var choice = childElement as XmlSchemaChoice;
                        if (choice != null)
                        {
                            foreach (var choiceElement in choice.Items)
                            {
                                var xmlChoiceSchemaElement = choiceElement as XmlSchemaElement;
                                if (xmlChoiceSchemaElement != null)
                                {
                                    RecursiveElementAnalyser(" " + prefix, xmlChoiceSchemaElement);
                                }
                            }
                        }
                    }
                }
            }
        }
    }

    static void Main(string[] args)
    {
        XmlSchemaSet schemas = new XmlSchemaSet();
        schemas.Add("", XmlReader.Create(new StringReader(File.ReadAllText("Schema.xsd"))));
        schemas.Compile();
        AnalyseSchema(schemas);
        Console.ReadLine();
    }
}

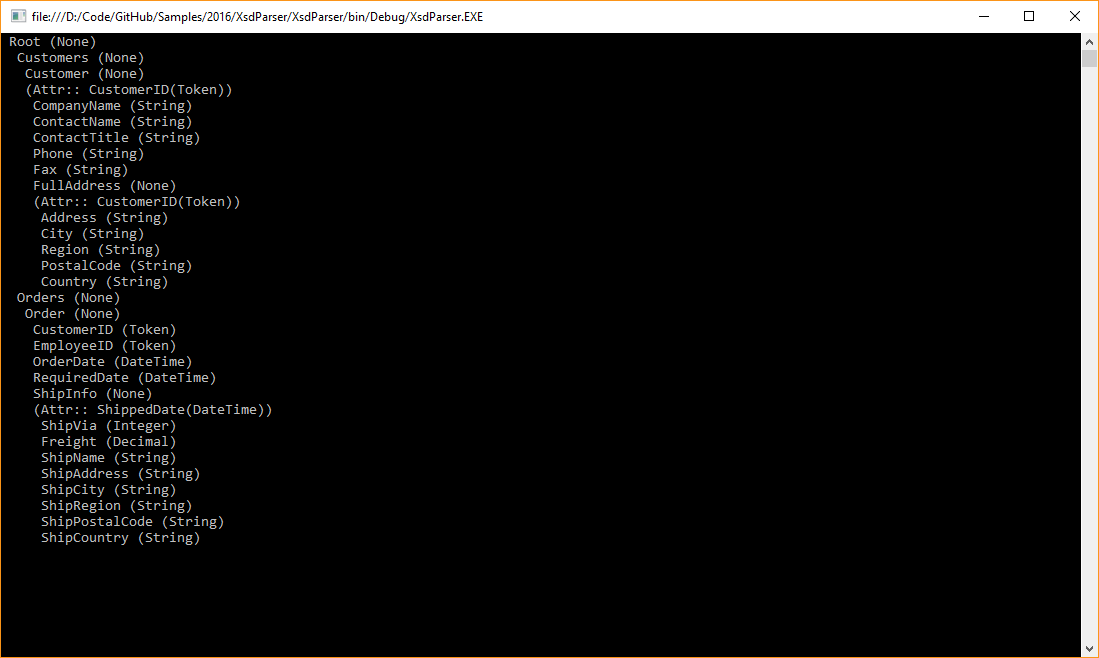
Output:

x

You should see the possible XML elements, attributes and their datatypes, but you have access to all specified schema information from the XSD that you want.

XML Namespaces

XML namespaces are powerful, but can also be pretty complicated for everyone who needs to parse your XML. I guess you could put some evil XML namespaces inside the XSD and things will break with my code. Just be aware of this issue if you are dealing with namespaces.

Visual Studio Tooling

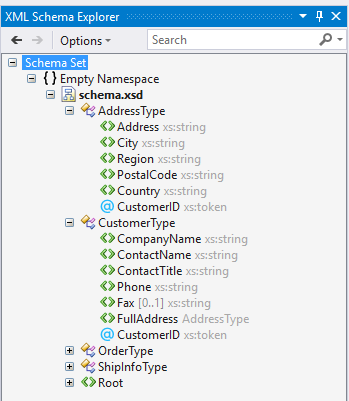
I discovered that Visual Studio ships with a pretty nice XSD editor. But you don’t need to craft the XSD by hand,there are many tools out there that can generate XSDs based on existing XML documents.

x

Sample XSD

I added the XSD Sample from the MSDN in the demo project. If you found an issue, just let me know.

Full Sample Code on GitHub

Hope this helps!

XML Autocompletion with AvalonEdit

$
0
0

AvalonEdit

AvalonEdit is a text editor WPF control, used and created by the SharpDevelop team. It comes with some nice features, like code folding support, text highlighting and infrastructure for advanced features like autocompletion.

Read more about AvalonEdit on the offical site.

To install AvalonEdit, just create a WPF project and install the AvalonEdit NuGet package.

Our Scenario

We use AvalonEdit to edit XML configurations, but it can be used with any language. This blogpost will only take a look at our XML-scenario.

XML Autocomplete or “IntelliSense”

AvalonEdit only ships with Syntax-Highlighting for XML - but nothing more. To get something like Tag-Autocompletion or even something like “IntelliSense” I had to combine different code pieces and write something new. So… the daily business of any programmer.

XML Tag-Completion - with Code from SharpDevelop and Xsemmel

Modern text editors will autocomplete given XML tags, e.g. if I type the closing element for “<foo” it will create something like “” and set the cursor inside the element. To get to this feature we need to know which XML tag we are currently try to write - this issue can be solved with some magic RegEx0.

The good part: This is already a solved problem. I discovered a very clever XmlParser on the SharpDevelop GitHub Repo and another one from the Xsemmel Project.

I use code from both projects and integrated it in my sample project. And I hope I didn’t break the license by doing it - if yes I did it unintentional. Each code part is marked with the source and the copyright notes are included as well.

Anyway: Huge credits are going to both projects.

What I get from those libraries?

Both libraries are clever enough to parse XML - or even “invalid” XML, and return the current position inside the XML tree. The code from Xsemmel also helped me with the “pure” tag completion.

My merged XmlParser will return me the needed information for autocompletion or even “IntelliSense”-like features.

XML “IntelliSense” - What’s the source of the “IntelliSense”?

To present some clever autocomplete actions, we need a source for this information. The good thing about XML is, that there is a huge range of related standards around it. The idea is simple:

Using an existing XML Schema should do the trick. I already blogged about it here.

Putting those pieces together:

I created a WPF project, included the AvalonEdit NuGet package and the code portions I already mentioned. The performance in the animation is a bit slow, because I wanted to show you what the XmlParser is doing in the background - this can be seen at the bottom of the application.

x.

You don’t need to “query” the document everytime you change the cursor - so in real life the performance hit is not very noticeable.

As I already mentioned in the XSD-blogpost: XML Namespaces will not work with this implementation. As far as I know the SharpDevelop code should understand namespaces, but at least my XSD parser is not smart enough.

The logic

The most interesting logic happens in the TextEntered-EventHandler.

The “>” and “/” key is interesting for the simple tag autocompletion. The “XsdParser”-Result is used when you hit the “<” key or “ “ as long as you are inside a tag for attribute autocompletion.

“Good enough”

My implementation is far away from perfection, but should be good enough for most simple cases. As I already mentioned, the heavy lifting is done by code from SharpDevelop or Xsemmel. My sample is self-contained and only relies on the AvalonEdit NuGet package and the standard WPF.

Full Sample Code on GitHub

Hope this helps!

Debugging .NET based Windows Error Reports (WER)

$
0
0

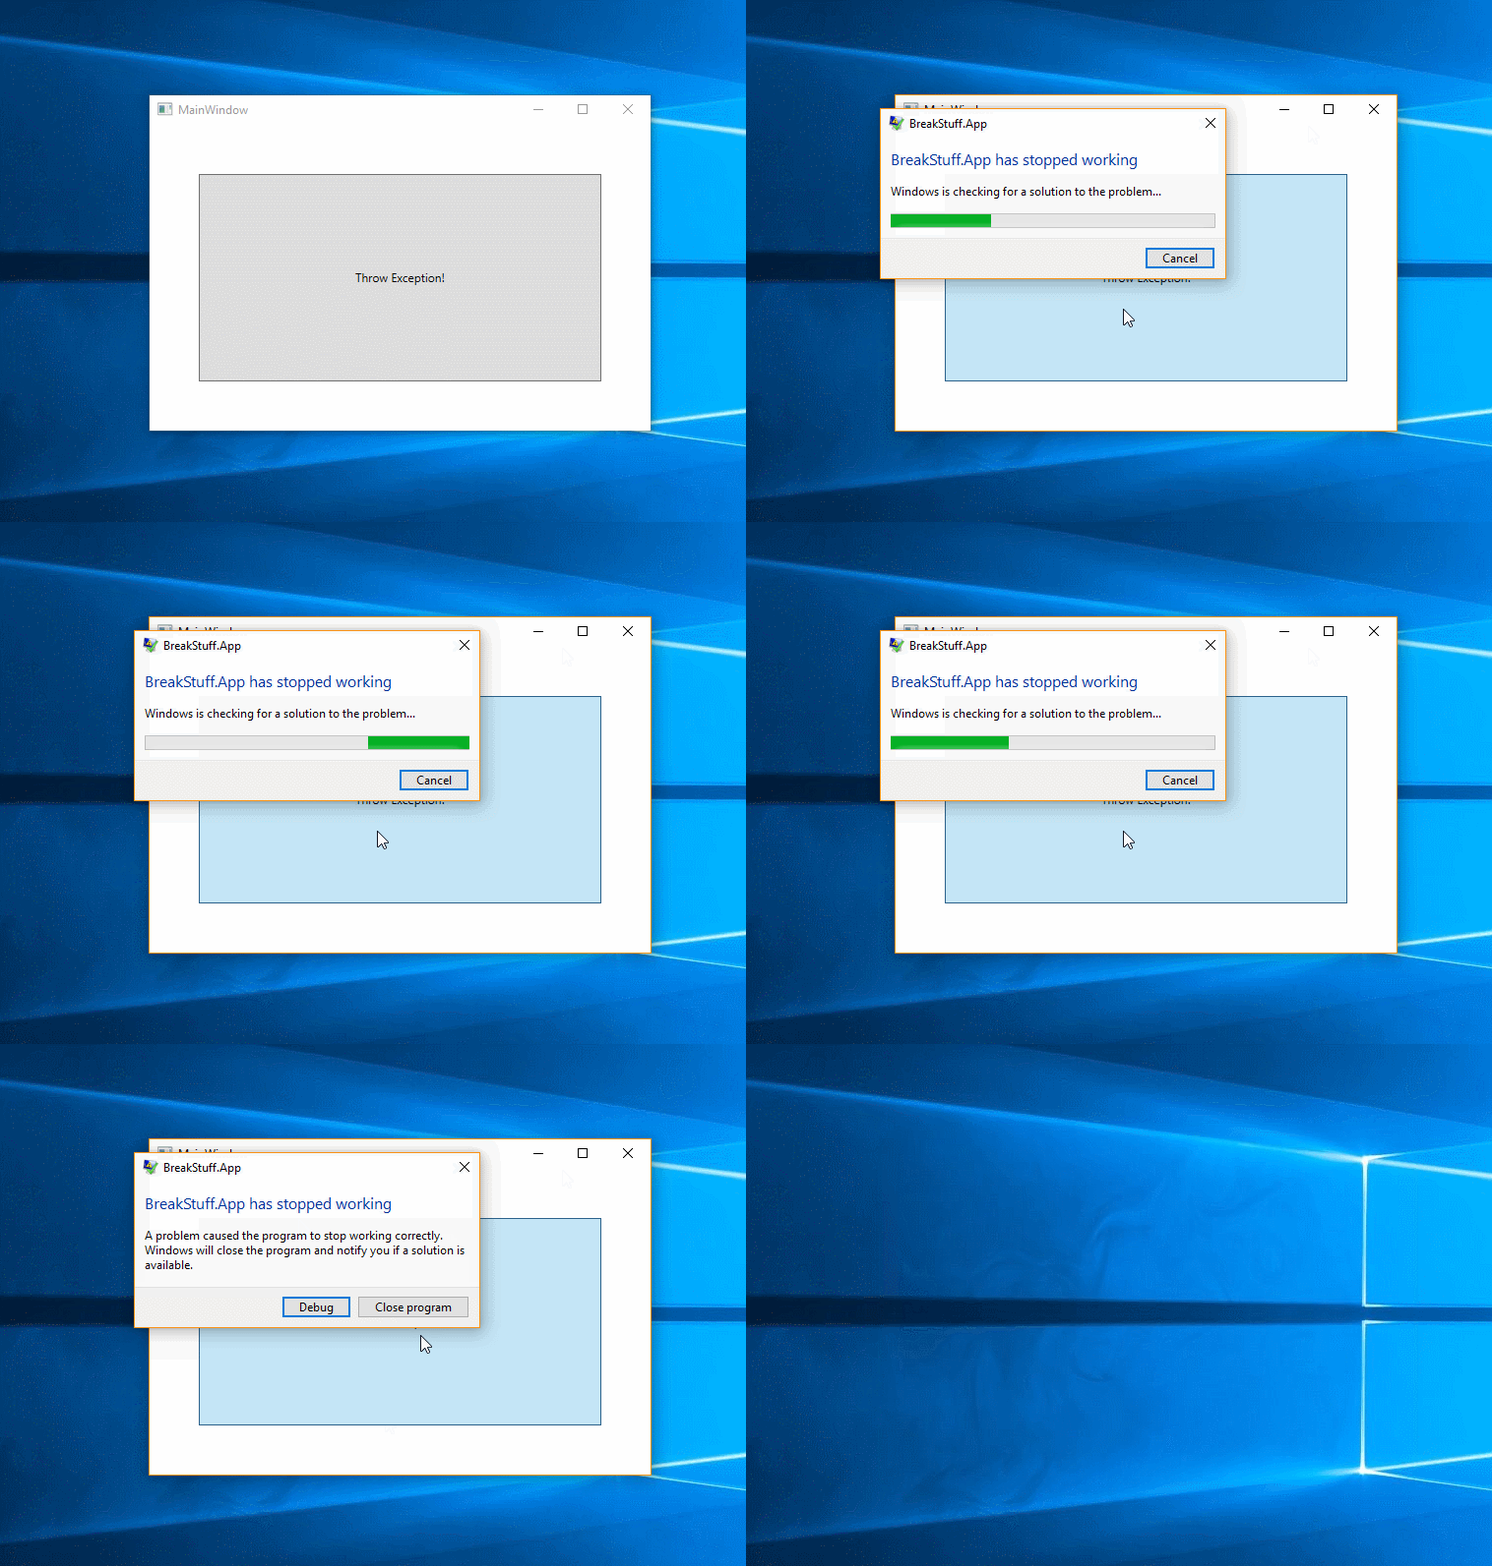
x.

The last hope: Windows Error Reports

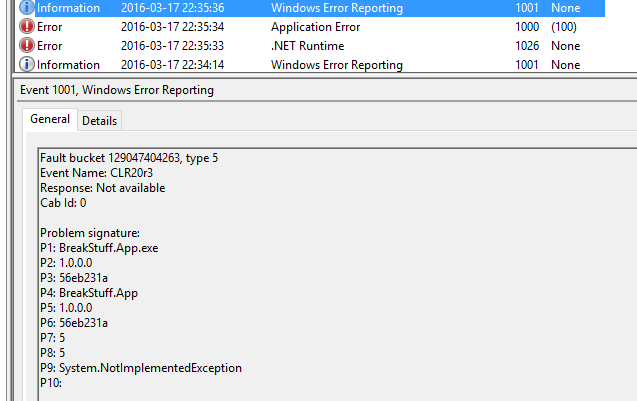
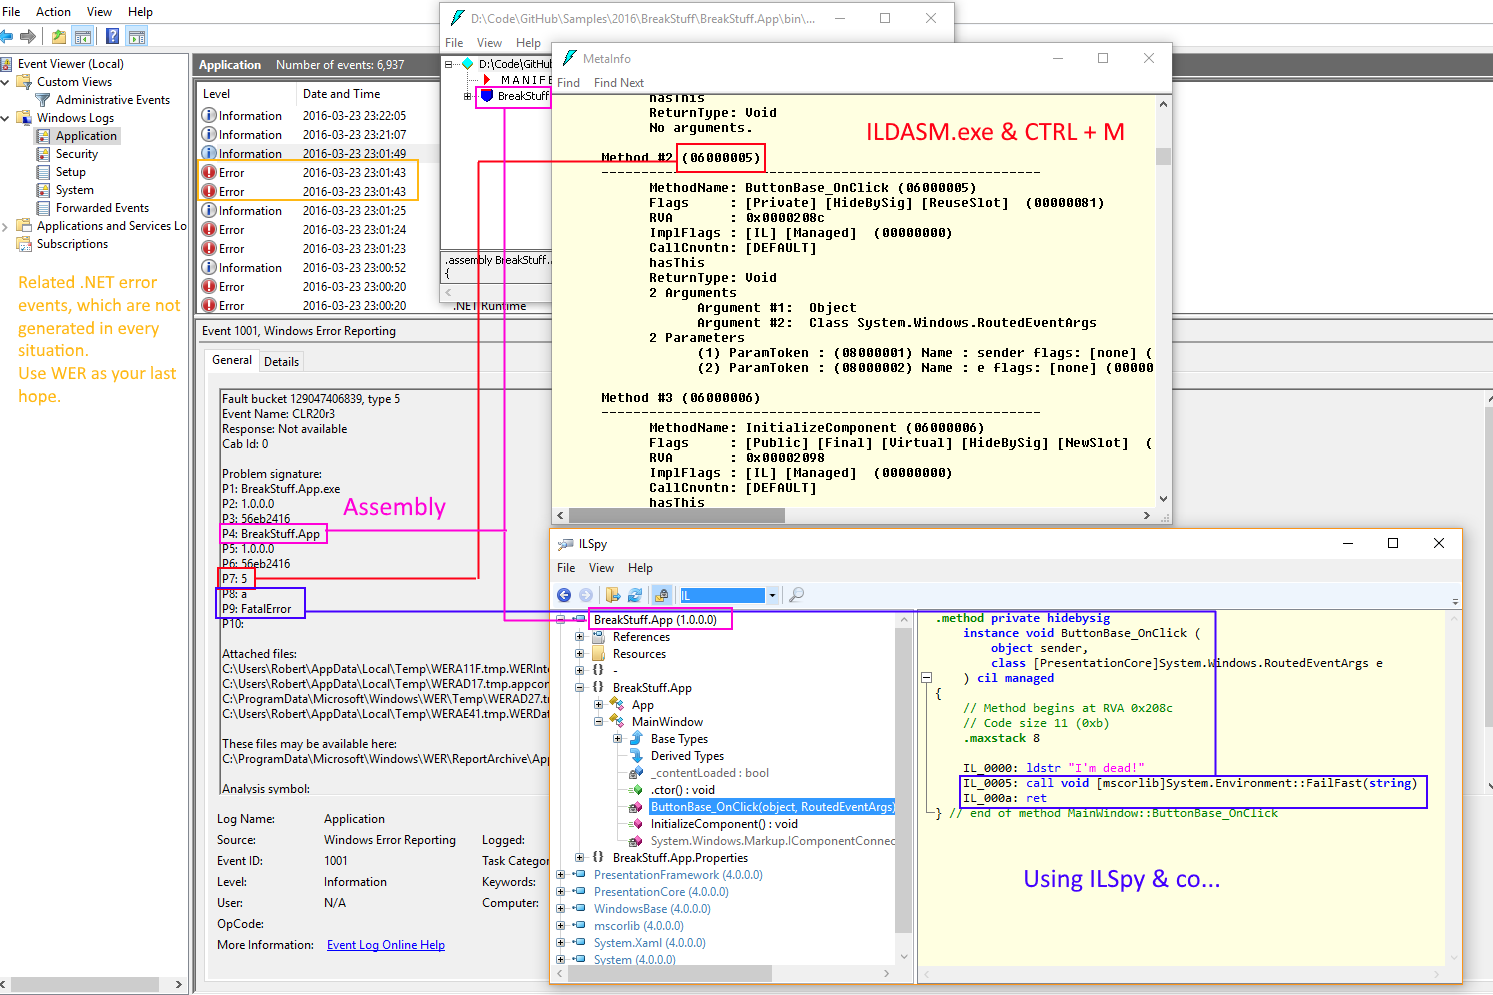
The “Windows Error Report” (WER) is automatically generated by Windows and can be seen in the Eventlog. In most cases, you might see some other - debugging friendlier - event logs. If there is a event log from with the source “.NET Runtime”, then use this first. Windows Error Reports are at first a bit strange to read.

x

Small, but important hint: I strongly recommend that you should use some logging libraries inside your application as well.

If you still don’t have a clue where your application breaks or those other event logs are missing the WER can be used to see where the exception is thrown in your .NET application.

Windows Error Report for .NET Apps

A typical Windows Error Report could look like this:

Fault bucket 129047406839, type 5
Event Name: CLR20r3
Response: Not available
Cab Id: 0

Problem signature:
P1: BreakStuff.App.exe
P2: 1.0.0.0
P3: 56eb2416
P4: BreakStuff.App
P5: 1.0.0.0
P6: 56eb2416
P7: 5
P8: a
P9: FatalError
P10: 

Attached files:
C:\Users\Robert\AppData\Local\Temp\WERE708.tmp.WERInternalMetadata.xml
C:\Users\Robert\AppData\Local\Temp\WERF4B5.tmp.appcompat.txt
C:\ProgramData\Microsoft\Windows\WER\Temp\WERF4D5.tmp.dmp
C:\Users\Robert\AppData\Local\Temp\WERF65D.tmp.WERDataCollectionFailure.txt
C:\ProgramData\Microsoft\Windows\WER\ReportQueue\AppCrash_BreakStuff.App.e_1952fbbdf8ecceaa6e9af5c44339210849f4774_b2bbc455_cab_7634f669\memory.hdmp
WERGenerationLog.txt

Each P holds some exception location information:

P1: “BreakStuff.App.exe” = App name or host process e.g. your.exe or Outlook.exe for a .NET addin.

P2: “1.0.0.0” = Version of the executabe

P3: “56eb2416” = Timestamp of the executable

P4: “BreakStuff.App” = Faulting assembly and module name

P5: “1.0.0.0” = Version of the faulting module

P6: “56eb2416” = Timestamp of the faulting module

P7: “5” = MethodDef– MethodDef token for the faulting method, after stripping off the high byte. This is the faulting method in your code. Super important!

P8: “a” = IL offset - in hex, in combination with P7 will it show you the exact position of the exception in your method.

P9: “FatalError” = Exception type

P1-P3 should be easy to understand and nothing new to you. If you have a bigger application P4 might lead to the correct namespace/assembly.

Most important to find the real source is P7 & P8 - I will show you how to read it.

P7: Finding the MethodDef token with ILDASM.exe

P7 tells you in which method the exception occurred. The number shown in P7 is the method token, which is the IL representation of your actual method in code. To see the real method name we need a tool.

As far as I know you could try to use WinDbg, but I was too stupid to use it correctly - ildasm.exe does also work for our use case. To get the method token you need “ildasm.exe”, which is included in the .NET SDK, which is part of the Windows SDK.

On a Windows 10 machine, with the SDK installed, you can use this version:

C:\Program Files (x86)\Microsoft SDKs\Windows\v10.0A\bin\NETFX 4.6 Tools\ildasm.exe

For ILDASM it is not important if the actual .NET app is using .NET 4.6 or any other version.

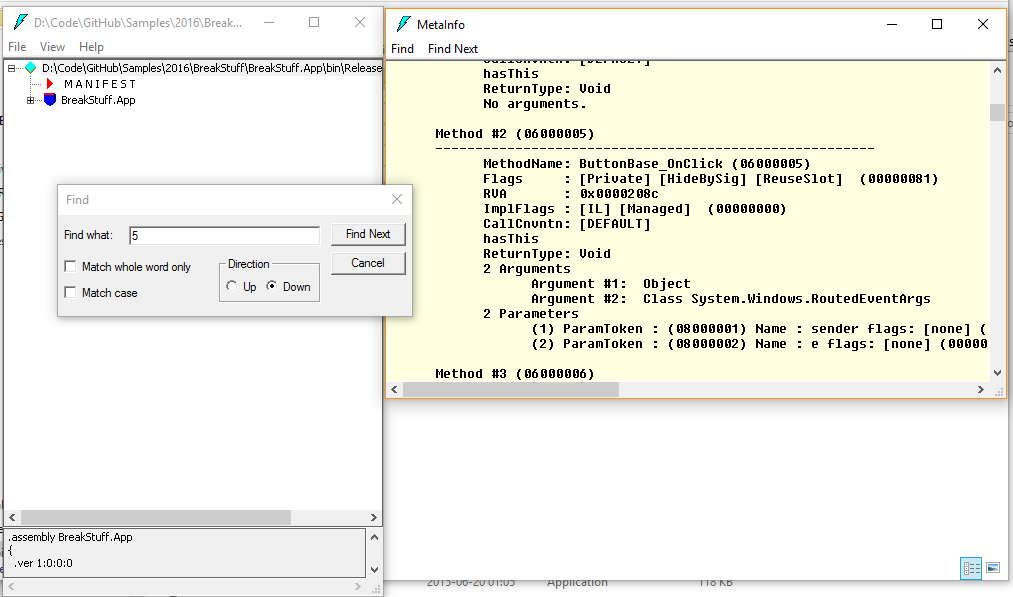
“ildasm.exe” itself is not a beauty, but works. Now open your assembly from P4 with this tool.

x

To see the tokens, press CTRL + M and search for P7.

In my case I see this:

Method #2 (06000005) 
-------------------------------------------------------
	MethodName: ButtonBase_OnClick (06000005)
	Flags     : [Private] [HideBySig] [ReuseSlot]  (00000081)
	RVA       : 0x0000208c
	ImplFlags : [IL] [Managed]  (00000000)
	CallCnvntn: [DEFAULT]
	hasThis 
	ReturnType: Void
	2 Arguments
		Argument #1:  Object
		Argument #2:  Class System.Windows.RoutedEventArgs
	2 Parameters
		(1) ParamToken : (08000001) Name : sender flags: [none] (00000000)
		(2) ParamToken : (08000002) Name : e flags: [none] (00000000)

Take a look at the method description: 0600000 5 - the 0600000 is the high byte (whatever that means… - just search for the number, I bet you will find something.)

BigBasti helped me in the comments to describe the high byte: Big numbers which need more than one byte to store the value have high bytes (most significant bytes) and low bytes (least significant bytes) - you need to know this to make sure you load the sequence of bytes in the correct order. - Thanks!

Ok - now we know the actual method. The exception occurs in the ButtonBase_OnClick method!

P8: Finding the exact position of the faulting code with ILSpy

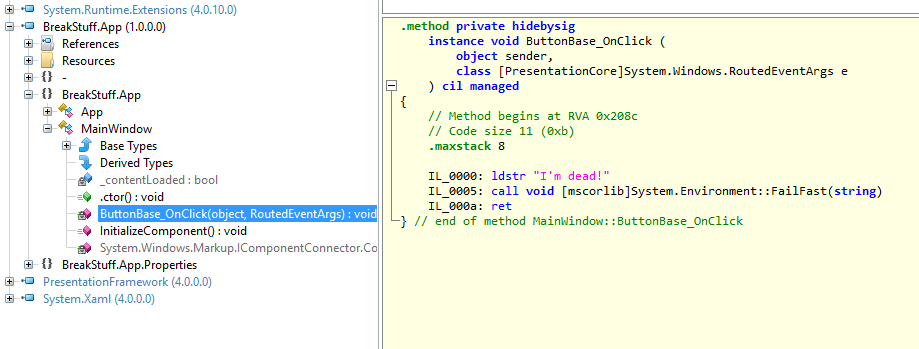
Now we need to look at the methods IL. You can use ILSpy or any other .NET decompiler (ildasm is not very comfortable, we only used it to get the method name). If you choosed ILSpy make sure you switch from the C# view to IL view and go to the faulting method:

x

// Method begins at RVA 0x208c
// Code size 11 (0xb)
.maxstack 8

IL_0000: ldstr "I'm dead!"
IL_0005: call void [mscorlib]System.Environment::FailFast(string)
IL_000a: ret
} // end of method MainWindow::ButtonBase_OnClick

As you might remember - P8 pointed to “a”, which is the IL_000a instruction.

Mission accomplished: Exception source found! Yay!

Big picture

I never thought I had to read the internal IL, but we had one weird case where no log files were generated and we used this trick to get to the source of the exception.

x

My breaking Sample Code on GitHub

Hope this helps!

Get the Windows 10 or 8 accent color in WPF

$
0
0

x.

Windows Accent Color

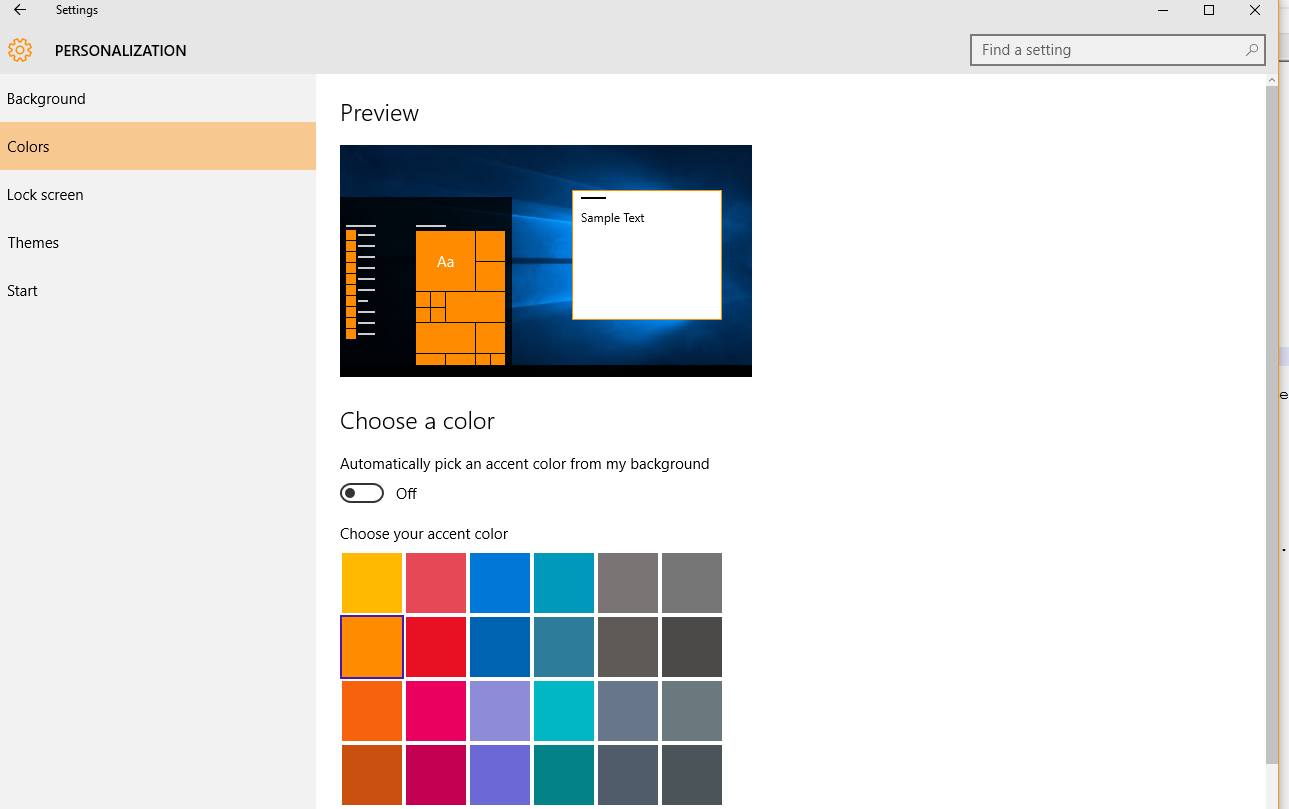
Since Windows 8 users can choose a system accent color. The color can be seen on the window borders of the default apps and it can be pretty easy be used inside a UWP App.

How to get the accent color in WPF?

Option 1: SystemParameters.WindowGlassBrush - not 100% the same color

As far as I know there are several ways to get the color code, one easy but not 100% correct way is to use the SystemParameters.WindowGlassBrush property that was introduced in .NET 4.5.

Sadly, the color is not 100% correct - I have no idea where this “similar”, but not identical color is used and why the API is returning this color.

It seems this is just a wrapper around the undocumented DwmGetColorizationParameters Win32 API.

Option 2: GetImmersiveColorFromColorSetEx

I found this solution here, which is just a wrapper around the GetImmersiveColorFromColorSetEx Win32 API.

Option 3: Registry, DwmGetColorizationParameters

The last option would be to read the Registry values - I found some hints on this site, but I wouldn’t recommend it, because it is more or less undocumented and might break in the future. So we will use option 1 or 2.

Usage:

The usage of both options is pretty easy (at least with the option 2 code provided) :

// https://gist.github.com/paulcbetts/3c6aedc9f0cd39a77c37varaccentColor=newSolidColorBrush(AccentColorSet.ActiveSet["SystemAccent"]);this.Code.Background=accentColor;this.Code.Text="AccentColorSet Immersive 'SystemAccent' "+accentColor.Color.ToString();// Available in .NET 4.5this.SystemProperties.Background=SystemParameters.WindowGlassBrush;this.SystemProperties.Text="SystemParameters.WindowGlassBrush "+((SolidColorBrush)SystemParameters.WindowGlassBrush).Color.ToString();

Result:

x.

As you can see, the lower color does match the border color instead of the first option. Crazy, right?¯\_(ツ)_/¯

From the comments: As Yves Goergen pointed out, the resulting color does not exactly match the border color, but it does match the system accent color, which is ok. I would guess that the border has some chrome behavior attached so that the color is slightly different.

The full code is on GitHub

Hope this helps.


Copy to clipboard with Javascript

$
0
0

Clipboard? Current state of the art…

I think everybody knows the clipboard. The goal is that we can store text inside the users clipboard, so he can just paste it. Most sites uses either Flash or some sort of mini-popup with a pre-selected text inside a textarea.

Both ways are not super user friendly and Flash is definitely done.

Clipboard API?

Currently there are some draft specs for a real clipboard API, but as far as I know, it’s far from done.

The good news: For our use case there is a pretty handy workaround available, which I found on StackOverflow.

The code:

<script>
    function detectIE() {
        var ua = window.navigator.userAgent;

        var msie = ua.indexOf('MSIE ');
        if (msie > 0) {
            // IE 10 or older => return version number
            return parseInt(ua.substring(msie + 5, ua.indexOf('.', msie)), 10);
        }

        var trident = ua.indexOf('Trident/');
        if (trident > 0) {
            // IE 11 => return version number
            var rv = ua.indexOf('rv:');
            return parseInt(ua.substring(rv + 3, ua.indexOf('.', rv)), 10);
        }

        // other browser or edge
        return false;
    }

    // source: http://stackoverflow.com/questions/400212/how-do-i-copy-to-the-clipboard-in-javascript
    // enhancement with special case for IEs, otherwise the temp textarea will be visible
    function copyTextToClipboard(text) {
        if (detectIE()) {
            try {
                window.clipboardData.setData('Text', text);
                console.log('Copying text command via IE-setData');
            } catch (err) {
                console.log('Oops, unable to copy via IE-setData');
            }
        }
        else {

            var textArea = document.createElement("textarea");

            //
            //  This styling is an extra step which is likely not required. 
            //
            // Why is it here? To ensure:
            // 1. the element is able to have focus and selection.
            // 2. if element was to flash render it has minimal visual impact.
            // 3. less flakyness with selection and copying which might occur if
            //    the textarea element is not visible.
            //
            // The likelihood is the element won't even render, not even a flash,
            // so some of these are just precautions. 
            // 
            // However in IE the element
            // is visible whilst the popup box asking the user for permission for
            // the web page to copy to the clipboard. To prevent this, we are using 
            // the detectIE workaround.

            // Place in top-left corner of screen regardless of scroll position.
            textArea.style.position = 'fixed';
            textArea.style.top = 0;
            textArea.style.left = 0;

            // Ensure it has a small width and height. Setting to 1px / 1em
            // doesn't work as this gives a negative w/h on some browsers.
            textArea.style.width = '2em';
            textArea.style.height = '2em';

            // We don't need padding, reducing the size if it does flash render.
            textArea.style.padding = 0;

            // Clean up any borders.
            textArea.style.border = 'none';
            textArea.style.outline = 'none';
            textArea.style.boxShadow = 'none';

            // Avoid flash of white box if rendered for any reason.
            textArea.style.background = 'transparent';


            textArea.value = text;

            document.body.appendChild(textArea);

            textArea.select();

            try {
                var successful = document.execCommand('copy');
                var msg = successful ? 'successful' : 'unsuccessful';
                console.log('Copying text command was ' + msg);
            } catch (err) {
                console.log('Oops, unable to copy');
            }

            document.body.removeChild(textArea);
        }

    }
</script>

Usage:

The usage is pretty simple, just call copyToClipboard, e.g.

<button type="button" onclick="copyTextToClipboard('Foobar!')">
	Set Foobar to clipboard</button>

document.execCommand(‘copy’)

This API is a bit strange, because it only works for visible elements and IE might render a small warning. To get rid of this effect we use a older IE-only API. “document.execCommand” is not limited to copy - there are some nice ideas around it. The Mozilla site has a large documentation about this function.

A full demo is available on JSFiddle and the code is stored on GitHub

Hope this helps.

FAKE: Build ASP.NET projects with web.config transformation (and without knowing a tiny bit of F#)

$
0
0

This is a follow-up to my other FAKE posts:

What’s the difference between a ASP.NET and other projects?

The most obvious difference is that the output is a bunch of dlls and content files. Additionally you might have a web.debug.config or web.release.config in your source folder.

Both files are important, because they are used during a Visual-Studio build as a Web.Config Transformation.

With a normal build the transformation will not kick in, so we need a way to trigger the transformation “manually”.

Project Overview

The sample project consists of one ASP.NET project and the .fsx file.

x

The “released” web.config should cover this 3 main transformation parts:

  • DefaultConnectionString to ‘ReleaseSQLServer’
  • No “debug”-attribute on system.web
  • developmentMode-AppSetting set to ‘true’

Web.Release.config

<?xml version="1.0"?><configurationxmlns:xdt="http://schemas.microsoft.com/XML-Document-Transform"><connectionStrings><addname="DefaultConnection"connectionString="ReleaseSQLServer"xdt:Transform="SetAttributes"xdt:Locator="Match(name)"/></connectionStrings><appSettings><addkey="developmentMode"value="true"xdt:Transform="SetAttributes"xdt:Locator="Match(key)"/></appSettings><system.web><compilationxdt:Transform="RemoveAttributes(debug)"/></system.web></configuration>

The FAKE script

We reuse the MSBuild-Helper from FAKE and inject a couple of “Publish”-related stuff, which will trigger the transformation.

A few remarks: In the “normal” WebDeploy-World you would have a PublishProfile and it would end up with a .zip-file and a couple of other files that fill in parameters like the ConnectionString. With this MSBuild command I mimik a part of this behavior and use the temporary output as our main artifact. In my most apps I use web.config transformations only for “easy” stuff (e.g. remove the debug attribute) - if you are doing fancy stuff and the output is not what you want, please let me know.

This MSBuild command should apply all your web.config transformations.

Publish a ASP.NET project

...
Target "BuildWebApp" (fun _ ->
trace "Building WebHosted Connect..."
!! "**/*.csproj"
 |> MSBuild artifactsBuildDir "Package"
    ["Configuration", "Release"
     "Platform", "AnyCPU"
     "AutoParameterizationWebConfigConnectionStrings", "False"
     "_PackageTempDir", (@"..\" + artifactsDir + @"Release-Ready-WebApp")
     ]
 |> Log "AppBuild-Output: "
)
...

“AutoParameterizationWebConfigConnectionStrings” or how to get rid of $(ReplacableToken_…

Blogpost updated on 2016-07-18

A friend told me that his transformed web.config contained “$(ReplaceableToken_…)” strings. It seems that “connectionStrings” are treated specially. If you have a connectionString in your web.config and don’t set “AutoParameterizationWebConfigConnectionStrings=False” you will get something like that:

<connectionStrings><!-- Not the result we are looking for :-/ --><add name="DefaultConnection" connectionString="$(ReplacableToken_DefaultConnection-Web.config Connection String_0)" providerName="System.Data.SqlClient" /></connectionStrings>

I would say this is not the result you are expecting. With the “AutoParameterizationWebConfigConnectionStrings=False” parameter it should either do a transformation or leave the default-connectionString value in the result.

Thanks to Timur Zanagar! I completely missed this issue.

Result

x

This build will produce two artifacts - the build-folder just contains the normal build output, but without a web.config transformation.

The other folder contains a ready to deploy web application, with the web.release.config applied.

<connectionStrings><add name="DefaultConnection" connectionString="ReleaseSQLServer" providerName="System.Data.SqlClient" /></connectionStrings><appSettings>
  ...<add key="developmentMode" value="true" /></appSettings><system.web>
  ...</system.web>

You can find the complete sample & build script on GitHub.

CAKE: Building solutions with C# & Roslyn

$
0
0

x

CAKE - C# Make

  • A DSL for build tasks (e.g. build following projects, copy stuff, deploy stuff etc.)
  • It’s just C# code that gets compiled via Roslyn
  • Active community, OSS & written in C#
  • You can get CAKE via NuGet
  • Before we begin you might want to check out the actual website of CAKE
  • Cross Platform support

Our goal: Building, running tests, package NuGet Packages etc.

I already did a couple of MSBuild and FAKE related blogposts, so if you are interested on these topics as well go ahead (some are quite old, there is a high chance that some pieces might not apply anymore):

Ok… now back to CAKE.

Let’s start with the basics: Building

I created a pretty simple WPF app and followed these instructions.

The build.cake script

My script is a simplified version of this build script:

// ARGUMENTS
var target = Argument("target", "Default");

// TASKS
Task("Restore-NuGet-Packages")
    .Does(() =>
{
    NuGetRestore("CakeExampleWithWpf.sln");
});

Task("Build")
    .IsDependentOn("Restore-NuGet-Packages")
    .Does(() =>
{
      MSBuild("CakeExampleWithWpf.sln", settings =>
        settings.SetConfiguration("Release"));

});

// TASK TARGETS
Task("Default").IsDependentOn("Build");

// EXECUTION
RunTarget(target);

If you know FAKE or MSBuild, this is more or less the same structure. You define tasks, which may depend on other tasks. At the end you invoke one task and the dependency chain will do its work.

Invoke build.cake

The “build.ps1” will invoke “tools/cake.exe” with the input file “build.cake”.

“build.ps1” is just a helper. This Powershell script will download nuget.exe and download the CAKE NuGet-Package and extract it under a /tools folder. If you don’t have problems with binary files in your source control, you don’t need this Powershell script.

Our first CAKE script!

The output is very well formatted and should explain the mechanics behind it good enough:

Time Elapsed 00:00:02.86
Finished executing task: Build

========================================
Default
========================================
Executing task: Default
Finished executing task: Default

Task                          Duration
--------------------------------------------------
Restore-NuGet-Packages        00:00:00.5192250
Build                         00:00:03.1315658
Default                       00:00:00.0113019
--------------------------------------------------
Total:                        00:00:03.6620927

The first steps are pretty easy and it’s much easier than MSBuild and feels good if you know C#.

The super simple intro code can be found on GitHub.

TFS 2015: Adding a new Windows Build Agent

$
0
0

The TFS 2015 Build System

The build system before TFS 2015 was based on a pretty arcane XAML workflow engine which was manageable, but not fun to use. With TFS 2015 a new build system was implemented, which behave pretty much the same way as other build systems (e.g. TeamCity or AppVeyor).

The “build workflow” is based on a simple “task”-concept.

There are many related topics in the TFS world, e.g. Release-Management, but this blogpost will just focus on the “Getting the system ready”-part.

TFS Build Agents

Like the other parts of Microsoft the TFS is now also in the cross-platform business. The build system in TFS 2015 is capable of building a huge range of languages. All you need is a compatible build agent.

My (simple) goal was to build a .NET application on a Windows build agent via the new TFS 2015 build system.

Step 1: Adding a new build agent

Important - Download Agent.

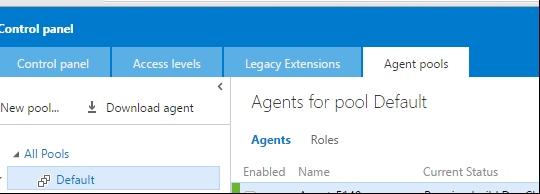
This one is maybe the hardest part. Instead of a huge TFS-Agent-Installer.msi you need to navigate inside the TFS control panel to the “Agent pool”-tab.

You need at least one pool and need to click the “Download Agent” button.

Step 2: Configure the agent

Configuration.

The .zip package contains the actual build agent executable and a .cmd file.

Invoke the “ConfigureAgent.cmd”-file:

We run those agents as Windows Service (which was one of the last config-questions) and are pretty happy with the system.

Step 3: You are done

Now your new build agent should appear under the given build agent pool:

TFS Build Agents.

After googleing around I also found the corresponding TFS HowTo, which describes more or less the complete setup. Well… now it is documented on MSDN and this blog. Maybe this will help my future-self ;)

Lets convert a WPF app to the Universal Windows Platform

$
0
0

Project Centennial - running desktop apps in the UWP world

Last year Microsoft revealed the plans to run and distribute desktop apps (basically all apps ever written for Windows) in the Universal-Windows-Platform “universe”. The project titel was “Project Centennial” and a year later the tooling seems to be ok-ish. So, let’s try something simple and convert a simple WPF app to UWP.

Limitations with this approach

Be aware that even if you can “convert” your WPF app this way you will get a UWP-ish app. The executable will only run on a normal Windows Desktop System. The app will not work on a Windows Phone, Xbox or HoloLens - at least not now.

Also keep in mind that certain operations might fail and that the outcome of some operations might suprise you. The app itself will run in a kind of sandbox. Calls to the file system or registry will be faked. Details can be found here.

As far as I know from a couple of hours playing around:

  • Changes to the Registry will not leak out of the sandbox, but for the app it will be seen as ok and is persistent
  • Changes to Well-Known-Folders (e.g. %AppData%) will not leak out of the sandbox, but for the app it will be seen as ok and is persistent
  • Some operation can leak out to the actual desktop, e.g. start another programm.

The Desktop App Converter

If you have an existing installer or setup you might want to take a look at the [desktop app converter](https://msdn.microsoft.com/en-us/windows/uwp/porting/desktop-to-uwp-run-desktop-app-converter. This utility will convert the installer to a UWP package.

A quick walk through can be found on Mike Taultys blog.

Step by Step - from WPF source to UWP app

The important steps from the WPF app to a UWP app are also documented in the MSDN.

But let’s start with a simple WPF app (running on .NET 4.6.1) - this is the MainWindow.xaml

<Window x:Class="WpfToUwpTestApp.MainWindow"
        xmlns="http://schemas.microsoft.com/winfx/2006/xaml/presentation"
        xmlns:x="http://schemas.microsoft.com/winfx/2006/xaml"
        xmlns:d="http://schemas.microsoft.com/expression/blend/2008"
        xmlns:mc="http://schemas.openxmlformats.org/markup-compatibility/2006"
        xmlns:local="clr-namespace:WpfToUwpTestApp"
        mc:Ignorable="d"
        Title="MainWindow - WpfToUwpTestApp" Height="350" Width="525"><StackPanel><Button Height="100" Width="100" Click="Button_Click1">Write in Registry</Button><Button Height="100" Width="100" Click="Button_Click2">Write in AppData</Button><Button Height="100" Width="100" Click="Button_Click3">Open HTTP Address</Button></StackPanel></Window>

The code behind:

public partial class MainWindow : Window
{
    public MainWindow()
    {
        InitializeComponent();
    }

    private void Button_Click1(object sender, RoutedEventArgs e)
    {
        RegistryKey key = Registry.CurrentUser.OpenSubKey("Software", true);

        key.CreateSubKey("WpfToUwpTestApp");
        key = key.OpenSubKey("WpfToUwpTestApp", true);


        key.CreateSubKey("ItWorks");
        key = key.OpenSubKey("ItWorks", true);

        key.SetValue("ItWorks", "true");
    }

    private void Button_Click2(object sender, RoutedEventArgs e)
    {
        string roaming = Environment.GetFolderPath(Environment.SpecialFolder.ApplicationData);

        string appFolder = System.IO.Path.Combine(roaming, "WpfToUwpTestApp");

        string file = System.IO.Path.Combine(appFolder, "Test.txt");

        if (Directory.Exists(appFolder) == false)
        {
            Directory.CreateDirectory(appFolder);
        }

        File.WriteAllText(file, "Hello World!");
    }

    private void Button_Click3(object sender, RoutedEventArgs e)
    {
        Process.Start("http://www.google.com");
    }
}

Pretty simple, right? Those three operations came just to my mind. In general I wouldn’t use the Registry at all, but I had a use case in mind where I need to access the Registry.

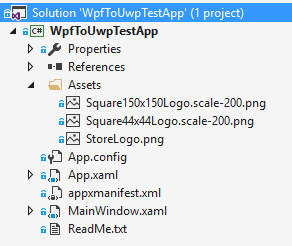
I also added a couple of dummy store images (from the default UWP app project template) - my solution looks like this:

x

When we build the .csproj the output should look like this:

  • WpfToUwpTestApp.exe
  • appxmanifest.xml
  • Assets/StoreLogo.png
  • Assets/Square150x150Logo.scale-200.png
  • Assets/Square44x44Logo.scale-200.png

The appmanifest.xml

The next step is to create the appmanifest.xml - on the MSDN there is a handy template. The Desktop App Converter does the same thing and tries to create this file automatically, but it’s not that hard to set it by hand:

<?xml version="1.0" encoding="utf-8"?><Packagexmlns="http://schemas.microsoft.com/appx/manifest/foundation/windows10"xmlns:uap="http://schemas.microsoft.com/appx/manifest/uap/windows10"xmlns:rescap="http://schemas.microsoft.com/appx/manifest/foundation/windows10/restrictedcapabilities"><IdentityName="WpfToUwpTestApp"ProcessorArchitecture="x64"Publisher="CN=Robert"Version="1.0.0.0"/><Properties><DisplayName>WpfToUwpTestApp</DisplayName><PublisherDisplayName>Robert</PublisherDisplayName><Description>No description entered</Description><Logo>Assets/StoreLogo.png</Logo></Properties><Resources><ResourceLanguage="en-us"/></Resources><Dependencies><TargetDeviceFamilyName="Windows.Desktop"MinVersion="10.0.14316.0"MaxVersionTested="10.0.14316.0"/></Dependencies><Capabilities><rescap:CapabilityName="runFullTrust"/></Capabilities><Applications><ApplicationId="Test"Executable="WpfToUwpTestApp.exe"EntryPoint="Windows.FullTrustApplication"><uap:VisualElementsBackgroundColor="#464646"DisplayName="WpfToUwpTestApp"Square150x150Logo="Assets/Square150x150Logo.scale-200.png"Square44x44Logo="Assets/Square44x44Logo.scale-200.png"Description="WpfUwpWriteInRegistry - Desc"/></Application></Applications></Package>

Create the App.appx package

Now we are ready to create the appx package. You need the Windows 10 SDK to do this.

To simplify things, I copied the needed files from the build output to a folder called _App.

To create the package, invoke the following command:

"C:\Program Files (x86)\Windows Kits\10\bin\x64\makeappx.exe" pack -d "%~dp0_App" -p "%~dp0App.appx"

The result is a unsigned appx package called “App”.

Create a valid pfx (one time only)

In the following step we need a valid pfx to sign the package. For development you can use this command to create a pfx:

"C:\Program Files (x86)\Windows Kits\10\bin\x64\makecert.exe" -r -h 0 -n "CN=Robert" -eku 1.3.6.1.5.5.7.3.3 -pe -sv App.pvk App.cer 

"C:\Program Files (x86)\Windows Kits\10\bin\x64\pvk2pfx.exe" -pvk App.pvk -spc App.cer -pfx App.pfx -po apptest

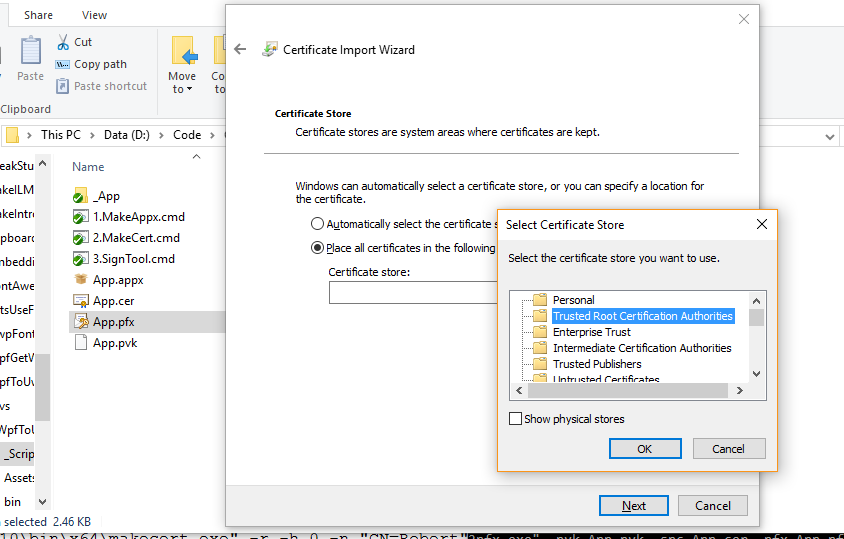
After this you should see a “App.pfx” in the folder. I’m not 100% sure if this step is really needed, but I needed to do it, otherwise I couldn’t install the app:

Now click on the pfx and enter the password “apptest” and import it in the “Trusted Root CAs”:

x

Sign App.appx

Now we need to sign the package and we are done:

"C:\Program Files (x86)\Windows Kits\10\bin\x64\signtool.exe" sign /f "App.pfx" -fd SHA256 /p apptest "App.appx"

Install the App!

Now you can double click on the appx package and the installer will show up:

x

Running the App

And there is our beauty:

x

Exploring the sandbox:

Remember our 3 methods? The results of those three calls are:

  • Write to the Registry: Seems to work for the app, but (as expected) the registry value will not leak out of the “sandbox”
  • Write to %appdata%: Seems to work for the app, but the data value will not leak out of the “sandbox”
  • Open a browser: The default browser will be invoked for a HTTP url.

It was my first try to convert a (simple) WPF app to UWP and the result is interesting.

Hope my first steps in this world might help you!

The code and a handy readme.txt is available on GitHub.

Viewing all 358 articles
Browse latest View live