Quantcast
Channel: Code Inside Blog
Viewing all 357 articles
Browse latest View live

Writing loops in T-SQL

$
0
0

The topic is quite old, but I found it really helpful, so be warned.

Scenario: Iterate over a result set and insert it in a new table in T-SQL

I had to write a SQL migration script to move date from an old table into a new table with a new primary key.

Update! I discovered that my problem would have been solved with a much simpler SQL script (INSERT INTO x …(SELECT … FROM Y)). So my example here is pretty dumb - sorry if this confuses you, but I will keep the blogpost to show the mechanics. Thanks Mark!

Here was/is my resulting script using T-SQL Cursors:

DECLARE @TemplateId as uniqueidentifier;
DECLARE @UserId as uniqueidentifier;

DECLARE @OldTemplateFavCursor as CURSOR;

SET @OldTemplateFavCursor = CURSOR FOR
SELECT UserTemplate.[Template_Id], UserTemplate.[User_Id] FROM UserTemplate;
 
OPEN @OldTemplateFavCursor;
FETCH NEXT FROM @OldTemplateFavCursor INTO @TemplateId, @UserId;
 
WHILE @@FETCH_STATUS = 0
BEGIN
 INSERT INTO dbo.[UserFavoriteTemplate]
           ([Id]
           ,[TemplateId]
           ,[UserId])
     VALUES
           (NEWID()
           ,@TemplateId
           ,@UserId)

FETCH NEXT FROM @OldTemplateFavCursor INTO @TemplateId, @UserId;
END
 
CLOSE @OldTemplateFavCursor;
DEALLOCATE @OldTemplateFavCursor;

Explanation

In the first couple of lines we just declare some variables.

In this particular script we want to move the “TemplateId” & “UserId” from the table “UserTemplate” into the target table “UserFavoriteTemplate”, but I also want to store an additional GUID as Id.

This line will select our current data into the cursor:

SET @OldTemplateFavCursor = CURSOR FOR SELECT UserTemplate.[Template_Id], UserTemplate.[User_Id] FROM UserTemplate;

With the “OPEN”, “FETCH NEXT” and “CLOSE” we move the cursor and inside the “WHILE” we can do our migration.

The syntax seems (from a C# perspective) strange, but works well for this scenario.

Performance consideration

I wouldn’t recommend this approach for large scale migrations or actual production code because I heard that the performance is not as great as some clever joins or other T-SQL magic.

Make sure you really need this

You can do some clever joins with SQL - make sure you really need this approach. My example here is not a clever one, so use this feature wisely. (again - thanks to Mark for the comment!)

Thanks Christopher for your help!


Enable SSL with custom domains on GitHub Pages via Cloudflare

$
0
0

Two weeks ago I decided (finally!) that I should enable SSL on this blog.

Problem: GitHub Pages with a custom domain

This blog is hosted on GitHub Pages with a custom domain, which currently doesn’t support SSL out of the box. If you stick with a github.io domain SSL is not a problem.

Cloudflare to the rescure

I decided to take a deeper look at Cloudflare, which provides DNS, CDN and other “network”-related services. For the “main” service Cloudflare serves as the DNS for your domain and is like a proxy.

With this setup you have some nice benefits:

  • A free SSL certificate (AFAIK you can also use your own cert if you need)
  • A CDN cache
  • DDOS protection
  • “Analytics”

Be aware: This is just the free plan.

And everything is pretty easy to manage via the web interface.

Setup

The first step is to register at Cloudflare & setup your domain. After the first step you need to change the name server for your domain to Cloudflares server.

All your domain belonging can now be managed inside Cloudflare:

x

Setting up some rules

When your DNS changes are done (which can take a couple of hours) you might want to introduce some basic rules. I use these settings, which enforces HTTPS and Cloudflare cache:

x

Done… or nearly done.

Now we have done the “Cloudflare-part”. The next step is to make sure that everything on your page uses HTTPS instead of HTTP to avoid “mixed content”-errors.

Some notes from my own “migration”:

  • If you have Google Analytics - make sure you change the property-settings to the HTTPS URL
  • If you use Disqus you need to migrate your comments from the HTTP url to the HTTPS URL. There is a migrate tool available, which uses a CSV file.

Other solutions…

As far as I know there are other, similar, providers out there and of course you can host the page yourself.

Cloudflare is an easy solution if you are willing to hand of the DNS settings of your domain.

Hope this helps!

DbProviderFactories: Write database agnostic ADO.NET code

$
0
0

Recently I needed to write a module that needs to connect to a wide range of SQL-DBs, e.g. MySQL, MS SQL, Oracle etc.

Problem: Most providers will use their concret classes

If you look at the C# example on the MySQL dev page you will see the MsSql-Namespace and classes:

MySql.Data.MySqlClient.MySqlConnection conn;
string myConnectionString;

myConnectionString = "server=127.0.0.1;uid=root;" +
    "pwd=12345;database=test;";

try
{
    conn = new MySql.Data.MySqlClient.MySqlConnection();
    conn.ConnectionString = myConnectionString;
    conn.Open();
}
catch (MySql.Data.MySqlClient.MySqlException ex)
{
    MessageBox.Show(ex.Message);
}

The same classes will probably not work for a MS SQL database.

“Solution”: Use the DbProviderFactories

For example if you install the MySql-NuGet package you will also get this little enhancement to you app.config:

<system.data><DbProviderFactories><remove invariant="MySql.Data.MySqlClient" /><add name="MySQL Data Provider" invariant="MySql.Data.MySqlClient" description=".Net Framework Data Provider for MySQL" type="MySql.Data.MySqlClient.MySqlClientFactory, MySql.Data, Version=6.9.9.0, Culture=neutral, PublicKeyToken=c5687fc88969c44d" /></DbProviderFactories></system.data>

Now we can get a reference to the MySql client via the DbProviderFactories:

using System;
using System.Data;
using System.Data.Common;

namespace DbProviderFactoryStuff
{
    class Program
    {
        static void Main(string[] args)
        {
            try
            {
                Console.WriteLine("All registered DbProviderFactories:");
                var allFactoryClasses = DbProviderFactories.GetFactoryClasses();

                foreach (DataRow row in allFactoryClasses.Rows)
                {
                    Console.WriteLine(row[0] + ": " + row[2]);
                }

                Console.WriteLine();
                Console.WriteLine("Try to access a MySql DB:");

                DbProviderFactory dbf = DbProviderFactories.GetFactory("MySql.Data.MySqlClient");
                using (DbConnection dbcn = dbf.CreateConnection())
                {
                    dbcn.ConnectionString = "Server=localhost;Database=testdb;Uid=root;Pwd=Pass1word;";
                    dbcn.Open();
                    using (DbCommand dbcmd = dbcn.CreateCommand())
                    {
                        dbcmd.CommandType = CommandType.Text;
                        dbcmd.CommandText = "SHOW TABLES;";

                        // parameter...
                        //var foo = dbcmd.CreateParameter();
                        //foo.ParameterName = "...";
                        //foo.Value = "...";

                        using (DbDataReader dbrdr = dbcmd.ExecuteReader())
                        {
                            while (dbrdr.Read())
                            {
                                Console.WriteLine(dbrdr[0]);
                            }
                        }
                    }
                }
            }
            catch (Exception exc)
            {
                Console.WriteLine(exc.Message);
            }

            Console.ReadLine();

        }
    }
}

The most important line is this one:

DbProviderFactory dbf = DbProviderFactories.GetFactory("MySql.Data.MySqlClient");

Now with the DbProviderFactory from the MySql client we can access the MySql database without using any MySql-specific classes.

There are a couple of “in-built” db providers registered, like the MS SQL provider or ODBC stuff.

The above code will output something like this:

All registered DbProviderFactories:
Odbc Data Provider: System.Data.Odbc
OleDb Data Provider: System.Data.OleDb
OracleClient Data Provider: System.Data.OracleClient
SqlClient Data Provider: System.Data.SqlClient
Microsoft SQL Server Compact Data Provider 4.0: System.Data.SqlServerCe.4.0
MySQL Data Provider: MySql.Data.MySqlClient

Other solutions

Of course there are other solutions - some OR-Mapper like the EntityFramework have a provider model which might also work, but this one here is a pretty basic approach.

SQL Commands

The tricky bit here is that you need to make sure that your SQL commands work on your database - this is not a silver bullet, it just lets you connect and execute SQL commands to any ‘registered’ database.

The full demo code is also available on GitHub.

Hope this helps.

GitHub API: Create or update files

$
0
0

This blogpost covers a pretty basic GitHub topic: Creating and updating content on GitHub. Of course, there are many ways to do it - e.g. you could do the full Git-ceremony and it would work with all Git hosts, but in my case I just wanted to target the offical GitHub API.

Prerequisite: A GitHub User, Repo and Token

To use this code you will need write access to a GitHub repository and you should have a valid GitHub token.

Code

The most simple way to communicate with the GitHub API is by using the Octokit SDK (from GitHub).

Description: Inside the try-block we try to get the target file, if it is already committed in the repo the API will return the last commit SHA.

With this SHA it is possible to create a new commit to do the actual update.

If the file was not found, we create the file. I’m not a huge fan of this try/catch block, but didn’t found any other way to check if the file is comitted or not (please give me a hint if this is wrong ;))

using System;
using System.Collections.Generic;
using System.Linq;
using System.Text;
using System.Threading.Tasks;
using Octokit;

namespace CreateOrUpdateGitHubFile
{
    class Program
    {
        static void Main(string[] args)
        {
            Task.Run(async () =>
            {
                var ghClient = new GitHubClient(new ProductHeaderValue("Octokit-Test"));
                ghClient.Credentials = new Credentials("ACCESS-TOKEN");

                // github variables
                var owner = "OWNER";
                var repo = "REPO";
                var branch = "BRANCH";

                var targetFile = "_data/test.txt";

                try
                {
                    // try to get the file (and with the file the last commit sha)
                    var existingFile = await ghClient.Repository.Content.GetAllContentsByRef(owner, repo, targetFile, branch);

                    // update the file
                    var updateChangeSet = await ghClient.Repository.Content.UpdateFile(owner, repo, targetFile,
                       new UpdateFileRequest("API File update", "Hello Universe! " + DateTime.UtcNow, existingFile.First().Sha, branch));
                }
                catch (Octokit.NotFoundException)
                {
                    // if file is not found, create it
                    var createChangeSet = await ghClient.Repository.Content.CreateFile(owner,repo, targetFile, new CreateFileRequest("API File creation", "Hello Universe! " + DateTime.UtcNow, branch));
                }


            }).Wait();
        }
    }
}

The demo code is also available on GitHub.

Hope this helps.

Build & run xUnit tests with Cake

$
0
0

Last year I already covered the basic usage of Cake, which stands for “C# Make”. This time we want to build and run xUnit tests with Cake.

Scenario

x

Let’s say we have this project structure. Be aware that all our tests have the suffix “Tests” in the project name.

The files are organized like this, so we have all “Tests” in a “tests” folder and the actual code under “src”:

src/Sloader.Config
src/Sloader.Engine
src/Sloader.Hosts.Console
src/Sloader.Result
tests/Sloader.Config.Tests
tests/Sloader.Engine.Tests
tests/Sloader.Result.Tests
.gitignore
build.cake
build.ps1
LICENSE
Sloader.sln

Goal

Now we want to build all tests projects and run them with the xUnit console runner. Be aware that there are multiple ways of doing it, but I found this quite good.

build.cake

#tool "nuget:?package=xunit.runner.console"
//////////////////////////////////////////////////////////////////////
// ARGUMENTS
//////////////////////////////////////////////////////////////////////

var target = Argument("target", "Default");
var configuration = Argument("configuration", "Release");

//////////////////////////////////////////////////////////////////////
// PREPARATION
//////////////////////////////////////////////////////////////////////

// Define directories.
var artifactsDir  = Directory("./artifacts/");
var rootAbsoluteDir = MakeAbsolute(Directory("./")).FullPath;

//////////////////////////////////////////////////////////////////////
// TASKS
//////////////////////////////////////////////////////////////////////

Task("Clean")
    .Does(() =>
{
    CleanDirectory(artifactsDir);
});

Task("Restore-NuGet-Packages")
    .IsDependentOn("Clean")
    .Does(() =>
{
    NuGetRestore("./Sloader.sln");
});

Task("Build")
    .IsDependentOn("Restore-NuGet-Packages")
    .Does(() =>
{

     
});

Task("BuildTests")
    .IsDependentOn("Restore-NuGet-Packages")
    .Does(() =>
{
	var parsedSolution = ParseSolution("./Sloader.sln");

	foreach(var project in parsedSolution.Projects)
	{
	
	if(project.Name.EndsWith(".Tests"))
		{
        Information("Start Building Test: " + project.Name);

        MSBuild(project.Path, new MSBuildSettings()
                .SetConfiguration("Debug")
                .SetMSBuildPlatform(MSBuildPlatform.Automatic)
                .SetVerbosity(Verbosity.Minimal)
                .WithProperty("SolutionDir", @".\")
                .WithProperty("OutDir", rootAbsoluteDir + @"\artifacts\_tests\" + project.Name + @"\"));
		}
	
	}    

});

Task("RunTests")
    .IsDependentOn("BuildTests")
    .Does(() =>
{
    Information("Start Running Tests");
    XUnit2("./artifacts/_tests/**/*.Tests.dll");
});

//////////////////////////////////////////////////////////////////////
// TASK TARGETS
//////////////////////////////////////////////////////////////////////

Task("Default")
    .IsDependentOn("RunTests");

//////////////////////////////////////////////////////////////////////
// EXECUTION
//////////////////////////////////////////////////////////////////////

RunTarget(target);

Explanation: BuildTests?

The default target “Default” will trigger “RunTests”, which depend on “BuildTests”.

Inside the “BuildTests”-target we use a handy helper from Cake and we parse the .sln file and search all “Test”-projects. With that information we can build each test individually and don’t have to worry over “overlapping” files. The output of this build will be saved at “artifacts/_tests”.

Running xUnit

To run xUnit we have to include the runner at the top of the cake file:

#tool "nuget:?package=xunit.runner.console"

Now we can just invoke XUnit2 and scan for all Tests.dlls and we are done:

XUnit2("./artifacts/_tests/**/*.Tests.dll");

Result

The console output should make the flow pretty clear:

PS C:\Users\Robert\Documents\GitHub\Sloader> .\build.ps1
Preparing to run build script...
Running build script...
Analyzing build script...
Processing build script...
Installing tools...
Compiling build script...

========================================
Clean
========================================
Executing task: Clean
Creating directory C:/Users/Robert/Documents/GitHub/Sloader/artifacts
Finished executing task: Clean

========================================
Restore-NuGet-Packages
========================================
Executing task: Restore-NuGet-Packages
MSBuild auto-detection: using msbuild version '14.0' from 'C:\Program Files (x86)\MSBuild\14.0\bin'.
All packages listed in packages.config are already installed.
Finished executing task: Restore-NuGet-Packages

========================================
BuildTests
========================================
Executing task: BuildTests
Start Building Test: Sloader.Config.Tests
Microsoft (R) Build Engine version 14.0.25420.1
Copyright (C) Microsoft Corporation. All rights reserved.

  Sloader.Config -> C:\Users\Robert\Documents\GitHub\Sloader\artifacts\_tests\Sloader.Config.Tests\Sloader.Config.dll
  Sloader.Config.Tests -> C:\Users\Robert\Documents\GitHub\Sloader\artifacts\_tests\Sloader.Config.Tests\Sloader.Config
  .Tests.dll
Start Building Test: Sloader.Result.Tests
Microsoft (R) Build Engine version 14.0.25420.1
Copyright (C) Microsoft Corporation. All rights reserved.

  Sloader.Result -> C:\Users\Robert\Documents\GitHub\Sloader\artifacts\_tests\Sloader.Result.Tests\Sloader.Result.dll
  Sloader.Result.Tests -> C:\Users\Robert\Documents\GitHub\Sloader\artifacts\_tests\Sloader.Result.Tests\Sloader.Result
  .Tests.dll
Start Building Test: Sloader.Engine.Tests
Microsoft (R) Build Engine version 14.0.25420.1
Copyright (C) Microsoft Corporation. All rights reserved.

  Sloader.Config -> C:\Users\Robert\Documents\GitHub\Sloader\artifacts\_tests\Sloader.Engine.Tests\Sloader.Config.dll
  Sloader.Result -> C:\Users\Robert\Documents\GitHub\Sloader\artifacts\_tests\Sloader.Engine.Tests\Sloader.Result.dll
  Sloader.Engine -> C:\Users\Robert\Documents\GitHub\Sloader\artifacts\_tests\Sloader.Engine.Tests\Sloader.Engine.dll
  Sloader.Engine.Tests -> C:\Users\Robert\Documents\GitHub\Sloader\artifacts\_tests\Sloader.Engine.Tests\Sloader.Engine
  .Tests.dll
Finished executing task: BuildTests

========================================
RunTests
========================================
Executing task: RunTests
Start Running Tests
xUnit.net Console Runner (64-bit .NET 4.0.30319.42000)
  Discovering: Sloader.Config.Tests
  Discovered:  Sloader.Config.Tests
  Starting:    Sloader.Config.Tests
  Finished:    Sloader.Config.Tests
  Discovering: Sloader.Engine.Tests
  Discovered:  Sloader.Engine.Tests
  Starting:    Sloader.Engine.Tests
  Finished:    Sloader.Engine.Tests
  Discovering: Sloader.Result.Tests
  Discovered:  Sloader.Result.Tests
  Starting:    Sloader.Result.Tests
  Finished:    Sloader.Result.Tests
=== TEST EXECUTION SUMMARY ===
   Sloader.Config.Tests  Total: 22, Errors: 0, Failed: 0, Skipped: 0, Time: 0.342s
   Sloader.Engine.Tests  Total:  9, Errors: 0, Failed: 0, Skipped: 0, Time: 0.752s
   Sloader.Result.Tests  Total:  4, Errors: 0, Failed: 0, Skipped: 0, Time: 0.475s
                                --          -          -           -        ------
                   GRAND TOTAL: 35          0          0           0        1.569s (3.115s)
Finished executing task: RunTests

========================================
Default
========================================
Executing task: Default
Finished executing task: Default

Task                          Duration
--------------------------------------------------
Clean                         00:00:00.0155255
Restore-NuGet-Packages        00:00:00.5065704
BuildTests                    00:00:02.1590662
RunTests                      00:00:03.2443534
Default                       00:00:00.0061325
--------------------------------------------------
Total:                        00:00:05.9316480

Create NuGet packages with Cake

$
0
0

This blogpost is a follow up to these Cake (C# Make) related blogpost:

Scenario

x

Let’s say we have this project structure. The “Config”, “Result” and “Engine” projects contains a corresponding .nuspec, like this:

<?xml version="1.0"?><package><metadata><id>Sloader.Config</id><version>0.1.0</version><title>Sloader.Config</title><authors>Code Inside Team</authors><owners>Code Inside Team</owners><licenseUrl>https://github.com/Code-Inside/Sloader/blob/master/LICENSE</licenseUrl><projectUrl>https://github.com/Code-Inside/Sloader</projectUrl><requireLicenseAcceptance>false</requireLicenseAcceptance><description>Sloader Config</description><releaseNotes>
      ## Version 0.1 ##
      Init</releaseNotes><copyright>Copyright 2017</copyright><tags>Sloader</tags><dependencies/></metadata></package>

Nothing fancy - pretty normal NuGet stuff.

Goal

The goal is to create a NuGet package for each target project with Cake.

build.cake

The usage in Cake is pretty much the same as with the normal nuget.exe pack command The sample only shows the actual cake target - see the older blogposts for a more complete example:

Task("BuildPackages")
    .IsDependentOn("Restore-NuGet-Packages")
	.IsDependentOn("RunTests")
    .Does(() =>
{
    var nuGetPackSettings = new NuGetPackSettings
	{
		OutputDirectory = rootAbsoluteDir + @"\artifacts\",
		IncludeReferencedProjects = true,
		Properties = new Dictionary<string, string>
		{
			{ "Configuration", "Release" }
		}
	};

     NuGetPack("./src/Sloader.Config/Sloader.Config.csproj", nuGetPackSettings);
     NuGetPack("./src/Sloader.Result/Sloader.Result.csproj", nuGetPackSettings);
	 NuGetPack("./src/Sloader.Engine/Sloader.Engine.csproj", nuGetPackSettings);
});

Easy, right? The most interesting part here is the NuGetPack command.

Result

x

The console output should make the flow pretty clear:

PS C:\Users\Robert\Documents\GitHub\Sloader> .\build.ps1 -t BuildPackages
Preparing to run build script...
Running build script...
Analyzing build script...
Processing build script...
Installing tools...
Compiling build script...

========================================
Clean
========================================
Executing task: Clean
Cleaning directory C:/Users/Robert/Documents/GitHub/Sloader/artifacts
Finished executing task: Clean

========================================
Restore-NuGet-Packages
========================================
Executing task: Restore-NuGet-Packages
MSBuild auto-detection: using msbuild version '14.0' from 'C:\Program Files (x86)\MSBuild\14.0\bin'.
All packages listed in packages.config are already installed.
Finished executing task: Restore-NuGet-Packages

========================================
BuildTests
========================================
Executing task: BuildTests
Start Building Test: Sloader.Config.Tests
Microsoft (R) Build Engine version 14.0.25420.1
Copyright (C) Microsoft Corporation. All rights reserved.

  Sloader.Config -> C:\Users\Robert\Documents\GitHub\Sloader\artifacts\_tests\Sloader.Config.Tests\Sloader.Config.dll
  Sloader.Config.Tests -> C:\Users\Robert\Documents\GitHub\Sloader\artifacts\_tests\Sloader.Config.Tests\Sloader.Config
  .Tests.dll
Start Building Test: Sloader.Result.Tests
Microsoft (R) Build Engine version 14.0.25420.1
Copyright (C) Microsoft Corporation. All rights reserved.

  Sloader.Result -> C:\Users\Robert\Documents\GitHub\Sloader\artifacts\_tests\Sloader.Result.Tests\Sloader.Result.dll
  Sloader.Result.Tests -> C:\Users\Robert\Documents\GitHub\Sloader\artifacts\_tests\Sloader.Result.Tests\Sloader.Result
  .Tests.dll
Start Building Test: Sloader.Engine.Tests
Microsoft (R) Build Engine version 14.0.25420.1
Copyright (C) Microsoft Corporation. All rights reserved.

  Sloader.Config -> C:\Users\Robert\Documents\GitHub\Sloader\artifacts\_tests\Sloader.Engine.Tests\Sloader.Config.dll
  Sloader.Result -> C:\Users\Robert\Documents\GitHub\Sloader\artifacts\_tests\Sloader.Engine.Tests\Sloader.Result.dll
  Sloader.Engine -> C:\Users\Robert\Documents\GitHub\Sloader\artifacts\_tests\Sloader.Engine.Tests\Sloader.Engine.dll
  Sloader.Engine.Tests -> C:\Users\Robert\Documents\GitHub\Sloader\artifacts\_tests\Sloader.Engine.Tests\Sloader.Engine
  .Tests.dll
Finished executing task: BuildTests

========================================
RunTests
========================================
Executing task: RunTests
Start Running Tests
xUnit.net Console Runner (64-bit .NET 4.0.30319.42000)
  Discovering: Sloader.Config.Tests
  Discovered:  Sloader.Config.Tests
  Starting:    Sloader.Config.Tests
  Finished:    Sloader.Config.Tests
  Discovering: Sloader.Engine.Tests
  Discovered:  Sloader.Engine.Tests
  Starting:    Sloader.Engine.Tests
  Finished:    Sloader.Engine.Tests
  Discovering: Sloader.Result.Tests
  Discovered:  Sloader.Result.Tests
  Starting:    Sloader.Result.Tests
  Finished:    Sloader.Result.Tests
=== TEST EXECUTION SUMMARY ===
   Sloader.Config.Tests  Total: 22, Errors: 0, Failed: 0, Skipped: 0, Time: 0.839s
   Sloader.Engine.Tests  Total:  9, Errors: 0, Failed: 0, Skipped: 0, Time: 1.597s
   Sloader.Result.Tests  Total:  4, Errors: 0, Failed: 0, Skipped: 0, Time: 0.979s
                                --          -          -           -        ------
                   GRAND TOTAL: 35          0          0           0        3.415s (7.631s)
Finished executing task: RunTests

========================================
BuildPackages
========================================
Executing task: BuildPackages
Attempting to build package from 'Sloader.Config.csproj'.
MSBuild auto-detection: using msbuild version '14.0' from 'C:\Program Files (x86)\MSBuild\14.0\bin'.
Packing files from 'C:\Users\Robert\Documents\GitHub\Sloader\src\Sloader.Config\bin\Release'.
Using 'Sloader.Config.nuspec' for metadata.
Found packages.config. Using packages listed as dependencies
Successfully created package 'C:\Users\Robert\Documents\GitHub\Sloader\artifacts\Sloader.Config.0.1.0.nupkg'.
Attempting to build package from 'Sloader.Result.csproj'.
MSBuild auto-detection: using msbuild version '14.0' from 'C:\Program Files (x86)\MSBuild\14.0\bin'.
Packing files from 'C:\Users\Robert\Documents\GitHub\Sloader\src\Sloader.Result\bin\Release'.
Using 'Sloader.Result.nuspec' for metadata.
Found packages.config. Using packages listed as dependencies
Successfully created package 'C:\Users\Robert\Documents\GitHub\Sloader\artifacts\Sloader.Result.0.1.0.nupkg'.
Attempting to build package from 'Sloader.Engine.csproj'.
MSBuild auto-detection: using msbuild version '14.0' from 'C:\Program Files (x86)\MSBuild\14.0\bin'.
Packing files from 'C:\Users\Robert\Documents\GitHub\Sloader\src\Sloader.Engine\bin\Release'.
Using 'Sloader.Engine.nuspec' for metadata.
Found packages.config. Using packages listed as dependencies
Successfully created package 'C:\Users\Robert\Documents\GitHub\Sloader\artifacts\Sloader.Engine.0.1.0.nupkg'.
Finished executing task: BuildPackages

Task                          Duration
--------------------------------------------------
Clean                         00:00:00.1785159
Restore-NuGet-Packages        00:00:01.7378473
BuildTests                    00:00:08.0222787
RunTests                      00:00:08.2714563
BuildPackages                 00:00:08.1142780
--------------------------------------------------
Total:                        00:00:26.3243762

HowTo: Get User Information & Group Memberships from Active Directory via C#

$
0
0

I had to find a way to access all group memberships from a given Active Directory user. The problem here is, that groups may contain other groups and I needed a list of “all” applied group memberships - directly or indirectly.

The “fastest” solution (without querying each group) is to use the Token-Groups attribute, which already does this magic for us. This list should contain all applied groups.

The code would also allow to read any other AD property, e.g. the UPN or names etc.

Code

class Program
{
    static void Main(string[] args)
    {
        Console.WriteLine("ListAllGroupsViaTokenGroups:");

        List<string> result = new List<string>();

        try
        {
            result = ListAllGroupsViaTokenGroups("USERNAME", "DOMAIN");

            foreach (var group in result)
            {
                Console.WriteLine(group);
            }
        }
        catch (Exception exc)
        {
            Console.WriteLine(exc.Message);
        }

        Console.Read();
    }

  
    private static List<string> ListAllGroupsViaTokenGroups(string username, string domainName)
    {
        List<string> result = new List<string>();

        using (PrincipalContext domainContext = new PrincipalContext(ContextType.Domain, domainName))
        using (var searcher = new DirectorySearcher(new DirectoryEntry("LDAP://" + domainContext.Name)))
        {
            searcher.Filter = String.Format("(&(objectClass=user)(sAMAccountName={0}))", username);
            SearchResult sr = searcher.FindOne();

            DirectoryEntry user = sr.GetDirectoryEntry();

            // access to other user properties, via user.Properties["..."]

            user.RefreshCache(new string[] { "tokenGroups" });

            for (int i = 0; i < user.Properties["tokenGroups"].Count; i++)
            {
                SecurityIdentifier sid = new SecurityIdentifier((byte[])user.Properties["tokenGroups"][i], 0);
                NTAccount nt = (NTAccount)sid.Translate(typeof(NTAccount));

                result.Add(nt.Translate(typeof(NTAccount)).ToString() + " (" + sid + ")");
            }
        }

        return result;
    }

}

Hope this will help someone in the future.

Code @ GitHub


How we moved to Visual Studio 2017

$
0
0

x

Visual Studio 2017 has arrived and because of .NET Core and other goodies we wanted to switch fast to the newest release with our product OneOffixx.

Company & Product Environment

In our solution we use some VC++ projects (just for Office Development & building a .NET shim), Windows Installer XML & many C# projects for desktop or ASP.NET stuff.

Our builds are scripted with CAKE (see here for some more blogposts about [CAKE}(https://blog.codeinside.eu/2017/02/13/create-nuget-packages-with-cake/) and us the TFS vNext Build to orchestrate everything.

Step 1: Update the Development Workstations

The first step was to update my local dev enviroment and install Visual Studio 2017.

After the installation I started VS and opened our solution and because we have some WIX projects we needed the most recent Wix 3.11 toolset & the VS 2017 extension.

Step 2: VC++ update

We wanted a clean VS 2017 enviroment, so we decided to use the most recent VC++ 2017 runtime for our VC++ projects.

Step 3: project update

In the past we had some issues that MSBuild used the wrong MSBuild version. Maybe this step is not needed, but we pointed all .csproj files to the newest MSBuild ToolVersion 15.0.

Step 4: CAKE update

The last step was to update the CAKE.exe (which is controlled by us and not automatically downloaded via a build script) to 0.18.

Step 5: Minor build script changes

We needed to adjust some paths (e.g. to the Windows SDK for signtool.exe) and ensure that we are using the most recent MSBuild.exe.

Step 6: Create a new Build-Agent

We decided to create a new TFS Build-Agent and do the usual build agent installation, imported the code-cert and do some magic because of some C++/COM-magic (don’t ask… COM sucks.)

Recap

Besides the C++/COM/magic issue (see above) the migration was pretty easy and now our team works with Visual Studio 2017.

.NET CultureInfo in Windows 10

$
0
0

Did you know that the CultureInfo behavior with “unkown” cultures has changed with Windows 10?

I stumbled two times about this “problem” - so this is enough to write a short blogpost about it.

Demo Code

Lets use this democode:

    try
    {


        // ok on Win10, but not on pre Win10 if culture is not registred
        CultureInfo culture1 = new CultureInfo("foo");
        CultureInfo culture2 = new CultureInfo("xyz");
        CultureInfo culture3 = new CultureInfo("en-xy");

        // not ok even on Win 10 - exception
        CultureInfo culture4 = new CultureInfo("foox");

    }
    catch (Exception exc)
    {

    }

Windows 10 Case

If you run this code under Windows 10 it should fail for the “foox” culture, because it doesn’t seem to be a valid culture anyway.

“culture1”, “culture2”, “culture3” are all valid cultures in the Windows 10 world, but are resolved with Unkown Locale and LCID 4096.

I guess Windows will look for a 2 or 3 letter ISO style language, and “foox” doesn’t match this pattern.

Pre Windows 10 - e.g. running on Win Server 2012R2

If you would run the code unter Windows Server 2012 R2 it would fail on the first culture, because there is no “foo” culture registred.

“Problem”

The main “problem” is that this behavior could lead to some production issues if you develop with Windows 10 and the software is running on a Win 2012 server.

If you are managing “language” content in your application, be aware of this “limitation” on older Windows versions.

I discovered this problem while debugging our backend admin application. With this ASP.NET frontend it is possible to add or manage “localized” content and the dropdown for the possible language listed a whole bunch of very special, but “Unkown locale” cultures. So we needed to filter out all LCID 4096 cultures to ensure it would run under all Windows versions.

MSDN

This behavior is also documented on MSDN

The “Unkown culture” LCID 4096 was introduced with Windows Vista, but only with Windows 10 it will be “easy” usable within the .NET Framework.

Using Visual Studio Code & Team Foundation Version Control (TFVC)

$
0
0

Recently we start working on a Angular 4 app but all other parts of the application (e.g. the backend stuff) were stored in a good old TFVC based repository (inside a Team Foundation Server 2015) . Unfortunately building an Angular app with the full blown Visual Studio with the “default” Team Explorer workflow is not really practical. Another point for using Visual Studio Code was that most other online resources about learning Angular are using VS Code.

Our goal was to keep one repository, otherwise it would be harder to build and maintain.

First plan: Migrate to Git

First we tried to migrate our complete code base to Git with this generally awesome tool. Unfortunately for us it failed because of our quite large branch-tree. I tried it on a smaller code base and it worked without any issues.

At this point we needed another solution, because we wanted to get started on the actual application - so we tried to stick with TFVC.

Important: I always would recommend Git over TFVC, because it’s the way our industry is currently moving and at some point in the future we will do this too.

If you have similar problems like us: Read on!

Second plan: Get the TFVC plugin working in Visual Studio Code

Good news: Since April 2017 there is a Visual Studio Team Services extension for Visual Studio Code that also supports TFVC!

Requirements:

  • Team Foundation Server 2015 Update 2
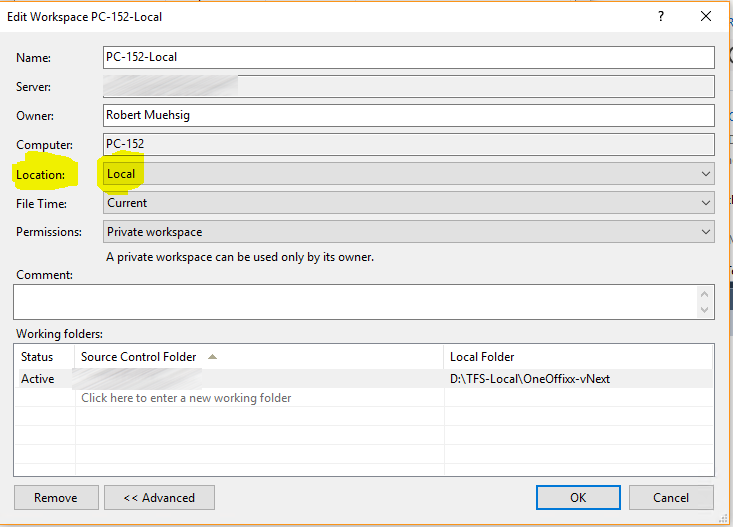
  • A existing local workspace configuration (at least currently, check this GitHub issue for further information)
  • The actual extension

Be aware: Local Workspaces!

Even I’m using TFS since a couple of years I just recently discovered that the TFS supports to different “workflows”. The “default” workflow always needs a connection to the TFS to checkout files etc. There is an alternative mode called “local” mode which seems to work like SVN. The difference is, that you can create a local file and the TFVC-client will “detect” those changes. Read more about the differences here.

x

Configuration

In our OnPremise TFS 2015 world I just needed only this configuration line in my user settings:

...
"tfvc.location": "C:\\Program Files (x86)\\Microsoft Visual Studio\\2017\\Professional\\Common7\\IDE\\CommonExtensions\\Microsoft\\TeamFoundation\\Team Explorer\\TF.exe",
...

Action!

Now when I point VS Code to my local workspace folder, the TFVC plugin will kick in and I see the familiar “change”-tracking:

x

It is not perfect, because I still need to setup and “manage” (e.g. get the history etc.) via the full blown Visual Studio, but with this setup it is “do-able”.

Non-cryptographic hash functions for .NET

$
0
0

Creating hashs is quite common to check if content X has changed without looking at the whole content of X. Git for example uses SHA1-hashs for each commit. SHA1 itself is a pretty old cryptographic hash function, but in the case of Git there might have been better alternatives available, because the “to-be-hashed” content is not crypto relevant - it’s just content marker. Well… in the case of Git the current standard is SHA1, which works, but a ‘better’ way would be to use non-cryptographic functions for non-crypto purposes.

Why you should not use crypto-hashs for non-crypto

I discovered this topic via a Twitter-conversation and it started with this Tweet:

Clemens Vasters then came and pointed out why it would be better to use non-crypto hash functions:

The reason makes perfect sense for me - next step: What other choice are available?

Non-cryptographic hash functions in .NET

If you are googleing around you will find many different hashing algorithm, like Jenkins or MurmurHash.

The good part is, that Brandon Dahler created .NET versions of the most well known algorithm and published them as NuGet packages.

The source and everything can be found on GitHub.

Lessons learned

If you want to hash something and it is not crypto relevant, then it would be better to look at one of those Data.HashFunctions - some a pretty crazy fast.

I’m not sure which one is ‘better’ - if you have some opinions please let me know. Brandon created a small description of each algorithm on the Data.HashFunction documentation page.

(my blogging backlog is quite long, so I needed 6 month to write this down ;) )

How to convert .crt & .key files to a .pfx

$
0
0

The requirements are simple: You will need the .cer with the corresponding .key file and need to download OpenSSL.

If you are using Windows, take the latest pre-compiled version for Windowsfrom this site

After the download run this command:

   openssl pkcs12 -export -out domain.name.pfx -inkey domain.name.key -in domain.name.crt

This will create a domain.name.pfx. As far as I remember you will be asked to set a password for the generated private .pfx part.

If you are confused with .pfx, .cer, .crt take a look at this nice description blogpost.

Hope this helps!

IdentityServer3 with WindowsAuthentication with ASP.NET WebApi & ASP.NET & WPF App

$
0
0

Please note: In my sample and in this blogpost I cover IdentityServer 3, because last year when I was working on the sample and our real implementation IdentityServer4 (a rewrite of IdentityServer 3) was in beta. My guess is, that most stuff should still apply even if you are using IdentityServer4, but I didn’t test it.

Also: I’m not a security expert - this might be all wrong, but currently this more or less works for us. If you find something strange, please let me know!

Overview

The sample consists of the following projects:

IdentityTest.IdServerHost: That’s the central IdentityServer in our solution. It contains all “clients” & “identityprovider” settings. IdentityTest.WinAuth: This is our Windows-Authentication provider. Because of the nature of WindowsAuth it needs to be an extra project. This needs to be hosted via IIS (or IIS Express) with Windows authentication enabled. The ASP.NET app acts as a bridge and will convert the Windows-Auth ticket into a SAML token, which can be integrated into the IdentityServer. It is more or less like a mini-ADFS.IdentityTest.WebApp: The WebApp itself can be used via browser and also hosts a WebApi. The WebApi is secured by the IdentityServer and secured pages will trigger the authentication against the IdServerHost. IdentityTest.WpfClient: With the WPFApp we want to get a AccessToken via a WebBrowser-Control from the IdServerHost and call the WebApi that is hosted and secured by the very same IdServerHost.

The IdentityServer team did a great job and have a large sample repository on GitHub.

x

I will talk about each part in my sample. Now lets beginn with…

The ‘IdServerHost’ Project

The IdentityServerHost is a plain ASP.NET application. To include the IdentityServer3 you need to add IdentityServer3 NuGet-Package.

The code is more or less identical with the Minimal-Sample from the IdentityServer3 team, but I disabled the SSL requirements for my demo.

Be aware: The IdentityServer use a certificate to sign the tokens, but this has nothing to do with the SSL certificate. This was a hard learning curve for me and IISExpress or something messed things up. In the end I disabled the SSL requirements for my development enviroment and could start to understand how each part is communicating with each other. The signing certificate in the sample is the sample .pfx file from the offical samples.

Remember: DO USE SSL IN PRODUCTION. Oh - and use the Cert-Store for the signing certificate as well!

Cert-Handling in IdentityServer in a nutshell: Do use SSL in production with a valid SSL certificate and setup another certificate that the IdentityServer will use to sign the tokens.

Besides the SSL stuff the most important stuff might be the client-registration and the identity-provider-registration.

The IdentityServer - as the auth-central - knows each ‘client’ and each ‘identity-provider’. Make sure all URLs are correct otherwise you will end up with errors. Even a slightly difference like ‘http://test.com/’ and ‘http://test.com’ (without the trailing slash at the end) will result in strange errors.

The ‘WinAuth’ Project

As already written this is our Windows-Authentication provider. Of course, it is only needed if you need WinAuth. If you want to use any other provider, like a Google/Microsoft/Facebook/Twitter-Login, then this is not needed. It is a bridge to the enterprise world and works quite well.

In the project I just reference the IdentityServer.WindowsAuthentication NuGet-Package and I’m nearly done. In the config I need to insert the URL of my IdentityServer host - those two parts needs to know each other and they will exchange public keys so they can trust each other.

For this trust-relationship the WinAuth provider has its own certificate. Actually you can reuse the same cert from the IdentityServerHost but I’m not sure if this is super secure, but it works.

The code and sample can also be found on the offical GitHub repo

The ‘WebApp’ Project

This project is a regular ASP.NET MVC project with WebApi 2 included. Nothing ASP.NET Core related, but the actual doing would be pretty similar.

On this page there are two ways to interact:

  • Via Browser
  • Via the WebApi

Browser Auth via OpenIdConnect Auth:

The NuGet Package Microsoft.Owin.Security.OpenIdConnect does the heavy lifting for us. In combination with the Microsoft.Owin.Security.Cookies NuGet package the authentication will kick in when someone access a [Authorize] marked Controller. The Cookie-Auth will preserve the identity information.

WebApi Auth:

To use the protected WebApi with any HTTP client the request must have a JWT bearer token. The implementation is super simple with this NuGet package IdentityServer3.AccessTokenValidation.

Setup of both auth options:

The setup is quite easy with the NuGet packages:

public class Startup
{
    public void Configuration(IAppBuilder app)
    {
        app.UseIdentityServerBearerTokenAuthentication(new IdentityServerBearerTokenAuthenticationOptions
        {
            Authority = ConfigurationManager.AppSettings["Security.Authority"],
            RequiredScopes = new[] { "openid" }
        });

        app.UseCookieAuthentication(new CookieAuthenticationOptions()
        {
            AuthenticationType = "cookies",
        });

        app.UseOpenIdConnectAuthentication(new OpenIdConnectAuthenticationOptions()
        {
            AuthenticationType = "oidc",
            SignInAsAuthenticationType = "cookies",
            Authority = ConfigurationManager.AppSettings["Security.Authority"],
            ClientId = "webapp",
            RedirectUri = ConfigurationManager.AppSettings["Security.RedirectUri"],
            ResponseType = "id_token",
            Scope = "openid all_claims"
        });
    }
}

It is important to use the correct “clientIds” and URLs as configured in the IdentityServer, otherwise you will receive errors from the IdentityServer.

The ‘WpfClient’ Project

This project is a small version of the original WpfOidcClientPop sample. The idea behind this sample is that a user can sign in with his regular account.

Auth via browser:

Instead of a Loginname/Password form rendered from the WPF app itself the authentication is delegated to a embedded browser control. Another option is to delegate it to the “real” installed browser, but this is another topic. The Microsoft Account login in Visual Studio is made that way or think of any popular “Facebook-Login” mobile app on your phone: The auth-process is basically a typical Web signin.

This scenario is also convered as a offical OpenID Connect specification. In WPF your best and easiest choice would be the IdentityModel.OidcClient2 package.

Auth “Steps”

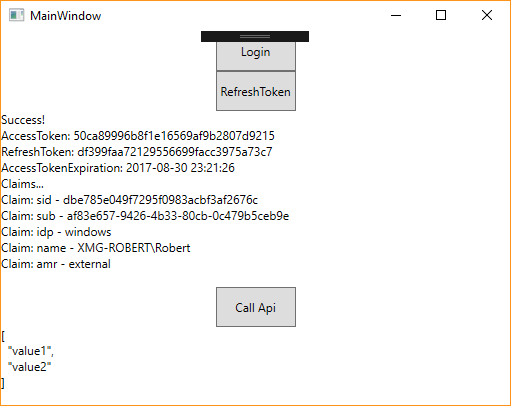
The first step in the sample project is to aquire a access token from the IdentityServer. The actual implementation is thanks to the OidcClient quite simple as you can see here.

The OidcClient will try to get the needed accesstoken in the silent mode first (this can be configured) and if this fails a embedded browser will be rendered and the user needs to sign in there. After a successful signin you will get a accesstoken and refreshtoken.

Sample note: If you try this on your local machine the auth-window should not appear, because it will just do a “silent” windows auth login.

Multiple IdentityProvider: If you configure multiple identity provider, a simple designed identity selection will appear in the embedded browser window.

After the intial sign in you can regenerate new accesstokens via the refreshtoken.

With the accesstoken we craft a HTTP request to our beloved WebApi and write use the token in the authorization header and finally we are done.

Things to consider:

It is important to setup the OIDCClient the correct way with the values that you specified in your IdentityServer configuration. Also you should read about OpenID scopes because they are linked to the actual result. Without the correct scope you might not get a accesstoken or refreshtoken.

x

Summary

With these 4 projects we have a quite mighty solution created. We can still use Windows Auth for enterprise needs, we can protect WebApis and WebPages via a central Identity solution and also use “native” apps. The IdentityServer itself has a wide range of configuration possibilities.

If you start doing something in this direction I would point you to the IdentityServer4, because new is always better, right?

GitHub Link

The full sample can be found on GitHub.

Hope this helps.

dnSpy - a OSS IL decompiler and debugger

$
0
0

My colleague was fighting against a nasty bug, that only occures on one machine. Unfortunatly this machine was not a development machine (no VS installed) and we didn’t want to mess with VS remote debugging, because (AFAIK) his would need some additional setup but we were not allowed to install anything.

Soooo… he searched around and found this:

dnSpy - a .NET assembly editor, decompiler, and debugger

The title contains the major points. It is a decompiler, like IL Spy, but addionaly it has a super nice debugger and it looks like a small Visual Studio.

Some pictures how I just decompile Paint.NET and attach the debugger:

x

x

x

I think this is just awesome and it helped my colleague alot.

OSS & Free

The complete project is hosted on GitHub and is “Open Source (GPLv3) and Free Forever”

Checkout the GitHub project page - it contains a lot more information. The tool itself was just 18mb zipped and can be run everywhere.

Its a decompiler!

And just to make sure you keep this in mind: The debugging works with every .NET application (at least in theory), because it decompiles the .NET IL language to C#. It is not a 1:1 debugger, but maybe it can help you.

Check out the dnSpy GitHub Site


Introducing Electron.NET - building Electron Desktop Apps with ASP.NET Core

$
0
0

x

The last couple of weeks I worked with my buddy Gregor Biswanger on a new project called Electron.NET.

As you might already guess: It is some sort of bridge between the well known Electron and .NET.

If you don’t know what Electron is: It helps to build desktop apps written in HTML/CSS/Javascript

The idea

Gregor asked me a while ago if it is possible to build desktop apps with ASP.NET Core (or .NET Core in general) and - indeed - there are some ideas how to make it, but unfortunatly there is no “official” UI stack available for .NET Core. After a little chat we agreed that the best bet would be to use Electron as is and somehow “embed” ASP.NET Core in it.

I went to bed, but Gregor was keen on to build a prototyp and he did it: He was able to launch the ASP.NET Core application inside the electron app and invoke some Electron APIs from the .NET World.

First steps done, yeah! In the following weeks Gregor was able to “bridge” most Electron APIs and I could help him with the tooling via our dotnet-extension.

Overview

The basic functionality is not too complex:

  • We ship a “standard” (more or less blank) Electron app
  • Inside the Electron part two free ports are searched:
    • The first free port is used inside the Electron app itself
    • The second free port is used for the ASP.NET Core process
  • The app launches the .NET Core process with ASP.NET Core port (e.g. localhost:8002) and injects the first port as parameter
  • Now we have a Socket.IO based linked between the launched ASP.NET Core app and the Electron app itself - this is our communication bridge!

At this point you can write your Standard ASP.NET Core Code and can communicate via our Electron.API wrapper to the Electron app.

Gregor did a fabulous blogpost with a great example.

Intersted? This way!

If you are interested, maybe take a look at the ElectronNET-Org on GitHub. The complete code is OSS and there are two demo repositories.

No way - this is a stupid idea!

The last days were quite intersting. We got some nice comments about the project and (of course) there were some critics.

As far as I know the current “this is bad, because… “-list is like this:

  • We still need node.js and Electron.NET is just a wrapper around Electron: Yes, it is.
  • Perf will suck: Well… to be honest - the current startup time does really suck, because we not only launch the Electron stuff, but we also need to start the .NET Core based WebHost - maybe we will find a solution
  • Starting a web server inside the app is bad on multiple levels because of security and perf: I agree, there are some ideas how to fix it, but this might take some time.

There are lots of issues open and the project is pretty young, maybe we will find a solution for the above problems, maybe not.

Final thoughts

The interesting point for me is, that we seem to hit a nerf with this project: There is demand to write X-Plat desktop applications.

We are looking for feedback - please share your opinion on the ElectronNET-GitHub-Repo or try it out :)

Desktop is dead, long live the desktop!

Signing with SignTool.exe - don't forget the timestamp!

$
0
0

If you currently not touching signtool.exe at all or have nothing to do with “signing” you can just pass this blogpost, because this is more or less a stupid “Today I learned I did a mistake”-blogpost.

Signing?

We use authenticode code signing for our software just to prove that the installer is from us and “safe to use”, otherwise you might see a big warning from Windows that the application is from an “unknown publisher”:

x

To avoid this, you need a code signing certificate and need to sign your program (e.g. the installer and the .exe)

The problem…

We are doing this code signing since the first version of our application. Last year we needed to buy a new certificate because the first code signing certificate was getting stale. Sadly, after the first certificate was expired we got a call from a customer who recently tried to install our software and the installer was signed with the “old” certificate. The result was the big “Warning”-screen from above.

I checked the file and compared it to other installers (with expired certificates) and noticed that our signature didn’t had a timestamp:

x

The solution

I stumbled upon this great blogpost about authenticode code signing and the timestamp was indeed important:

When signing your code, you have the opportunity to timestamp your code; you should definitely do this. Time-stamping adds a cryptographically-verifiable timestamp to your signature, proving when the code was signed. If you do not timestamp your code, the signature will be treated as invalid upon the expiration of your digital certificate. Since it would probably be cumbersome to re-sign every package you’ve shipped when your certificate expires, you should take advantage of time-stamping. A signed, time-stamped package remains valid indefinitely, so long as the timestamp marks the package as having been signed during the validity period of the certificate.

Time-stamping itself is pretty easy and only one parameter was missing all the time… now we invoke Signtool.exe like this and we have a digitial signature with a timestamp:

signtool.exe sign /tr http://timestamp.digicert.com /sm /n "Subject..." /d "Description..." file.msi

Remarks:

  • Our code signing cert is from Digicert and they provide the timestamp URL.
  • SignTool.exe is part of the Windows SDK and currently is in the ClickOnce folder (e.g. C:\Program Files (x86)\Microsoft SDKs\ClickOnce\SignTool)

Hope this helps.

First steps to enable login with Microsoft or Azure AD account for your application

$
0
0

It is quite common these days to “Login with Facebook/Google/Twitter”. Of course Microsoft has something similar. If I remember it correctly the first version was called “Live SDK” with the possibility to login with your personal Microsoft Account.

With Office 365 and the introduction of Azure AD we were able to build an application to sign-in with a personal account via the “Live SDK” and organizational account via “Azure AD”.

However: The developer and end user UX was far way from perfect, because the implementation for each account type was different and for the user it was not clear which one to choose.

Microsoft Graph & Azure AD 2.0

Fast forward to the right way: Use the Azure AD 2.0 endpoint.

Step 1: Register your own application

You just need to register your own application in the Application Registration Portal. The registration itself is a typical OAuth-application registration and you get a ClientId and Secret for your application.

Warning: If you have “older” LiveSDK application registered under your account you need to choose Converged Applications. LiveSDK applications are more or less legacy and I wouldn’t use them anymore.

Step 2: Choose a platform

Now you need to choose your application platform. If you want to enable the sign-in stuff for your web application you need to choose “Web” and insert the redirect URL. After the sign-in process the token will be send to this URL.

x

Step 3: Choose Microsoft Graph Permissions (Scopes)

In the last step you need to select what permissions your applications need. A first-time user needs to accept your permission requests. The “Microsoft Graph” is a collection of APIs that works for personal Microsoft accounts and Office 365/Azure AD account.

x

The “User.Read” permission is the most basic permission that would allow to sign-in, but if you want to access other APIs as well you just need to add those permissions to your application:

x

Finish

After the application registration and the selection of the needed permissions you are ready to go. You can even generate a sample application on the portal. For a quick start check this page

Microsoft Graph Explorer

x

As I already said: The Graph is the center of Microsofts Cloud Data and the easiest way to play around with the different scopes and possibilities is with the Microsoft Graph Explorer.

Hope this helps.

WCF Global Fault Contracts

$
0
0

If you are still using WCF you might have stumbled upon this problem: WCF allows you to throw certain Faults in your operation, but unfortunatly it is a bit awkward to configure if you want “Global Fault Contracts”. With this solution here it should be pretty easy to get “Global Faults”:

Define the Fault on the Server Side:

Let’s say we want to throw the following fault in all our operations:

[DataContract]
public class FoobarFault
{

}

Register the Fault

The tricky part in WCF is to “configure” WCF that it will populate the fault. You can do this manually via the [FaultContract-Attribute] on each operation, but if you are looking for a global WCF fault configuration, you need to apply it as a contract behavior like this:

[AttributeUsage(AttributeTargets.Interface, AllowMultiple = false, Inherited = true)]publicclassGlobalFaultsAttribute:Attribute,IContractBehavior{// this is a list of our global fault detail classes.staticType[]Faults=newType[]{typeof(FoobarFault),};publicvoidAddBindingParameters(ContractDescriptioncontractDescription,ServiceEndpointendpoint,BindingParameterCollectionbindingParameters){}publicvoidApplyClientBehavior(ContractDescriptioncontractDescription,ServiceEndpointendpoint,ClientRuntimeclientRuntime){}publicvoidApplyDispatchBehavior(ContractDescriptioncontractDescription,ServiceEndpointendpoint,DispatchRuntimedispatchRuntime){}publicvoidValidate(ContractDescriptioncontractDescription,ServiceEndpointendpoint){foreach(OperationDescriptionopincontractDescription.Operations){foreach(TypefaultinFaults){op.Faults.Add(MakeFault(fault));}}}privateFaultDescriptionMakeFault(TypedetailType){stringaction=detailType.Name;DescriptionAttributedescription=(DescriptionAttribute)Attribute.GetCustomAttribute(detailType,typeof(DescriptionAttribute));if(description!=null)action=description.Description;FaultDescriptionfd=newFaultDescription(action);fd.DetailType=detailType;fd.Name=detailType.Name;returnfd;}}

Now we can apply this ContractBehavior in the Service just like this:

[ServiceBehavior(...), GlobalFaults]
public class FoobarService
...

To use our Fault, just throw it as a FaultException:

throw new FaultException<FoobarFault>(new FoobarFault(), "Foobar happend!");

Client Side

On the client side you should now be able to catch this exception just like this:

try{...}catch(Exceptionex){if(exisFaultExceptionfaultException){if(faultException.Action==nameof(FoobarFault)){...}}}

Hope this helps!

(This old topic was still on my “To-blog” list, even if WCF is quite old, maybe someone is looking for something like this)

Viewing all 357 articles
Browse latest View live