Quantcast
Channel: Code Inside Blog
Viewing all 357 articles
Browse latest View live

Windows Fall Creators Update 1709 and Docker Windows Containers

$
0
0

Who shrunk my Windows Docker image?

We started to package our ASP.NET/WCF/Full-.NET Framework based web app into Windows Containers, which we then publish to the Docker Hub.

Someday we discovered that one of our new build machines produced Windows Containers only half the size: Instead of a 8GB Docker image we only got a 4GB Docker image. Yeah, right?

The problem with Windows Server 2016

I was able to run the 4GB Docker image on my development machine without any problems and I thought that this is maybe a great new feature (it is… but!). My boss then told my that he was unable to run this on our Windows Server 2016.

The issue: Windows 10 Fall Creators Update

After some googling around we found the problem: Our build machine was a Windows 10 OS with the most recent “Fall Creators Update” (v1709) (which was a bad idea from the beginning, because if you want to run Docker as a Service you will need a Windows Server!). The older build machine, which produced the much larger Docker image, was running with the normal Creators Update from March(?).

Docker resolves the base images for Windows like this:

Compatibility issue

As it turns out: You can’t run the smaller Docker images on Windows Server 2016. Currently it is only possible to do it via the preview “Windows Server, version 1709” or on the Windows 10 Client OS.

Oh… and the new Windows Server is not a simple update to Windows Server 2016, instead it is a completely new version. Thanks Microsoft.

Workaround

Because we need to run our images on Windows Server 2016, we just target the LTSC2016 base image, which will produce 8GB Docker images (which sucks, but works for us).

This post could also be in the RTFM-category, because there are some notes on the Docker page available, but it was quite easy to overread ;)


Did you know that you can run ASP.NET Core 2 under the full framework?

$
0
0

This post might be obvious for some, but I really struggled a couple of month ago and I’m not sure if a Visual Studio Update fixed the problem for me or if I was just blind…

The default way: Running .NET Core

AFAIK the framework dropdown in the normal Visual Studio project template selector (the first window) is not important and doesn’t matter anyway for .NET Core related projects.

When you create a new ASP.NET Core application you will see something like this:

x

The important part for the framework selection can be found in the upper left corner: .NET Core is currently selected.

When you continue your .csproj file should show something like this:

<ProjectSdk="Microsoft.NET.Sdk.Web"><PropertyGroup><TargetFramework>netcoreapp2.0</TargetFramework></PropertyGroup><ItemGroup><PackageReferenceInclude="Microsoft.AspNetCore.All"Version="2.0.5"/></ItemGroup><ItemGroup><DotNetCliToolReferenceInclude="Microsoft.VisualStudio.Web.CodeGeneration.Tools"Version="2.0.2"/></ItemGroup></Project>

Running the full framework:

I had some trouble to find the option, but it’s really obvious. You just have to adjust the selected framework in the second window:

x

After that your .csproj has the needed configuration.

<ProjectSdk="Microsoft.NET.Sdk.Web"><PropertyGroup><TargetFramework>net461</TargetFramework></PropertyGroup><ItemGroup><PackageReferenceInclude="Microsoft.AspNetCore"Version="2.0.1"/><PackageReferenceInclude="Microsoft.AspNetCore.Mvc"Version="2.0.2"/><PackageReferenceInclude="Microsoft.AspNetCore.Mvc.Razor.ViewCompilation"Version="2.0.2"PrivateAssets="All"/><PackageReferenceInclude="Microsoft.AspNetCore.StaticFiles"Version="2.0.1"/><PackageReferenceInclude="Microsoft.VisualStudio.Web.BrowserLink"Version="2.0.1"/></ItemGroup><ItemGroup><DotNetCliToolReferenceInclude="Microsoft.VisualStudio.Web.CodeGeneration.Tools"Version="2.0.2"/></ItemGroup></Project>

The biggest change: When you run under the full .NET Framework you can’t use the “All”-Meta-Package, because with version 2.0 the package is still .NET Core only, and need to point to each package manually.

Easy, right?

Be aware: Maybe with ASP.NET Core 2.1 the Meta-Package story with the full framework might get easier.

I’m still not sure why I struggled to find this option… Hope this helps!

.editorconfig: Sharing a common coding style in a team

$
0
0

Sharing Coding Styles & Conventions

In a team it is really important to set coding conventions and to use a specific coding style, because it helps to maintain the code - a lot. Of course has each developer his own “style”, but some rules should be set, otherwise it will end in a mess.

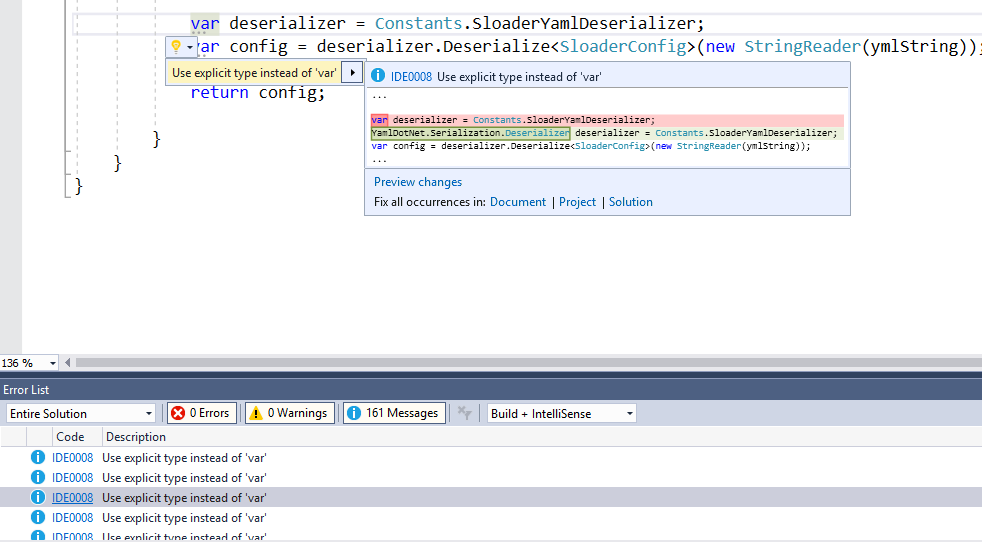
Typical examples for such rules are “Should I use var or not?” or “Are _ still OK for private fields?”. Those questions shouldn’t be answered in a Wiki - it should be part of the daily developer life and should show up in your IDE!

Be aware that coding conventions are highly debated. In our team it was important to set a commpon ruleset, even if not everyone is 100% happy with each setting.

Embrace & enforce the conventions

In the past this was the most “difficult” aspect: How do we enforce these rules?

Rules in a Wiki are not really helpful, because if you are in your favorite IDE you might not notice rule violations.

Stylecop was once a thing in the Visual Studio World, but I’m not sure if this is still alive.

Resharper, a pretty useful Visual Studio plugin, comes with it’s own code convention sharing file, but you will need Resharper enforce and embrace the conventions.

Introducing: .editorconfig

Last year Microsoft decided to support the .EditorConfig file format in Visual Studio.

The .editorconfig defines a set of common coding styles (think of tabs or spaces) in a very simple format. Different text ediotors and IDEs support this file, which makes it a good choice if you are using multiple IDEs or working with different setups.

Additionally Microsoft added a couple of C# related options for the editorconfig file to support the C# language features.

Each rule can be marked as “Information”, “Warning” or “Error” - which will light up in your IDE.

Sample

This was a tough choice, but I ended up with the .editorconfig of the CoreCLR. It is more or less the “normal” .NET style guide. I’m not sure if I love the the “var”-setting and the “static private field naming (like s_foobar)”, but I can life with them and it was for us a good starting point (and still is).

The .editorconfig file can be saved at the same level as the .sln file, but you could also use multiple .editorconfig files based on the folder structure. Visual Studio should detect the file and see the rules.

Benefits

When everything is ready Visual Studio should populate the results and show does nice light blub:

x

Be aware that I have Resharper installed and Resharper has it’s own ruleset, which might be in conflict with the .editorconfig setting. You need to adjust those settings in Resharper. I’m still not 100% sure how good the .editorconfig support is, sometimes I need to overwrite the backed in Resharper settings and sometimes it just works. Maybe this page gives a hint.

Getting started?

Just search for a .editorconfig file (or use something from the Microsoft GitHub repositories) and play with the settings. The setup is easy and it’s just a small text file right next to our code. Read more about the customization here.

Related topic

If you are looking for a more powerful option to embrace coding standards, you might want to take a look at Roslyn Analysers:

With live, project-based code analyzers in Visual Studio, API authors can ship domain-specific code analysis as part of their NuGet packages. Because these analyzers are powered by the .NET Compiler Platform (code-named “Roslyn”), they can produce warnings in your code as you type even before you’ve finished the line (no more waiting to build your code to discover issues). Analyzers can also surface an automatic code fix through the Visual Studio light bulb prompt to let you clean up your code immediately

CultureInfo.GetCultureInfo() vs. new CultureInfo() - what's the difference?

$
0
0

The problem

The problem started with a simple code:

double.TryParse("1'000", NumberStyles.Any, culture, out _)

Be aware that the given culture was “DE-CH” and the Swiss use the ‘ for the separator for numbers.

Unfortunately the Swiss authorities have abandoned the ‘ for currencies, but it is widly used in the industrie and such a number should be parsed or displayed.

Now Microsoft steps in and they use a very similar char in the “DE-CH” region setting:

  • The backed in char to separate numbers: ‘ (CharCode: 8217)
  • The obvious choice would be: ‘ (CharCode: 39)

The result of this configuration hell:

If you don’t change the region settings in Windows you can’t parse doubles with this fancy group separator.

Stranger things:

My work machine is running the EN-US version of Windows and my tests where failing because of this madness, but it was even stranger: Some other tests (quite similar to what I did) were OK on our company DE-CH machines.

But… why?

After some crazy time I discovered that our company DE-CH machines (and the machines from our customer) were using the “sane” group separator, but my code still didn’t work as expected.

Root cause

The root problem (besides the stupid char choice) was this: I used the “wrong” method to get the “DE-CH” culture in my code.

Let’s try out this demo code:

classProgram{staticvoidMain(string[]args){varculture=newCultureInfo("de-CH");Console.WriteLine("de-CH Group Separator");Console.WriteLine($"{culture.NumberFormat.CurrencyGroupSeparator} - CharCode: {(int)char.Parse(culture.NumberFormat.CurrencyGroupSeparator)}");Console.WriteLine($"{culture.NumberFormat.NumberGroupSeparator} - CharCode: {(int)char.Parse(culture.NumberFormat.NumberGroupSeparator)}");varcultureFromFramework=CultureInfo.GetCultureInfo("de-CH");Console.WriteLine("de-CH Group Separator from Framework");Console.WriteLine($"{cultureFromFramework.NumberFormat.CurrencyGroupSeparator} - CharCode: {(int)char.Parse(cultureFromFramework.NumberFormat.CurrencyGroupSeparator)}");Console.WriteLine($"{cultureFromFramework.NumberFormat.NumberGroupSeparator} - CharCode: {(int)char.Parse(cultureFromFramework.NumberFormat.NumberGroupSeparator)}");}}

The result should be something like this:

de-CH Group Separator
' - CharCode: 8217
' - CharCode: 8217
de-CH Group Separator from Framework
' - CharCode: 8217
' - CharCode: 8217

Now change the region setting for de-CH and see what happens:

x

de-CH Group Separator
' - CharCode: 8217
X - CharCode: 88
de-CH Group Separator from Framework
' - CharCode: 8217
' - CharCode: 8217

Only the CultureInfo from the first instance got the change!

Modified vs. read-only

The problem can be summerized with: RTFM!

From the MSDN for GetCultureInfo: Retrieves a cached, read-only instance of a culture.

The “new CultureInfo” constructor will pick up the changed settings from Windows.

TL;DR:

  • CultureInfo.GetCultureInfo will return a “backed in” culture, which might be very fast, but doesn’t respect user changes.
  • If you need to use the modified values from windows: Use the normal CultureInfo constructor.

Hope this helps!

DbProviderFactories & ODP.NET: When even Oracle can be tamed

$
0
0

Oracle and .NET: Tales from the dark ages

Each time when I tried to load data from an Oracle database it was a pretty terrible experience.

I remember that I struggle to find the right Oracle driver and even when everything was installed the strange TNS ora config file popped up and nothing worked.

It can be simple…

2 weeks ago I had the pleasure to load some data from a Oracle database and discovered something beautiful: Actually, I can be pretty simple today.

The way to success:

1. Just ignore the System.Data.OracleClient-Namespace

The implementation is pretty old and if you go this route you will end up with the terrible “Oracle driver/tns.ora”-chaos mentioned above.

2. Use the Oracle.ManagedDataAccess:

Just install the official NuGet package and you are done. The single .dll contains all the bits to connect to an Oracle database. No driver installation additional software is needed. Yay!

The NuGet package will add some config entries in your web.config or app.config. I will cover this in the section below.

3. Use sane ConnectionStrings:

Instead of the wild Oracle TNS config stuff, just use (a more or less) sane ConnectionString.

You can either just use the same configuration you would normally do in the TNS file, like this:

Data Source=(DESCRIPTION=(ADDRESS_LIST=(ADDRESS=(PROTOCOL=TCP)(HOST=MyHost)(PORT=MyPort)))(CONNECT_DATA=(SERVER=DEDICATED)(SERVICE_NAME=MyOracleSID)));User Id=myUsername;Password=myPassword;

Or use the even simpler “easy connect name schema” like this:

Data Source=username/password@myserver//instancename;

DbProviderFactories & ODP.NET

As I mentioned earlier after the installation your web or app.config might look different.

The most interesting addition is the registration in the DbProviderFactories-section:

...<system.data><DbProviderFactories><removeinvariant="Oracle.ManagedDataAccess.Client"/><addname="ODP.NET, Managed Driver"invariant="Oracle.ManagedDataAccess.Client"description="Oracle Data Provider for .NET, Managed Driver"type="Oracle.ManagedDataAccess.Client.OracleClientFactory, Oracle.ManagedDataAccess, Version=4.122.1.0, Culture=neutral, PublicKeyToken=89b483f429c47342"/></DbProviderFactories></system.data>
...

I covered this topic a while ago in an older blogpost, but to keep it simple: It also works for Oracle!

privatestaticvoidOracleTest(){stringconstr="Data Source=localhost;User Id=...;Password=...;";DbProviderFactoryfactory=DbProviderFactories.GetFactory("Oracle.ManagedDataAccess.Client");using(DbConnectionconn=factory.CreateConnection()){try{conn.ConnectionString=constr;conn.Open();using(DbCommanddbcmd=conn.CreateCommand()){dbcmd.CommandType=CommandType.Text;dbcmd.CommandText="select name, address from contacts WHERE UPPER(name) Like UPPER('%' || :name || '%') ";vardbParam=dbcmd.CreateParameter();// prefix with : possible, but @ will be result in an errordbParam.ParameterName="name";dbParam.Value="foobar";dbcmd.Parameters.Add(dbParam);using(DbDataReaderdbrdr=dbcmd.ExecuteReader()){while(dbrdr.Read()){Console.WriteLine(dbrdr[0]);}}}}catch(Exceptionex){Console.WriteLine(ex.Message);Console.WriteLine(ex.StackTrace);}}}

MSSQL, MySql and Oracle - via DbProviderFactories

The above code is a snippet from my larger sample demo covering MSSQL, MySQL and Oracle. If you are interested just check this demo on GitHub.

Each SQL-Syntax teats parameter a bit different, so make sure you use the correct syntax for your target database.

Bottom line

Accessing a Oracle database from .NET doesn’t need to be a pain nowadays.

Be aware that the ODP.NET provider might surface higher level APIs to work with Oracle databases. The dbProviderfactory-approach helped us for our simple “just load some data”-scenario.

Hope this helps.

Easy way to copy a SQL database with Microsoft SQL Server Management Studio (SSMS)

$
0
0

How to copy a database on the same SQL server

The scenario is pretty simple: We just want a copy of our database, with all the data and the complete scheme and permissions.

1. step: Make a back up of your source database

Click on the desired database and choose “Backup” under tasks.

x

2. step: Use copy only or use a full backup

In the dialog you may choose “copy-only” backup. With this option the regular backup job will not be confused.

x

3. step: Use “Restore” to create a new database

This is the most important point here: To avoid fighting against database-file namings use the “restore” option. Don’t create a database manually - this is part of the restore operation.

x

4. step: Choose the copy-only backup and choose a new name

In this dialog you can name the “copy” database and choose the copy-only backup from the source database.

x

Now click ok and you are done!

Behind the scenes

This restore operation works way better to copy a database then to overwrite an existing database, because the restore operation will adjust the filenames.

x

Further information

I’m not a DBA, but when I follow these steps I normally have nothing to worry about if I want a 1:1 copy of a database. This can also be scripted, but then you may need to worry about filenames.

This stackoverflow question is full of great answers!

Hope this helps!

Improving Code

$
0
0

Improving code

TL;DR;

**Things I learned: **

  • long one-liners are hard to read and understand
  • split up your code into small, easy to understand functions
  • less “plumping” (read infrastructure code) is the better
  • get indentation right
  • correct, concise, fast

**Why should I bother? **

Readable code is:

  • easier to debug
  • fast to fix
  • easier to maintain

The problem

Recently I wanted to implement an algorithm for a project we are doing. The goal was to create a so-called “Balanced Latin Square”, we used it to prevent ordering effects in user studies. You can find a little bit of background here and a nice description of the algorithm here.

It’s fairly simple, although it is not obvious how it works, just by looking at the code. The function takes an integer as an argument and returns a Balanced Latin Square. For example, a “4” would return this matrix of numbers:

1 2 4 3 
2 3 1 4 
3 4 2 1 
4 1 3 2 

And there is a little twist if your number is odd, then you need to reverse every row and append them to your result.

After I created the my implementation, I had an idea on how to simplify it. At least I thought its simpler ;)

First attempt - Loops

Based on the description and a Python version of that algorithm, I created a classical (read “imperative”) implementation.

So this is the C# Code:

publicList<List<String>>BalancedLatinSquares(intn){varresult=newList<List<String>>(){};for(inti=0;i<n;i++){varrow=newList<String>();for(intj=0;j<n;j++){varcell=((j%2==1?j/2+1:n-j/2)+i)%n;cell++;// start counting from 1row.Add(cell.ToString());}result.Add(row);}if(n%2==1){varreversedResult=result.Select(x=>x.AsQueryable().Reverse().ToList()).ToList();result.AddRange(reversedResult);}returnresult;}

I also wrote some simple unit tests to ensure this works. But in the end, I really didn’t like this code. It contains two nested loops and a lot of plumbing code. There are four lines alone just to create the result object (list) and to add the values to it. Recently I looked into functional programming and since C# also has some functional inspired features, I tried to improve this code with some functional goodness :)

Second attempt - Lambda Expressions

publicList<List<String>>BalancedLatinSquares(intn){varresult=Enumerable.Range(0,n).Select(i=>Enumerable.Range(0,n).Select(j=>((((j%2==1?j/2+1:n-j/2)+i)%n)+1).ToString()).ToList()).ToList();if(n%2==1){varreversedResult=result.Select(x=>x.AsQueryable().Reverse().ToList()).ToList();result.AddRange(reversedResult);returnresult;}

This is the result of my attempt to use some functional features. And hey, it is much shorter, therefore it must be better, right? Well, I posted a screenshot of both versions on Twitter and asked which one the people prefer. As it turned out, a lot of folks actually preferred the loop version. But why? Looking back at my code a saw two problems by looking at this line:

Enumerable.Range(0, n).Select(j => ((((j % 2 == 1 ? j / 2 + 1 : n - j / 2) + i) % n)+1).ToString()).ToList()

  • I squeezed a lot of code in this one liner. This makes it harder to read and therefore harder to understand.
  • Another issue is, that I omitted descriptive variable names since they are not needed anymore. Oh and I removed the only comment I wrote since this comment would not fit in the one line of code :)

So, shorter is not always better.

Third attempt - better Lambda Expressions

The smart folks on Twitter had some great ideas about how to improve my code.

The first step was to get rid of the unholy one-liner. You can - and should - always split up your code into smaller, meaningful code blocks. I pulled out the calculateCell function and out of that I also extracted a isEven function. The nice thing is, that the function names also working as a kind of documentation about whats going on.

By returning IEnumerable instead of lists, I was able to remove some .toList() calls. Also, I was able to shorten the code to create the reversedResult.

Another simple step to improve readability is to get line indentation right. Personally, I don’t care which indentation style people are using, as long as it’s used consistently.

publicstaticIEnumerable<IEnumerable<int>>GenerateBalancedLatinSquares(intn){boolisEven(inti)=>i%2==0;intcalculateCell(intj,inti)=>((isEven(j)?n-j/2:j/2+1)+i)%n+1;varresult=Enumerable.Range(0,n).Select(row=>Enumerable.Range(0,n).Select(col=>calculateCell(col,row)));if(isEven(n)!=false){varreversedResult=result.Select(x=>x.Reverse());result=result.Concat(reversedResult);}returnresult;conditional}

I think there is room for further improvement. For the calculateCell function I am using this ?: conditional operator, it allows you to write very compact code, on the other hand, it’s also harder to read. If you would replace this with an if statement you would need more lines of code, but also have more space to add comments. Functional languages like Scala, F#, and Haskel providing this neat match expression that could help here.

Extra: How does this algorithm look in other languages:

Python

defbalanced_latin_squares(n):l=[[((j/2+1ifj%2elsen-j/2)+i)%n+1forjinrange(n)]foriinrange(n)]ifn%2:# Repeat reversed for odd nl+=[seq[::-1]forseqinl]returnl

I took this sample from Paul Grau.

Haskell

Thank you Carsten

Migrate a .NET library to .NET Core / .NET Standard 2.0

$
0
0

I have a small spare time project called Sloader and I recently moved the code base to .NET Standard 2.0. This blogpost covers how I moved this library to .NET Standard.

Uhmmm… wait… what is .NET Standard?

If you have been living under a rock in the past year: .NET Standard is a kind of “contract” that allows the library to run under all .NET implementations like the full .NET Framework or .NET Core. But hold on: The library might also run under Unity, Xamarin and Mono (and future .NET implementations that support this contract - that’s why it is called “Standard”). So - in general: This is a great thing!

Sloader - before .NET Standard

Back to my spare time project:

Sloader consists of three projects (Config/Result/Engine) and targeted the full .NET Framework. All projects were typical library projects. All components were tested with xUnit and builded via Cake. The configuration is using YAML and the main work is done via the HttpClient.

To summarize it: The library is a not too trivial example, but in general it has pretty low requirements.

Sloader - moving to .NET Standard 2.0

The blogpost from Daniel Crabtee “Upgrading to .NET Core and .NET Standard Made Easy” was a great resource and if you want to migrate you should check his blogpost.

The best advice from the blogpost: Just create new .NET Standard projects and xcopy your files to the new projects.

To migrate the projects to .NET Standard I really just needed to deleted the old .csproj files and copied everything into new .NET Standard library projects.

After some fine tuning and NuGet package reference updates everything compilied.

This GitHub PR shows the result of the migration.

Problems & Aftermath

In my library I still used the old way to access configuration via the ConfigurationManager class (referenced via the official NuGet package). This API is not supported on every platform (e.g. Azure Functions), so I needed to tweak those code parts to use System.Environment Variables (this is in my example OK, but there are other options as well).

Everthing else “just worked” and it was a great experience. I tried the same thing with .NET Core 1.0 and it failed horrible, but this time the migration was more or less painless.

.NET Portability Analyzer

If you are not sure if your code works under .NET Standard or Core just install the .NET Portability Analyzer.

This handy tool will give you an overwhy which parts might run without problems under .NET Standard or .NET Core.

.NET Standard 2.0 and .NET Framework

If you still targeting the full Framework, make sure you use at least .NET Framework Version 4.7.2. In theory .NET Standard 2.0 was supposed to work under .NET 4.6.2, but it seems that this ended not too well:

Hope this helps and encourage you to try a migration to a more modern stack!


Be afraid of varchar(max) with async EF or ADO.NET

$
0
0

Last month we had changed our WCF APIs to async implementations, because we wanted all those glorious scalability improvements in our codebase.

The implementation was quite easy, because our service layer did most of the time just some simple EntityFramework 6 queries.

The field test went horribly wrong

After we moved most of the code to async we did a small test and it worked quite good. Our gut feelings were OK-ish, because we knew that we didn’t do a full stress test.

As always: Things didn’t work as expected. We deployed the code on our largest customer and it did: Nothing.

100% CPU

We knew that after the deployment we would hit a high load and at first it seems to “work” based on the CPU workload, but nothing happend. I checked the SQL monitoring and noticed that the throughput was ridiculous low. One query (which every client needed to execute) caught my attention, because the query itself was super simple, but somehow was the showstopper for everyone.

The “bad query”

I checked the code and it was more or less something like this (with the help of EntityFramework 6)

var result = await dbContext.Configuration.ToListAsync();

The “Configuration” itself is a super simple table with a Key & Value column.

Be aware that the same code worked OK with the non async implementation!

“Cause”

This call was extremely costly in terms of performance, but why? It turns out, that this customer installation had a pretty large configuration. One value was around 10MB, which doesn’t sound that much, but if this code is executed in parallel with 5000 clients, it can hurt.

On top of that: The async implementation tries to be smart, but this leads to thousand of task creations, which will slow down everything.

This stackoverflow answer really helped me to understand this problem. Just look at those figures:

First, in the first case we were having just 3500 hit counts along the full call path, here we have 118 371. Moreover, you have to imagine all the synchronization calls I didn’t put on the screenshoot…

Second, in the first case, we were having “just 118 353” calls to the TryReadByteArray() method, here we have 2 050 210 calls ! It’s 17 times more… (on a test with large 1Mb array, it’s 160 times more)

Moreover there are:

  • 120 000 Task instances created
  • 727 519 Interlocked calls
  • 290 569 Monitor calls
  • 98 283 ExecutionContext instances, with 264 481 Captures
  • 208 733 SpinLock calls

My guess is the buffering is made in an async way (and not a good one), with parallel Tasks trying to read data from the TDS. Too many Task are created just to parse the binary data. …

Switch to ADO.NET, damn EF, right?

If you are now thinking: “Yeah… EF sucks, right, use just plain ADO.NET!” you will end up in the same mess, because the default ExecuteAsync-reader is used in the EntityFramework.

I use EF Core, am I save?

The same problem applies to EF Core, just checkout this comment by the EF Team.

How can we solve this problem then?

Solution 1: Async, but with Sequential read

I changed the code to use plain ADO.NET, but with CommandBehavior.Sequential access.

This way it seems that the async implementation is much smarter how to read large chunks of data. I’m not an ADO.NET expert, but with the default strategy ADO.NET tries to read the whole row and stores it in memory. With the sequential access it can use the memory more effective - at least, it seems to work much better.

Your code also needs to be implemented with sequential access in mind, otherwise it will fail.

Solution 2: Avoid large type like nvarchar(max)

This advice comes from the EF team:

Avoid using NTEXT, TEXT, IMAGE, TVP, UDT, XML, [N]VARCHAR(MAX) and VARBINARY(MAX) – the maximum data size for these types is so large that it is very unusual (or even impossible) that they would happen to be able to fit within a single packet.

When we need to store large content, we typically use a separat blob table and stream those values to the clients. This works quite well, but we forgot our “configuration” table :-)

When I now look at this problem it seems obvious, but we had some hard days to fix the issue.

Hope this helps.

Helpful links:

How to fix ERR_CONNECTION_RESET & ERR_CERT_AUTHORITY_INVALID with IISExpress and SSL

$
0
0

This post is a result of some pretty strange SSL errors that I encountered last weekend.

The scenario:

I tried to setup a development environment for a website that uses a self signed SSL cert. The problem occured right after the start - especially Chrome displayed those wonderful error messages:

  • ERR_CONNECTION_RESET
  • ERR_CERT_AUTHORITY_INVALID

The “maybe” solution:

When you google the problem you will see a couple of possible solutions. I guess the first problem on my machine was, that a previous cert was stale and thus created this issue. I later then began to delete all localhost SSL & IIS Express related certs in the LocalMachine-Cert store. Maybe this was a dumb idea, because it caused more harm then it helped.

But: Maybe this could solve your problem. Try to check your LocalMachine or LocalUser-Cert store and check for stale certs.

How to fix the IIS Express?

Well - after I deleted the IIS Express certs I couldn’t get anything to work, so I tried to repair the IIS Express installation and boy… this is a long process.

The repair process via the Visual Studio Installer will take some minutes and in the end I had the same problem again, but my IIS Express was working again.

How to fix the real problem?

After some more time (and I did repair the IIS Express at least 2 or 3 times) I tried the second answer from this Stackoverflow.com question:

cd C:\Program Files (x86)\IIS Express\IisExpressAdminCmd.exe setupsslUrl -url:https://localhost:44387/ -UseSelfSigned

And yeah - this worked. Puh…

Conclusion:

  • Don’t delete random IIS Express certs in your LocalMachine-Cert store.
  • If you do: Repair the IIS Express via the Visual Studio Installer (the option to repair IIS Express via the Programs & Feature management tool seems to be gone with VS 2017).
  • Try to setup the SSL cert with the “IisExpressAdminCmd.exe” - this helped me a lot.

I’m not sure if this really fixed my problem, but maybe it may help:

You can “manage” some part of the SSL stuff via “netsh” from a normal cmd prompt (powershell acts weird with netsh), e.g.:

netsh http delete sslcert ipport=0.0.0.0:44300
netsh http add sslcert ipport=0.0.0.0:44300 certhash=your_cert_hash_with_no_spaces appid={123a1111-2222-3333-4444-bbbbcccdddee}

Be aware: I remember that I deleted a sslcert via the netsh tool, but was unable to add a sslcert. After the IisExpressAdminCmd.exe stuff I worked for me.

Hope this helps!

HowTo: Run a Docker container using Azure Container Instances

$
0
0

x

Azure Container Instances

There are (at least) 3 diffent ways how to run a Docker Container on Azure:

In this blogpost we will take a small look how to run a Docker Container on this service. The “Azure Container Instances”-service is a pretty easy service and might be a good first start. I will do this step for step guide via the Azure Portal. You can use the CLI or Powershell. My guide is more or less the same as this one, but I will highlight some important points in my blogpost, so feel free to check out the official docs.

Using Azure Container Instances

1. Add new…

At first search for “Container Instances” and this should show up:

x

2. Set base settings

Now - this is propably the most important step - choose the container name and source of the image. Those settings can’t be changed later on!

The image can be from a Public Docker Hub repository or from a prive docker registry.

Important: If you are using a Private Docker Hub repository use ‘index.docker.io’ as the login server. It took me a while to figure that out.

x

3. Set container settings

Now you need to choose which OS and how powerful the machine should be.

Important: If you want an easy access via HTTP to your container, make sure to set a “DNS label”. With this label you access it like this: customlabel.azureregion.azurecontainer.io

x

Make sure to set any needed environment variables here.

Also keep in mind: You can’t change this stuff later on.

Ready

In the last step you will see a summery of the given settings:

x

Go

After you finish the setup your Docker Container should start after a short amount of time (depending on your OS and image of course).

x

The most important aspect here:

Check the status, which should be “running”. You can also see your applied FQDN.

Summery

This service is pretty easy. The setup itself is not hard, but sometimes the UI seems “buggy”, but if you can run your Docker Container locally, you should also be able to run it on this service.

Hope this helps!

Make your WCF Service async

$
0
0

Oh my: WCF???

This might be the elephant in the room: I wouldn’t use WCF for new stuff anymore, but to keep some “legacy” stuff working it might be a good idea to modernize those services as well.

WCF Service/Client compatibility

WCF services had always close relationships with their clients and so it is no suprise, that most guides show how to implement async operations on the server and client side.

In our product we needed to ensure backwards compatibility with older clients and to my suprise: Making the operations async don’t break the WCF contract!.

So - a short example:

Sync Sample

The sample code is more or less the default implementation for WCF services when you use Visual Studio:

[ServiceContract]
public interface IService1
{
    [OperationContract]
    string GetData(int value);

    [OperationContract]
    CompositeType GetDataUsingDataContract(CompositeType composite);

    // TODO: Add your service operations here
}

[DataContract]
public class CompositeType
{
    bool boolValue = true;
    string stringValue = "Hello ";

    [DataMember]
    public bool BoolValue
    {
        get { return boolValue; }
        set { boolValue = value; }
    }

    [DataMember]
    public string StringValue
    {
        get { return stringValue; }
        set { stringValue = value; }
    }
}

public class Service1 : IService1
{
    public string GetData(int value)
    {
        return string.Format("You entered: {0}", value);
    }

    public CompositeType GetDataUsingDataContract(CompositeType composite)
    {
        if (composite == null)
        {
            throw new ArgumentNullException("composite");
        }
        if (composite.BoolValue)
        {
            composite.StringValue += "Suffix";
        }
        return composite;
    }
}

The code is pretty straight forward: The typical interface with two methods, which are decorated with OperationContract and a default implementation.

When we know run this example and check the generated WSDL we will get something like this:

<wsdl:definitions xmlns:wsdl="http://schemas.xmlsoap.org/wsdl/" xmlns:wsx="http://schemas.xmlsoap.org/ws/2004/09/mex" xmlns:wsu="http://docs.oasis-open.org/wss/2004/01/oasis-200401-wss-wssecurity-utility-1.0.xsd" xmlns:wsa10="http://www.w3.org/2005/08/addressing" xmlns:wsp="http://schemas.xmlsoap.org/ws/2004/09/policy" xmlns:wsap="http://schemas.xmlsoap.org/ws/2004/08/addressing/policy" xmlns:msc="http://schemas.microsoft.com/ws/2005/12/wsdl/contract" xmlns:soap12="http://schemas.xmlsoap.org/wsdl/soap12/" xmlns:wsa="http://schemas.xmlsoap.org/ws/2004/08/addressing" xmlns:wsam="http://www.w3.org/2007/05/addressing/metadata" xmlns:xsd="http://www.w3.org/2001/XMLSchema" xmlns:tns="http://tempuri.org/" xmlns:soap="http://schemas.xmlsoap.org/wsdl/soap/" xmlns:wsaw="http://www.w3.org/2006/05/addressing/wsdl" xmlns:soapenc="http://schemas.xmlsoap.org/soap/encoding/" name="Service1" targetNamespace="http://tempuri.org/"><wsdl:types><xsd:schema targetNamespace="http://tempuri.org/Imports"><xsd:import schemaLocation="http://localhost:8733/Design_Time_Addresses/SyncWcf/Service1/?xsd=xsd0" namespace="http://tempuri.org/"/><xsd:import schemaLocation="http://localhost:8733/Design_Time_Addresses/SyncWcf/Service1/?xsd=xsd1" namespace="http://schemas.microsoft.com/2003/10/Serialization/"/><xsd:import schemaLocation="http://localhost:8733/Design_Time_Addresses/SyncWcf/Service1/?xsd=xsd2" namespace="http://schemas.datacontract.org/2004/07/SyncWcf"/></xsd:schema></wsdl:types><wsdl:message name="IService1_GetData_InputMessage"><wsdl:part name="parameters" element="tns:GetData"/></wsdl:message><wsdl:message name="IService1_GetData_OutputMessage"><wsdl:part name="parameters" element="tns:GetDataResponse"/></wsdl:message><wsdl:message name="IService1_GetDataUsingDataContract_InputMessage"><wsdl:part name="parameters" element="tns:GetDataUsingDataContract"/></wsdl:message><wsdl:message name="IService1_GetDataUsingDataContract_OutputMessage"><wsdl:part name="parameters" element="tns:GetDataUsingDataContractResponse"/></wsdl:message><wsdl:portType name="IService1"><wsdl:operation name="GetData"><wsdl:input wsaw:Action="http://tempuri.org/IService1/GetData" message="tns:IService1_GetData_InputMessage"/><wsdl:output wsaw:Action="http://tempuri.org/IService1/GetDataResponse" message="tns:IService1_GetData_OutputMessage"/></wsdl:operation><wsdl:operation name="GetDataUsingDataContract"><wsdl:input wsaw:Action="http://tempuri.org/IService1/GetDataUsingDataContract" message="tns:IService1_GetDataUsingDataContract_InputMessage"/><wsdl:output wsaw:Action="http://tempuri.org/IService1/GetDataUsingDataContractResponse" message="tns:IService1_GetDataUsingDataContract_OutputMessage"/></wsdl:operation></wsdl:portType><wsdl:binding name="BasicHttpBinding_IService1" type="tns:IService1"><soap:binding transport="http://schemas.xmlsoap.org/soap/http"/><wsdl:operation name="GetData"><soap:operation soapAction="http://tempuri.org/IService1/GetData" style="document"/><wsdl:input><soap:body use="literal"/></wsdl:input><wsdl:output><soap:body use="literal"/></wsdl:output></wsdl:operation><wsdl:operation name="GetDataUsingDataContract"><soap:operation soapAction="http://tempuri.org/IService1/GetDataUsingDataContract" style="document"/><wsdl:input><soap:body use="literal"/></wsdl:input><wsdl:output><soap:body use="literal"/></wsdl:output></wsdl:operation></wsdl:binding><wsdl:service name="Service1"><wsdl:port name="BasicHttpBinding_IService1" binding="tns:BasicHttpBinding_IService1"><soap:address location="http://localhost:8733/Design_Time_Addresses/SyncWcf/Service1/"/></wsdl:port></wsdl:service></wsdl:definitions>

Convert to async

To make the service async we only need change the method signature and returing Tasks:

[ServiceContract]
public interface IService1
{
    [OperationContract]
    Task<string> GetData(int value);

    [OperationContract]
    Task<CompositeType> GetDataUsingDataContract(CompositeType composite);

    // TODO: Add your service operations here
}

...

public class Service1 : IService1
{
    public async Task<string> GetData(int value)
    {
        return await Task.FromResult(string.Format("You entered: {0}", value));
    }

    public async Task<CompositeType> GetDataUsingDataContract(CompositeType composite)
    {
        if (composite == null)
        {
            throw new ArgumentNullException("composite");
        }
        if (composite.BoolValue)
        {
            composite.StringValue += "Suffix";
        }

        return await Task.FromResult(composite);
    }
}

When we run this example and check the WSDL we will see that it is (besides some naming that I changed based on my samples) identical:

<wsdl:definitions xmlns:wsdl="http://schemas.xmlsoap.org/wsdl/" xmlns:wsx="http://schemas.xmlsoap.org/ws/2004/09/mex" xmlns:wsu="http://docs.oasis-open.org/wss/2004/01/oasis-200401-wss-wssecurity-utility-1.0.xsd" xmlns:wsa10="http://www.w3.org/2005/08/addressing" xmlns:wsp="http://schemas.xmlsoap.org/ws/2004/09/policy" xmlns:wsap="http://schemas.xmlsoap.org/ws/2004/08/addressing/policy" xmlns:msc="http://schemas.microsoft.com/ws/2005/12/wsdl/contract" xmlns:soap12="http://schemas.xmlsoap.org/wsdl/soap12/" xmlns:wsa="http://schemas.xmlsoap.org/ws/2004/08/addressing" xmlns:wsam="http://www.w3.org/2007/05/addressing/metadata" xmlns:xsd="http://www.w3.org/2001/XMLSchema" xmlns:tns="http://tempuri.org/" xmlns:soap="http://schemas.xmlsoap.org/wsdl/soap/" xmlns:wsaw="http://www.w3.org/2006/05/addressing/wsdl" xmlns:soapenc="http://schemas.xmlsoap.org/soap/encoding/" name="Service1" targetNamespace="http://tempuri.org/"><wsdl:types><xsd:schema targetNamespace="http://tempuri.org/Imports"><xsd:import schemaLocation="http://localhost:8733/Design_Time_Addresses/AsyncWcf/Service1/?xsd=xsd0" namespace="http://tempuri.org/"/><xsd:import schemaLocation="http://localhost:8733/Design_Time_Addresses/AsyncWcf/Service1/?xsd=xsd1" namespace="http://schemas.microsoft.com/2003/10/Serialization/"/><xsd:import schemaLocation="http://localhost:8733/Design_Time_Addresses/AsyncWcf/Service1/?xsd=xsd2" namespace="http://schemas.datacontract.org/2004/07/AsyncWcf"/></xsd:schema></wsdl:types><wsdl:message name="IService1_GetData_InputMessage"><wsdl:part name="parameters" element="tns:GetData"/></wsdl:message><wsdl:message name="IService1_GetData_OutputMessage"><wsdl:part name="parameters" element="tns:GetDataResponse"/></wsdl:message><wsdl:message name="IService1_GetDataUsingDataContract_InputMessage"><wsdl:part name="parameters" element="tns:GetDataUsingDataContract"/></wsdl:message><wsdl:message name="IService1_GetDataUsingDataContract_OutputMessage"><wsdl:part name="parameters" element="tns:GetDataUsingDataContractResponse"/></wsdl:message><wsdl:portType name="IService1"><wsdl:operation name="GetData"><wsdl:input wsaw:Action="http://tempuri.org/IService1/GetData" message="tns:IService1_GetData_InputMessage"/><wsdl:output wsaw:Action="http://tempuri.org/IService1/GetDataResponse" message="tns:IService1_GetData_OutputMessage"/></wsdl:operation><wsdl:operation name="GetDataUsingDataContract"><wsdl:input wsaw:Action="http://tempuri.org/IService1/GetDataUsingDataContract" message="tns:IService1_GetDataUsingDataContract_InputMessage"/><wsdl:output wsaw:Action="http://tempuri.org/IService1/GetDataUsingDataContractResponse" message="tns:IService1_GetDataUsingDataContract_OutputMessage"/></wsdl:operation></wsdl:portType><wsdl:binding name="BasicHttpBinding_IService1" type="tns:IService1"><soap:binding transport="http://schemas.xmlsoap.org/soap/http"/><wsdl:operation name="GetData"><soap:operation soapAction="http://tempuri.org/IService1/GetData" style="document"/><wsdl:input><soap:body use="literal"/></wsdl:input><wsdl:output><soap:body use="literal"/></wsdl:output></wsdl:operation><wsdl:operation name="GetDataUsingDataContract"><soap:operation soapAction="http://tempuri.org/IService1/GetDataUsingDataContract" style="document"/><wsdl:input><soap:body use="literal"/></wsdl:input><wsdl:output><soap:body use="literal"/></wsdl:output></wsdl:operation></wsdl:binding><wsdl:service name="Service1"><wsdl:port name="BasicHttpBinding_IService1" binding="tns:BasicHttpBinding_IService1"><soap:address location="http://localhost:8733/Design_Time_Addresses/AsyncWcf/Service1/"/></wsdl:port></wsdl:service></wsdl:definitions>

Clients

The contract itself is still the same. You can still use the sync-methods on the client side, because WCF doesn’t care (at least with the SOAP binding stuff). It would be clever to also update your client code, but you don’t have to, that was the most important point for us.

Async & OperationContext access

If you are accessing the OperationContext on the server side and using async methods you might stumble on an odd behaviour:

After the first access to OperationContext.Current the value will disappear and OperationContext.Current will be null. This Stackoverflow.com question shows this “bug”.

The reason for this: There are some edge cases, but if you are not using “Reentrant services” the behaviour can be changed with this setting:

<appSettings><add key="wcf:disableOperationContextAsyncFlow" value="false" /></appSettings>

With this setting if should work like before in the “sync”-world.

Summery

“Async all the things” - even legacy WCF services can be turned into async task based APIs without breaking any clients. Checkout the sample code on GitHub.

Hope this helps!

Links:

How to use TensorFlow with AMD GPU's

$
0
0

How to use TensorFlow with AMD GPU’s

Most machine learning frameworks that run with a GPU support Nvidia GPUs, but if you own a AMD GPU you are out of luck.

Recently AMD has made some progress with their ROCm platform for GPU computing and does now provide a TensorFlow build for their gpus.

Since I work with tensorflow and own a AMD GPU it was time to give it a try. I stumpled upon these instructions for TensorFlow 1.8 but since they are outdated, I decided to write down what I did.

1. Set up Linux

It looks like there is currently no ROCm support for Windows. And no, WSL aka Bash for Windows does not work. But there are packages for CentOS/RHEL 7 and Ubuntu. I used Ubuntu 18.04.

2. Install ROCm

Just follow the ROCm install instructions.

3. Install TensorFlow

AMD provides a special build of TensorFlow. Currently they support TensorFlow 1.12.0. You can build it yourself, but the most convenient way to use it, is to install the package from PyPI:

sudo apt install python3-pip 
pip3 install --user tensorflow-rocm

4. Train a Model

To test your setup you can run the image recognition task from the Tensorflow tutorials.

git clone https://github.com/tensorflow/models.git
cd models/tutorials/image/imagenet
python3 classify_image.py

and the result should look like this:

giant panda, panda, panda bear, coon bear, Ailuropoda melanoleuca (score = 0.89103)
indri, indris, Indri indri, Indri brevicaudatus (score = 0.00810)
lesser panda, red panda, panda, bear cat, cat bear, Ailurus fulgens (score = 0.00258)
custard apple (score = 0.00149)
earthstar (score = 0.00141)

Extra: Monitor your GPU

If you like to check that your model fully utilize your GPU, you can use the (radeontop)[https://github.com/clbr/radeontop] tool:

Install it with

sudo apt-get install radeontop

and run it

sudo radeontop

This will dump the statistics to the command line.

sudo radeontop -d -

Office Add-ins with ASP.NET Core

$
0
0

The “new” Office-Addins

Most people might associate Offce-Addins with “old school” COM addins, but since a couple of years Microsoft pushes a new add-in application modal powered by HTML, Javascript and CSS.

The cool stuff is, that these add-ins will run unter Windows, macOS, Online in a browser and on the iPad. If you want to read more about the general aspects, just checkout the Microsoft Docs.

In Microsoft Word you can find those addins under the “Insert” ribbon:

x

Visual Studio Template: Urgh… ASP.NET

Because of the “new” nature of the Add-ins you could actually use your favorite text editor and create a valid Office Add-ins. There are some great tooling out there, including a Yeoman generator for Office-Add-ins.

If you want to stick with Visual Studio you might want to install the __“Office/SharePoint development-Workload”. After the installation you should see a couple of new templates appear in your Visual Studio:

x

Sadly, those templates still uses ASP.NET and not ASP.NET Core.

x

ASP.NET Core Sample

If you want to use ASP.NET Core, you might want to take a look at my ASP.NET Core-sample. It is not a VS template - it is meant to be a starting point, but feel free to create one if this would help!

x

The structure is very similar. I moved all the generated HTML/CSS/JS stuff in a separate area and the Manifest.xml points to those files.

Result should be something like this:

x

Warning:

In the “ASP.NET”-Offce-Addin-development world there is one feature that is kinda cool, but seems not to be working with ASP.NET Core projects. The original Manifest.xml generated by the Visual Studio template uses a placeholder called “~remoteAppUrl”. It seems that Visual Studio was able to replace this placeholder during startup with the correct URL of the ASP.NET application. This is not possible with a ASP.NET Core application.

The good news is, that this feature is not really needed. You just need to point to the correct URL and everything is fine and the debugging is OK as well.

Hope this helps!

Check Scheduled Tasks with Powershell

$
0
0

Task Scheduler via Powershell

Let’s say we want to know the latest result of the “GoogleUpdateTaskMachineCore” task and the corresponding actions.

x

All you have to do is this (in a Run-As-Administrator Powershell console) :

Get-ScheduledTask | where TaskName -EQ 'GoogleUpdateTaskMachineCore' | Get-ScheduledTaskInfo

The result should look like this:

LastRunTime        : 2/26/2019 6:41:41 AM
LastTaskResult     : 0
NextRunTime        : 2/27/2019 1:02:02 AM
NumberOfMissedRuns : 0
TaskName           : GoogleUpdateTaskMachineCore
TaskPath           : \
PSComputerName     :

Be aware that the “LastTaskResult” might be displayed as an integer. The full “result code list” documentation only lists the hex value, so you need to convert the number to hex.

Now, if you want to access the corresponding actions you need to work with the “actual” task like this:

PS C:\WINDOWS\system32> $task = Get-ScheduledTask | where TaskName -EQ 'GoogleUpdateTaskMachineCore'
PS C:\WINDOWS\system32> $task.Actions


Id               :
Arguments        : /c
Execute          : C:\Program Files (x86)\Google\Update\GoogleUpdate.exe
WorkingDirectory :
PSComputerName   :

If you want to dig deeper, just checkout all the properties:

PS C:\WINDOWS\system32> $task | Select *


State                 : Ready
Actions               : {MSFT_TaskExecAction}
Author                :
Date                  :
Description           : Keeps your Google software up to date. If this task is disabled or stopped, your Google
                        software will not be kept up to date, meaning security vulnerabilities that may arise cannot
                        be fixed and features may not work. This task uninstalls itself when there is no Google
                        software using it.
Documentation         :
Principal             : MSFT_TaskPrincipal2
SecurityDescriptor    :
Settings              : MSFT_TaskSettings3
Source                :
TaskName              : GoogleUpdateTaskMachineCore
TaskPath              : \
Triggers              : {MSFT_TaskLogonTrigger, MSFT_TaskDailyTrigger}
URI                   : \GoogleUpdateTaskMachineCore
Version               : 1.3.33.23
PSComputerName        :
CimClass              : Root/Microsoft/Windows/TaskScheduler:MSFT_ScheduledTask
CimInstanceProperties : {Actions, Author, Date, Description...}
CimSystemProperties   : Microsoft.Management.Infrastructure.CimSystemProperties

If you have worked with Powershell in the past this blogpost should “easy”, but it took me a while to see the result code and to check if the action was correct or not.

Hope this helps!


Load hierarchical data from MSSQL with recursive common table expressions

$
0
0

Scenario

We have a pretty simple scenario: We have a table with a simple Id + ParentId schema and some demo data in it. I have seen this design quite a lot in the past and in the relational database world this is the obvious choice.

x

Problem

Each data entry is really simple to load or manipulate. Just load the target element and change the ParentId for a move action etc.. A more complex problem is how to load a whole “data tree”. Let’s say I want to load all children or parents of a given Id. You could load everything, but if your dataset is large enough, this operation will work poorly and might kill your database.

Another naive way would be to query this with code from a client application, but if your “tree” is big enough, it will consume lots of resources, because for each “level” you open a new connection etc.

Recursive Common Table Expressions!

Our goal is to load the data in one go as effective as possible - without using Stored Procedures(!). In the Microsoft SQL Server world we have this handy feature called “common table expresions (CTE)”. A common table expression can be seen as a function inside a SQL statement. This function can be invoked by itself and now we can call this a “recursive common table expression”.

The syntax itself is a bit odd, but works well and you can enhance it with JOINs from other tables.

Scenario A: From child to parent

Let’s say you want to go the tree upwards from a given Id:

WITH RCTE AS
    (
    SELECT anchor.Id as ItemId, anchor.ParentId as ItemParentId, 1 AS Lvl, anchor.[Name]
    FROM Demo anchor WHERE anchor.[Id] = 7
    UNION ALL
    SELECT nextDepth.Id  as ItemId, nextDepth.ParentId as ItemParentId, Lvl+1 AS Lvl, nextDepth.[Name]
    FROM Demo nextDepth
    INNER JOIN RCTE recursive ON nextDepth.Id = recursive.ItemParentId
    )
SELECT ItemId, ItemParentId, Lvl, [Name]
FROM RCTE as hierarchie

The anchor.[Id] = 7 is our starting point and should be given as a SQL parameter. The with statement starts our function description, which we called “RCTE”. In the first select we just load everything from the target element. Note, that we add a “Lvl” property, which starts at 1. The UNION ALL is needed (at least we were not 100% if there are other options). In the next line we are doing a join based on the Id = ParentId schema and we increase the “Lvl” property for each level. The last line inside the common table expression uses the “recursive” feature.

Now we are done and can use the CTE like a normal table in our final statement.

Result:

x

We now only load the “path” from the child entry up to the root entry.

If you ask why we introduce the “lvl” column: With this column it is really easy see each “step” and it might come handy in your client application.

Scenario B: From parent to all descendants

With a small change we can do the other way around. Loading all descendants from a given id.

The logic itself is more or less identical, we changed only the INNER JOIN RCTE ON …

WITH RCTE AS
    (
    SELECT anchor.Id as ItemId, anchor.ParentId as ItemParentId, 1 AS Lvl, anchor.[Name]
    FROM Demo anchor WHERE anchor.[Id] = 2
    UNION ALL
    SELECT nextDepth.Id  as ItemId, nextDepth.ParentId as ItemParentId, Lvl+1 AS Lvl, nextDepth.[Name]
    FROM Demo nextDepth
    INNER JOIN RCTE recursive ON nextDepth.ParentId = recursive.ItemId
    )
SELECT ItemId, ItemParentId, Lvl, [Name]
FROM RCTE as hierarchie

Result:

x

In this example we only load all children from a given id. If you point this to the “root”, you will get everything except the “alternative root” entry.

Conclusion

Working with trees in a relational database might not “feel” as good as in a document database, but it doesn’t mean, that such scenarios needs to perform bad. We use this code at work for some bigger datasets and it works really well for us.

Thanks to my collegue Alex - he discovered this wild T-SQL magic.

Hope this helps!

Update OnPrem TFS 2018 to AzureDevOps Server 2019

$
0
0

We recently updated our OnPrem TFS 2018 installation to the newest release: Azure DevOps Server

The product has the same core features as TFS 2018, but with a new UI and other improvements. For a full list you should read the Release Notes.

*Be aware: This is the OnPrem solution, even with the slightly missleading name “Azure DevOps Server”. If you are looking for the Cloud solution you should read the Migration-Guide.

“Updating” a TFS 2018 installation

Our setup is quite simple: One server for the “Application Tier” and another SQL database server for the “Data Tier”. The “Data Tier” was already running with SQL Server 2016 (or above), so we only needed to touch the “Application Tier”.

Application Tier Update

In our TFS 2018 world the “Application Tier” was running on a Windows Server 2016, but we decided to create a new (clean) server with Windows Server 2019 and doing a “clean” Azure DevOps Server install, but pointing to the existing “Data Tier”.

In theory it is quite possible to update the actual TFS 2018 installation, but because “new is always better”, we also switched the underlying OS.

Update process

The actual update was really easy. We did a “test run” with a copy of the database and everything worked as expected, so we reinstalled the Azure DevOps Server and run the update on the production data.

Steps:

x

x

x

x

x

x

x

x

x

x

x

x

x

x

Summary

If you are running a TFS installation, don’t be afraid to do an update. The update itself was done in 10-15 minutes on our 30GB-ish database.

Just download the setup from the Azure DevOps Server site (“Free trial…”) and you should be ready to go!

Hope this helps!

Build Windows Server 2016 Docker Images under Windows Server 2019

$
0
0

Since the uprising of Docker on Windows we also invested some time into it and packages our OneOffixx server side stack in a Docker image.

Windows Server 2016 situation:

We rely on Windows Docker Images, because we still have some “legacy” parts that requires the full .NET Framework, thats why we are using this base image:

FROM microsoft/aspnet:4.7.2-windowsservercore-ltsc2016

As you can already guess: This is based on a Windows Server 2016 and besides the “legacy” parts of our application, we need to support Windows Server 2016, because Windows Server 2019 is currently not available on our customer systems.

In our build pipeline we could easily invoke Docker and build our images based on the LTSC 2016 base image and everything was “fine”.

Problem: Move to Windows Server 2019

Some weeks ago my collegue updated our Azure DevOps Build servers from Windows Server 2016 to Windows Server 2019 and our builds began to fail.

Solution: Hyper-V isolation!

After some internet research this site popped up: Windows container version compatibility

Microsoft made some great enhancements to Docker in Windows Server 2019, but if you need to “support” older versions, you need to take care of it, which means:

If you have a Windows Server 2019, but want to use Windows Server 2016 base images, you need to activate Hyper-V isolation.

Example from our own cake build script:

var exitCode = StartProcess("Docker", new ProcessSettings { Arguments = "build -t " + dockerImageName + " . --isolation=hyperv", WorkingDirectory = packageDir});

Hope this helps!

Jint: Invoke Javascript from .NET

$
0
0

If you ever dreamed to use Javascript in your .NET application there is a simple way: Use Jint.

Jint implements the ECMA 5.1 spec and can be use from any .NET implementation (Xamarin, .NET Framework, .NET Core). Just use the NuGet package and has no dependencies to other stuff - it’s a single .dll and you are done!

Why should integrate Javascript in my application?

In our product “OneOffixx” we use Javascript as a scripting language with some “OneOffixx” specific objects.

The pro arguments for Javascript:

  • It’s a well known language (even with all the brainfuck in it)
  • You can sandbox it quite simple
  • With a library like Jint it is super simple to interate

I highly recommend to checkout the GitHub page, but here a some simple examples, which should show how to use it:

Example 1: Simple start

After the NuGet action you can use the following code to see one of the most basic implementations:

public static void SimpleStart()
{
    var engine = new Jint.Engine();
    Console.WriteLine(engine.Execute("1 + 2 + 3 + 4").GetCompletionValue());
}

We create a new “Engine” and execute some simple Javascript and returen the completion value - easy as that!

Example 2: Use C# function from Javascript

Let’s say we want to provide a scripting environment and the script can access some C# based functions. This “bridge” is created via the “Engine” object. We create a value, which points to our C# implementation.

public static void DefinedDotNetApi()
{
    var engine = new Jint.Engine();

    engine.SetValue("demoJSApi", new DemoJavascriptApi());

    var result = engine.Execute("demoJSApi.helloWorldFromDotNet('TestTest')").GetCompletionValue();

    Console.WriteLine(result);
}

public class DemoJavascriptApi
{
    public string helloWorldFromDotNet(string name)

    {
        return $"Hello {name} - this is executed in {typeof(Program).FullName}";
    }
}

Example 3: Use Javascript from C#

Of course we also can do the other way around:

public static void InvokeFunctionFromDotNet()
{
    var engine = new Engine();

    var fromValue = engine.Execute("function jsAdd(a, b) { return a + b; }").GetValue("jsAdd");

    Console.WriteLine(fromValue.Invoke(5, 5));

    Console.WriteLine(engine.Invoke("jsAdd", 3, 3));
}

Example 4: Use a common Javascript library

Jint allows you to inject any Javascript code (be aware: There is no DOM, so only “libraries” can be used).

In this example we use handlebars.js:

public static void Handlebars()
{
    var engine = new Jint.Engine();

    engine.Execute(File.ReadAllText("handlebars-v4.0.11.js"));

    engine.SetValue("context", new
    {
        cats = new[]
        {
            new {name = "Feivel"},
            new {name = "Lilly"}
        }
    });

    engine.SetValue("source", "  says meow!!!\n");

    engine.Execute("var template = Handlebars.compile(source);");

    var result = engine.Execute("template(context)").GetCompletionValue();

    Console.WriteLine(result);
}

Example 5: REPL

If you are crazy enough, you can build a simple REPL like this (not sure if this would be a good idea for production, but it works!)

public static void Repl()
{
    var engine = new Jint.Engine();

    while (true)
    {
        Console.Write("> ");
        var statement = Console.ReadLine();
        var result = engine.Execute(statement).GetCompletionValue();
        Console.WriteLine(result);
    }
}

Jint: Javascript integration done right!

As you can see: Jint is quite powerfull and if you feel the need to integrate Javascript in your application, checkout Jint!

The sample code can be found here .

Hope this helps!

SQL Server, Named Instances & the Windows Firewall

$
0
0

The problem

“Cannot connect to sql\instance. A network-related or instance-specific error occurred while establishing a connection to SQL Server. The server was not found or was not accessible. Verify that the instance name is correct and that SQL Server is configured to allow remote connections. (provider: SQL Network Interfaces, error: 26 - Error Locating Server/Instance Specified) (Microsoft SQL Server, Error: -1)”

Let’s say we have a system with a running SQL Server (Express or Standard Edition - doesn’t matter) and want to connect to this database from another machine. The chances are high that you will see the above error message.

Be aware: You can customize more or less anything, so this blogposts does only cover a very “common” installation.

I struggled last week with this problem and I learned that this is a pretty “old” issue. To enlighten my dear readers I made the following checklist:

Checklist:

  • Does the SQL Server allow remote connections?
  • Does the SQL Server allow your authentication schema of choice (Windows or SQL Authentication)?
  • Check the “SQL Server Configuration Manager” if the needed TCP/IP protocol is enabled for your SQL Instance.
  • Check your Windows Firewall (see details below!)

Windows Firewall settings:

Per default SQL Server uses TCP Port 1433 which is the minimum requirement without any special needs - use this command:

netsh advfirewall firewall add rule name = SQLPort dir = in protocol = tcp action = allow localport = 1433 remoteip = localsubnet profile = DOMAIN,PRIVATE,PUBLIC

If you use named instances we need (at least) two additional ports:

netsh advfirewall firewall add rule name = SQLPortUDP dir = in protocol = udp action = allow localport = 1434 remoteip = localsubnet profile = DOMAIN,PRIVATE,PUBLIC

This UDP Port 1434 is used to query the real TCP port for the named instance.

Now the most important part: The SQL Server will use a (kind of) random dynamic port for the named instance. To avoid this behavior (which is really a killer for Firewall settings) you can set a fixed port in the SQL Server Configuration Manager.

SQL Server Configuration Manager -> Instance -> TCP/IP Protocol (make sure this is "enabled") -> *Details via double click* -> Under IPAll set a fixed port under "TCP Port", e.g. 1435

After this configuration, allow this port to communicate to the world with this command:

netsh advfirewall firewall add rule name = SQLPortInstance dir = in protocol = tcp action = allow localport = 1435 remoteip = localsubnet profile = DOMAIN,PRIVATE,PUBLIC

(Thanks Stackoverflow!)

Check the official Microsoft Docs for further information on this topic, but these commands helped me to connect to my SQL Server.

The “dynamic” port was my main problem - after some hours of Googling I found the answer on Stackoverflow and I could establish a connection to my SQL Server with the SQL Server Management Studio.

Hope this helps!

Viewing all 357 articles
Browse latest View live